TriggerStick Adapter
thingiverse
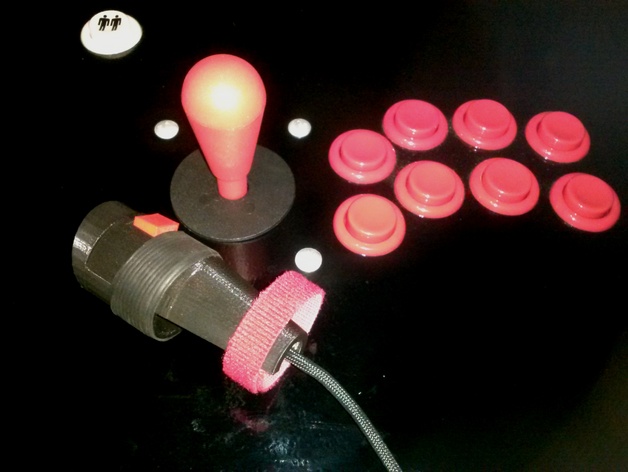
Is it tough to play classic arcade games that use triggersticks or flightsticks when all you've got is a standard bat-top? Not really! There's a solution in plain sight. This design allows you to create an adapter that snaps onto any HAPP-style bat-top arcade stick, adding a clicky trigger and optionally a standard normally open pushbutton for your thumb on top. When not in use, it can be removed to keep your control panel tidy. Watch my video to learn more about this: http://youtu.be/_W7sB6rgBDI And remember to check out the instructions page if you need help with printing and assembly. Get ready to play! Instructions: To get started, you'll need a few things: Some wire (a few colors would be nice, something flexible) A microswitch (Radio Shack part #275-0016 is what I used) A momentary push-button switch (optional, but Radio Shack part #275-0644 works great too) Solder and a soldering iron An old bicycle inner tube (for a 1-inch rubber band) Hot glue gun Velcro cable tie strap Drill bits and a drill Print the "Trigstick" parts: you'll need the front half and the top/back halves. There's an STL file for each. You'll also want to print a trigger button; I've given you two options - one with a flat face, the other curved. Choose your preference (I went with the flat one). Insert the trigger into the hole in the front half from inside out. Make sure the lip on the long edge of the trigger faces up. Solder wires to your microswitch and wire it "normally open" style (a ground wire to the "C" terminal, and your signal wire to the "NO" terminal). Using hot glue, stick your switch onto the little shelf behind the button; I took out my microswitch's lever so that when you press the trigger, it hits the switch's tiny nub. This gives great feedback and neatly hides the switch inside the front shell. If you want, you can drill a hole on the "Top/Back" half and set up a push-button switch there. There's a recessed spot for reference; this design is made with right-handed use in mind, so flip it if you need lefty friendly. You might need to trim some of the front half so your button fits neatly inside. Wire your switch, join ground wires as needed, since they all hook into one shared common ground wire. Grab that old inner tube and cut out a 1-inch long (about 25.4mm) fat rubber band. Put the two shell parts together with it; this will hold everything tight while keeping installation super easy and stress-free. Use hot glue to secure an end of your Velcro strap inside the front shell's bottom edge - it helps keep things in place, keeps wires neat and stops anything from coming loose mid-play. Feel free to cover those wire messes up with a nice protective sleeve if you want; the connections work like regular arcade buttons so wiring shouldn't be hard. All set! Just slap that adapter on top of your stick (starting from above, slide it forward), then use some force (or some twisting) to pop it securely into place; once in there, take that cable harness and attach Velcro around the base of your stick, secure with a quick wrap, and you're ready for business! Want something even better? Hack this to death if you think you can do better. I'll give your improved design credit (if you're up to it, of course); might just make use of some tweaks myself too! I created this design in such a way that allows for modifiable options; screw holes are there so permanent installs are a breeze and easily done. You've even got those connector areas that could use plugs for an all-connected buildout! I threw together a "Mock-up_stick.stl" if confusion kicks in or reference needed for setup help.
With this file you will be able to print TriggerStick Adapter with your 3D printer. Click on the button and save the file on your computer to work, edit or customize your design. You can also find more 3D designs for printers on TriggerStick Adapter.
