Trefoil Version 05 - LED Ornament - Color Changing Lamp
prusaprinters
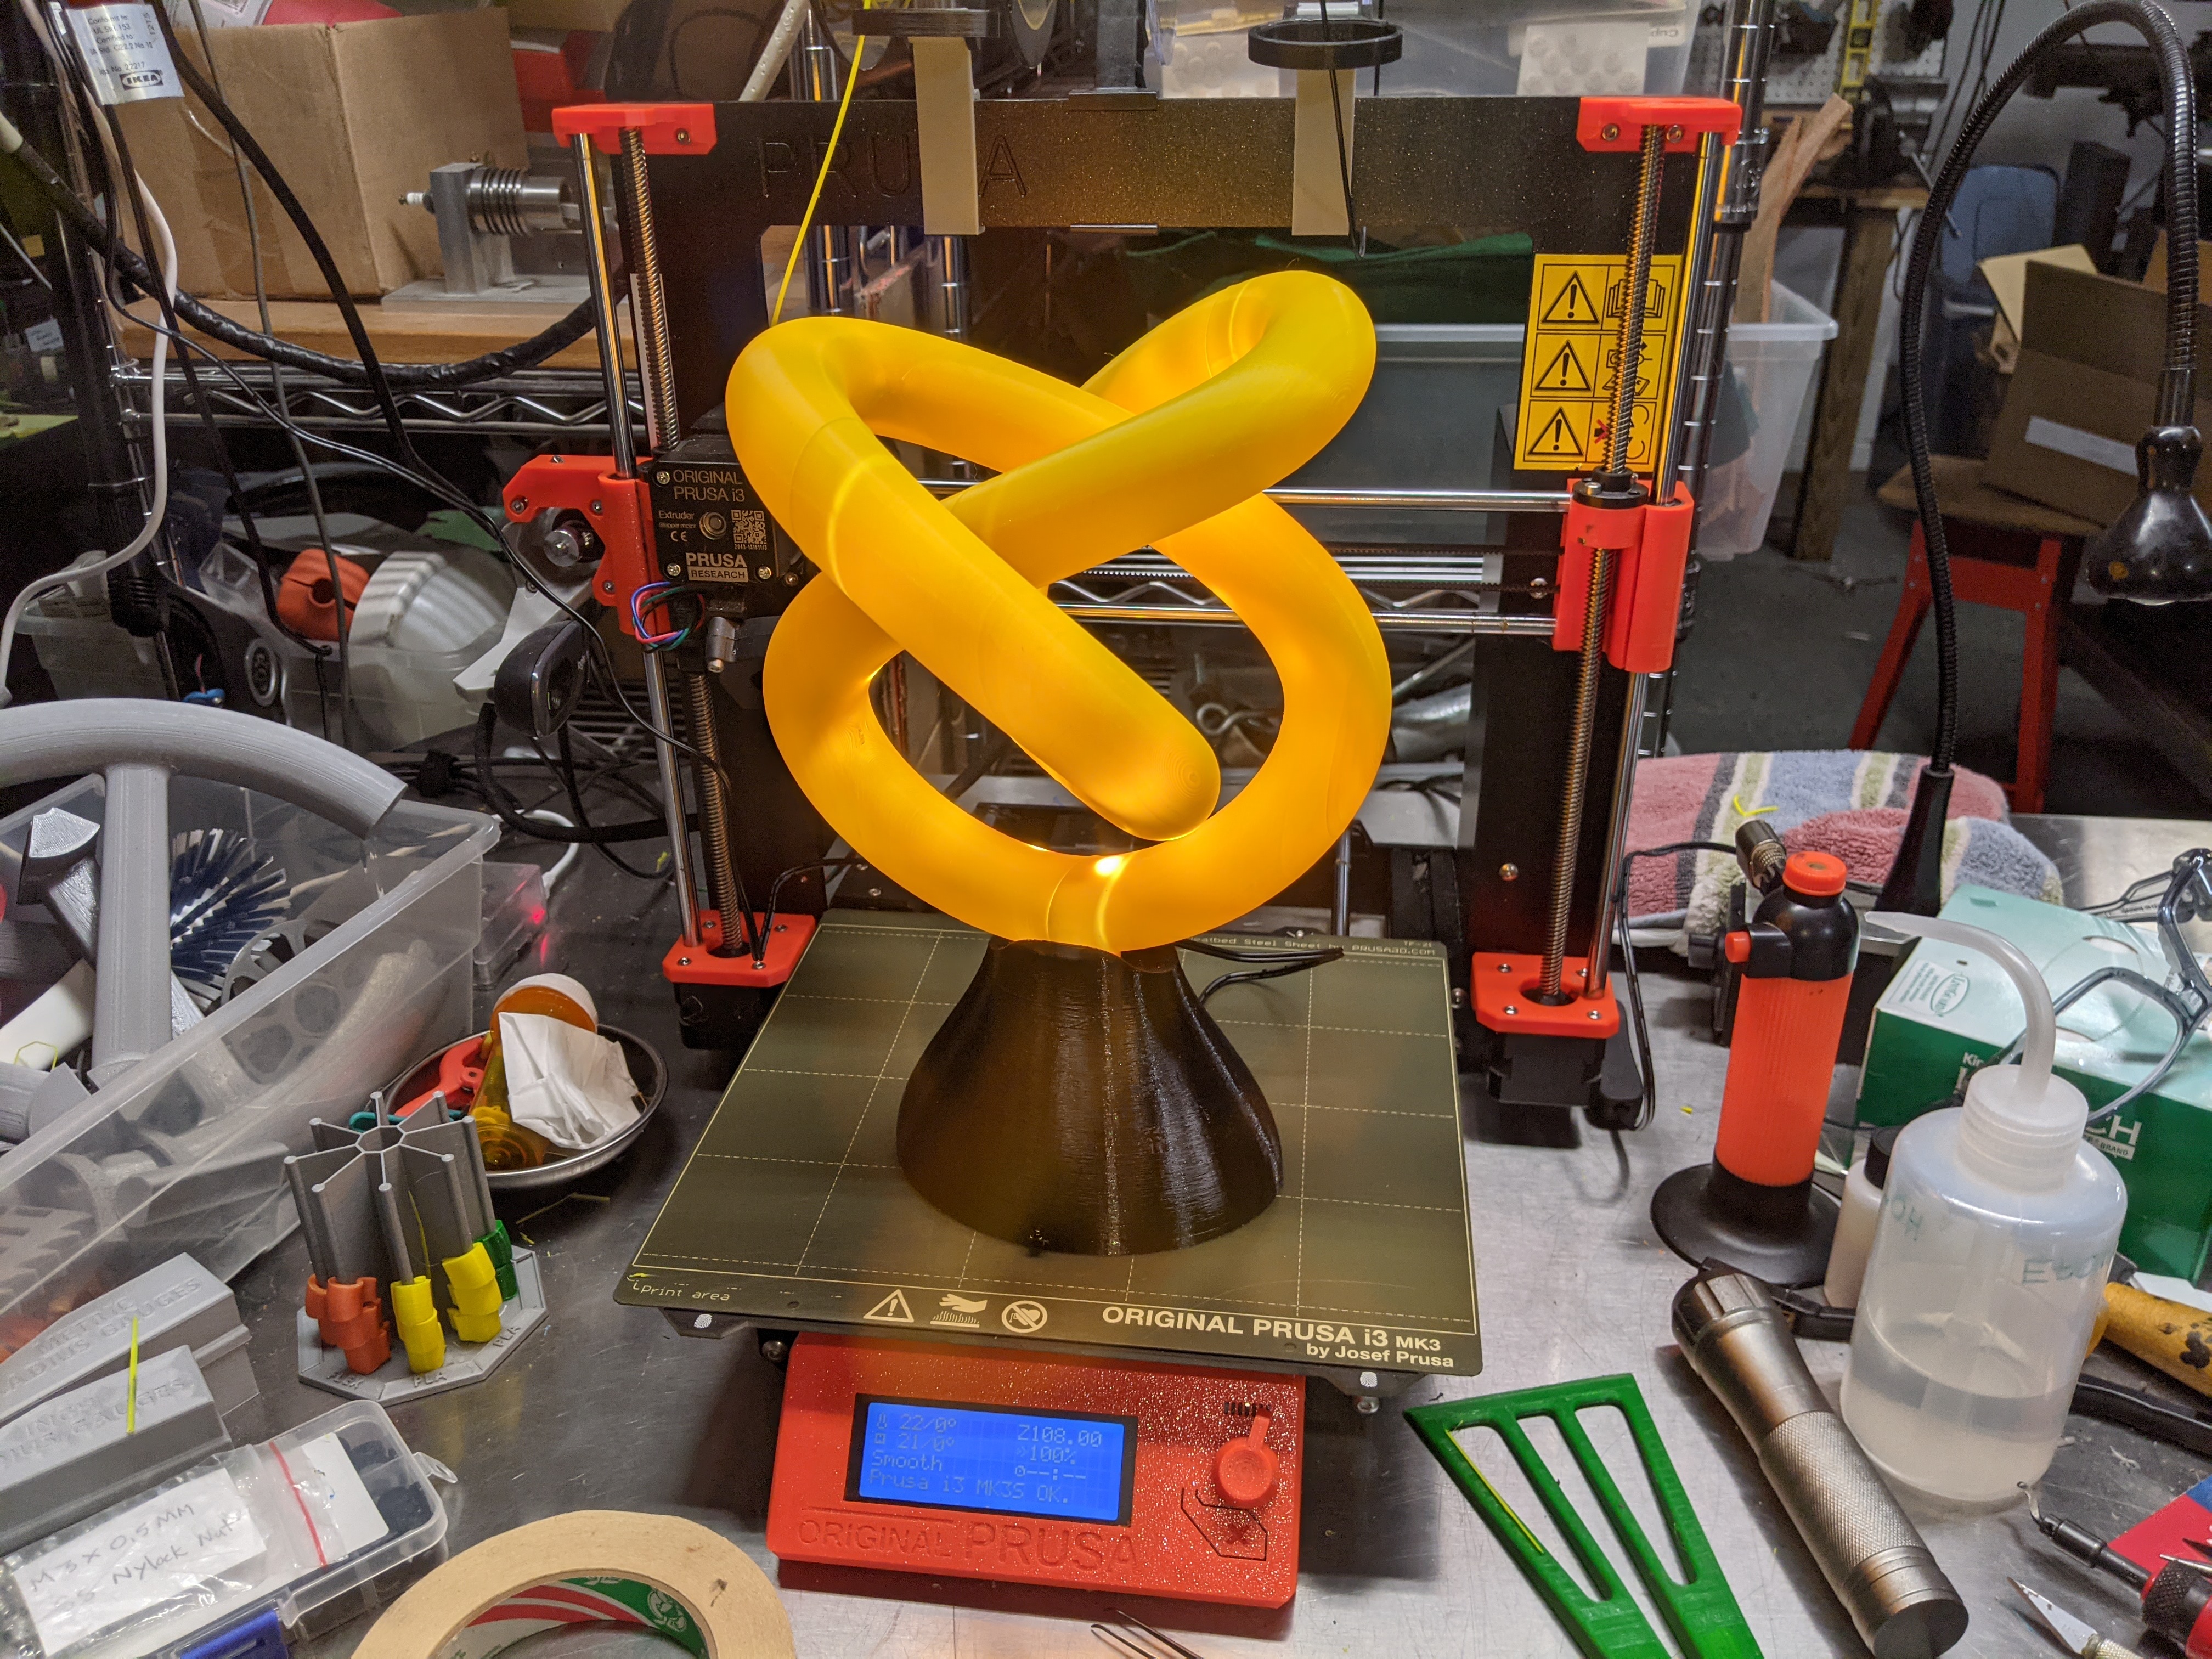
<p>Time for a bit of background : This build, and all of my related trefoil knot builds, were inspired by this video by “Big Clive” :</p><p><a href="https://www.youtube.com/watch?v=35xmE8Nurj8">https://www.youtube.com/watch?v=35xmE8Nurj8</a></p><p>The object in that video was actually flat, and the 3D effect was illusional (and limited in viewing direction). This got me wondering if I could recreate the effect in actual 3D. Creating the CAD for a basic trefoil knot and printing the result turned out to be easier than I expected, but developing the idea further into a large, hollow, segmented shape with matching base took a lot more experimentation.</p><h5>Assembly</h5><p>This build requires the purchase of a “LED light kit” (see photo) - search your favorite shopping site for “LED Strip Lights with Remote 5m/16.4ft”; my purchase cost $16 (US, July 2021). The lit provides a LED light strip, a controller module, a power supply, and a remote control. The LED light strip is longer than required, but can be cut shorter.</p><p><i>A side note about the light kit - my kit was advertised as having a “chasing mode” (lights turning on one by one in sequence), but did not actually have that mode (which I was hoping for). Caveat Emptor.</i></p><p>The base for this build was designed specifically for the kit I purchased, but I expect most of the kits available will be identical in all essential aspects. Assembly follows these steps :</p><ol><li>Attach controller to base bottom; position IR detector and power cord approrpriately</li><li>Attach base bottom to base; position IR detector in base hole; position controller LED connector</li><li>Prepare LED strip : Cut to length and remove adhesive backing</li><li>Insert LED strip into trefoil knot segments as segments are connected</li></ol><p>Note : All screws used in assembly are Philips flat head self-tapping screws. I recommend purchasing a “screw assortment” (see photo) for this project as well as for general 3D printing use.</p><h5>[1 ] Attach Controller</h5><p>[See related photos] The controller is attached to the base bottom using two M2x10 flat head screws. The controller has an IR detector lead for the remote; this is positioned in the slot in the base bottom (but not yet protruding at this time). Plug in the power cord, and thread the cable through the strain relief pegs as shown in the photo.</p><h5>[2] Attach Base to Bottom</h5><p>[See related photos] Attach the base to the bottom using two M3X10 flat head screws. Make sure the LED connector lead is protruding through the hole at the top so it will be accessible for connection to the LED strip. On the bottom of the base, there is a access hole to the IR detector; use this access hole to push the IR detector out through the hole in the base (a pair of needle nose pliers helps with this).</p><h5>[3] Prepare LED Strip</h5><p>The "internal length" of the trefoil knot is approximately 118cm (~46-½ inches). I cut the LED strip to a length of about 138cm (~54 inches) to provide a margin of error, and just tucked the excess into the base. The LED strip has an adhesive backing covered with a red plastic prospective strip. The protective strip interferes with the light, and the adhesive is not required, so both must be removed. I found that I was able to peel off the adhesive from my LED strip (alternatively, the red plastic could be removed and replaced with clear plastic).</p><h5>[4] Insert LED strip</h5><p>Before final assembly, I recommend test fitting the two “socket” segments into the base. This is a tight fit, and I had to sand the socket inserts a bit to get the pieces to fit.</p><p>Connect the LED strip to the controller lead (note the small arrows on the connectors - these must match up). This is a good time to plug in the power supply to make sure the LED lights are working. Disconnect after testing. I also taped the plug/controller connection to make sure the parts did not come loose later.</p><p>With the LED strip connected, feed the LED strip all the way though the “purple” segment (do not insert the segment into the base at this time). Make sure at least one of LEDs is protruding through the end that connects to the base, so as to avoid “dark spots” in the knot. Feed the LED strip through the remaining segments one at a time, connection the segments as you go. Connect the segments in this order:</p><ol><li>Purple</li><li>Brown</li><li>Gray</li><li>Blue</li><li>Green</li><li>Gold</li></ol><p><i><strong>See the Print Instructions for more information on color coding, and tips on connecting the segments.</strong></i></p><p>Once all of the segments are connected, trim the LED strip shorter as appropriate, but make sure that it is still long enough to protrude through the last segment. Insert the “connector” on the assembled segments into the hole in the base.</p><p> </p><h4>Printing Instructions</h4><p>Notes :</p><ol><li><strong>All STL files are scaled 200%</strong></li><li>Color designations used in the files are for reference use only. I printed all trefoil knot segment parts in a single color.</li><li>I printed all trefoil knot segment parts in Hatchbox PLA (yellow) and the print files for those parts wer made with the Hatchbox PLA profile.</li><li>Base parts were printed in PLA using the Generic PLA profile.</li><li>I recommend printing all parts one at a time.</li><li>I recommend labeling segments as noted below.</li></ol><p><strong>The base and base-bottom parts</strong> were printed in black PLA. I recommend using black (or another dark color) for the base parts as this helps to “hide” the IR detector.</p><ul><li>The base-bottom can be printed without supports, 0% infill</li><li>The base requires supports under the center hole and the screw mount bosses (see photo for painting on supports). I used 15% rectilinear infill for the base.</li></ul><p><strong>The trefoil knot segment files</strong> are color coded to correspond to the CAD screen-shot. As noted previously, I recommend printing each segment one at a time. Before removing the printed segment from the print bed, I recommend labeling each end with a piece of tape to indicate it's “color” and the “color match” for each end. This is because the segments look very similar, and it is easy to get them mixed up when connecting them together. I used the following labeling method :</p><ul><li>A tape label in the middle of the segment giving the segment's “color”</li><li>A tape label at each end of the segment showing the segment color mating with that end (for example, “Brown” on the end of the “Purple” segment means to connect that end to the “Brown” segment).</li><li>Each segment is oriented on the build plate so that the front-most end mates to the previous segment print. For example, the forward end of the “Brown” segment mates to the “Purple” segment printed previously.</li><li>The “purple” and “gold” segments require supports under the part of the segment that inserts into the base.</li><li>I included support under the center of each segment; this is not absolutely necessary as the segments will print without this added support, but the center support does improve the appearance of the finished print.</li><li>All segments were printed with the open ends down (I tried printing with the open ends up, but could not get clean results on the part contacting the bed).</li></ul><p>I recommend printing the segments in the same order as they are assembled :</p><ol><li>Purple</li><li>Brown</li><li>Gray</li><li>Blue</li><li>Green</li><li>Gold</li></ol><p> </p><h4>Video?</h4><p>Not sure if this will work, but here is a link to a short video :</p><p><a href="https://photos.app.goo.gl/DmTq93yNmAWciRok6">https://photos.app.goo.gl/DmTq93yNmAWciRok6</a></p><p> </p><h4>CAD</h4><p> </p><p>The OnShape CAD files are here :</p><p><a href="https://cad.onshape.com/documents/f36468084e28f8df8fa36937/w/4ddd1ec94fcc3fbe8bf684cd/e/61382dd697abb53af7c7095e">https://cad.onshape.com/documents/f36468084e28f8df8fa36937/w/4ddd1ec94fcc3fbe8bf684cd/e/61382dd697abb53af7c7095e</a></p><p> </p><p> </p>
With this file you will be able to print Trefoil Version 05 - LED Ornament - Color Changing Lamp with your 3D printer. Click on the button and save the file on your computer to work, edit or customize your design. You can also find more 3D designs for printers on Trefoil Version 05 - LED Ornament - Color Changing Lamp.