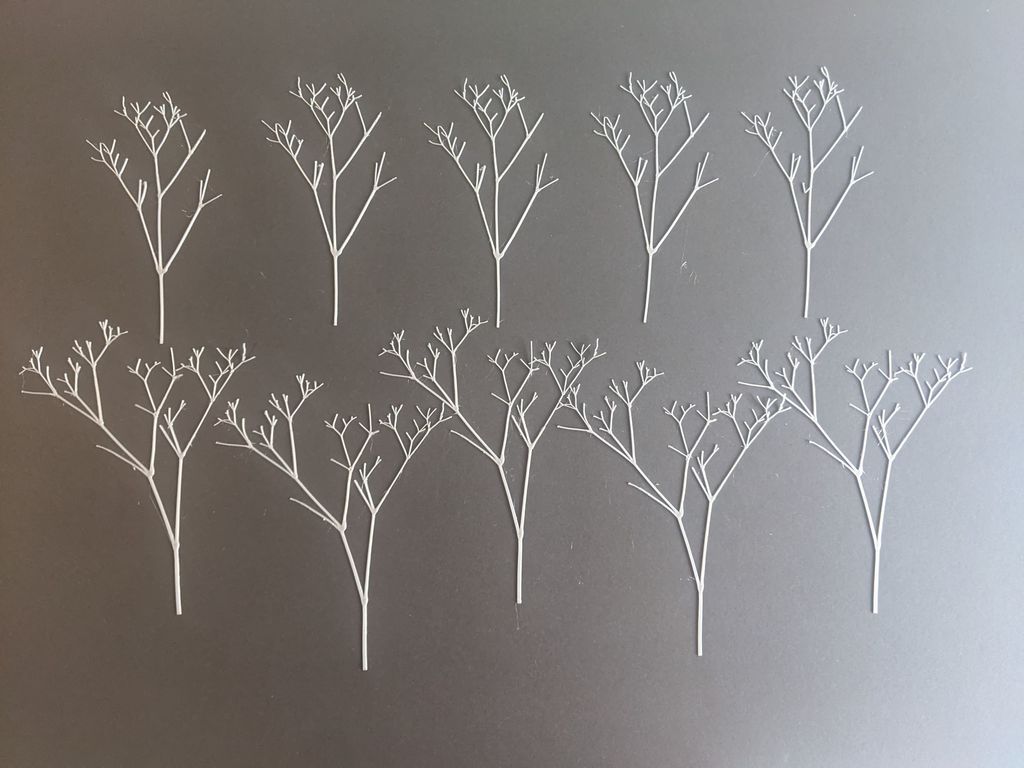
Tree Branch / Shrub Armature - D&D Scatter
prusaprinters
<p>A set of several Baby's Breath (Gypsophila) twigs perfect for creating or adding detail and body to your tabletop trees, shrubs, or other flora! The PLA is thin enough to easily heat and bend into whatever shape you want, and they look fantastic bunched together. Best of all - I designed and optimized these for rapid 3D printing so you can quickly knock out a whole batch of these.</p><p>I want to give a shoutout to <a href="https://www.youtube.com/c/LukesAps/videos">Luke of Geek Gaming Scenics</a>, who's tutorial on building realistic Silver Birch models inspired me to create these. I had limited access to actual dried Baby's Breath - so I just made my own!</p><p>I designed these branches/twigs with 28mm scale gaming in mind, but they can absolutely be used in different scales and can be integrated with other methods of creating terrain and scatter. I've added some pictures of some garden-wire trees I made, before and after I applied these twigs to fill them out. If you're looking for quick and detailed tree trunks with branches to print as well, check out my tree designs:</p><ul><li><a href="https://www.thingiverse.com/thing:4793422">Oak Tree Armatures</a></li></ul><p><a href="https://www.thingiverse.com/thing:4793435">Birch Tree Armatures</a> I may create more variations and add them over time - so be sure to keep an eye on this page for more models.</p><p>You can also <a href="/zachfejes/designs">check out my other designs for 3D printed tabletop scenery</a> - you may find something great for your games!</p><p>As always, I'd love to see how you all print these and use them in your games. Please add makes/pictures so others can get some ideas for how to use them!</p><p> </p><h3>Print Settings</h3><p><strong>Printer Brand: </strong>Prusa</p><p><strong>Printer: </strong>i3 MK2S</p><p><strong>Rafts: </strong>No</p><p><strong>Supports: </strong>No</p><p><strong>Resolution: </strong>0.4mm</p><p><strong>Infill: </strong>100%</p><p><strong>Filament: </strong>Overture PLA Space Grey </p><p><strong>Notes: </strong>Printed on the Prusa Mini, on a flat coated spring-steel bed. Additional details:</p><p><br/>Layer Height: 0.15mm</p><p>Nozzle Temp: 205</p><p>Bed Temp: 60</p><p>Perimeters: 4</p><p>In PrusaSlicer, you MUST turn on 'Detect Thin Lines' to be able to print this - but otherwise you can print directly from the files.</p><h3> </h3><h3> </h3><h3>Post-Printing</h3><p><strong>Step 0: (Optional) Prepare some Trees!</strong></p><p>If you plan to just bunch the twigs once they're deformed, you can ignore this step.</p><p>Otherwise, build yourself some trees! There are many ways to do this and youtube can be helpful to explore them. For the trees below I used twisted garden wire, textured with hot glue, and then primed. The bases are made with foam core with a few medium-sized stones for visual interest.</p><p>You can also see my stack of printed branches to the left, ready to be deformed and used!</p><p><strong>Tree structures and stacks of fresh-off-the-printer branches</strong></p><p><strong>1. Heat and Bend</strong></p><p>Once printed you can easily bend, twist, and reposition the branches, and then let it cool to harden again. There are many ways you can achieve this, but I'll detail just one.</p><blockquote><p>WARNING: This method involves an open flame, melting plastic, and flammable materials, so please exercise caution, only do this in a safe environment, and prepare safety measures.</p><p>In my case, I set up a simple tea candle to provide a consistent source of heat. I took a branch and held the part I wanted to deform above the flame until it started to bow. Then I moved it away from the heat and deformed it by hand to a more organic shape. Once heated in this way you have about 20 seconds of working time until it begins to harden again - but once you get used to it it's more than enough, and if it isn't you can always heat it again.</p></blockquote><p>Finding the right height above the flame requires some practice, so I'd advise printing out an extra branch or two to practice with first. The plastic can yield pretty quick, so you have to really pay attention.</p><p><strong>Heated and deformed branchs, ready for use</strong></p><p><strong>2. Apply to Tree / Bunch Into Shrub</strong></p><p>Once you have a good pile of twisted branches, you can start building with them!</p><p>If you want to create smaller shrubs or bushes, you can snip the branches to the height you're looking for, and cluster a bunch together. I'd add hot-glue to a prepared base and just stick the bundle down into it.</p><p>For the trees, I went around the larger structures adding branches wherever it looked good - keeping in mind that the branches will eventually support flocking. Because they're so light, you only need a tiny dab of super glue to affix them, and you can quickly fill out an entire tree.</p><p><strong>Applied to tree with superglue</strong></p><p><strong>Bunched together to form a shrub</strong></p>
With this file you will be able to print Tree Branch / Shrub Armature - D&D Scatter with your 3D printer. Click on the button and save the file on your computer to work, edit or customize your design. You can also find more 3D designs for printers on Tree Branch / Shrub Armature - D&D Scatter.
