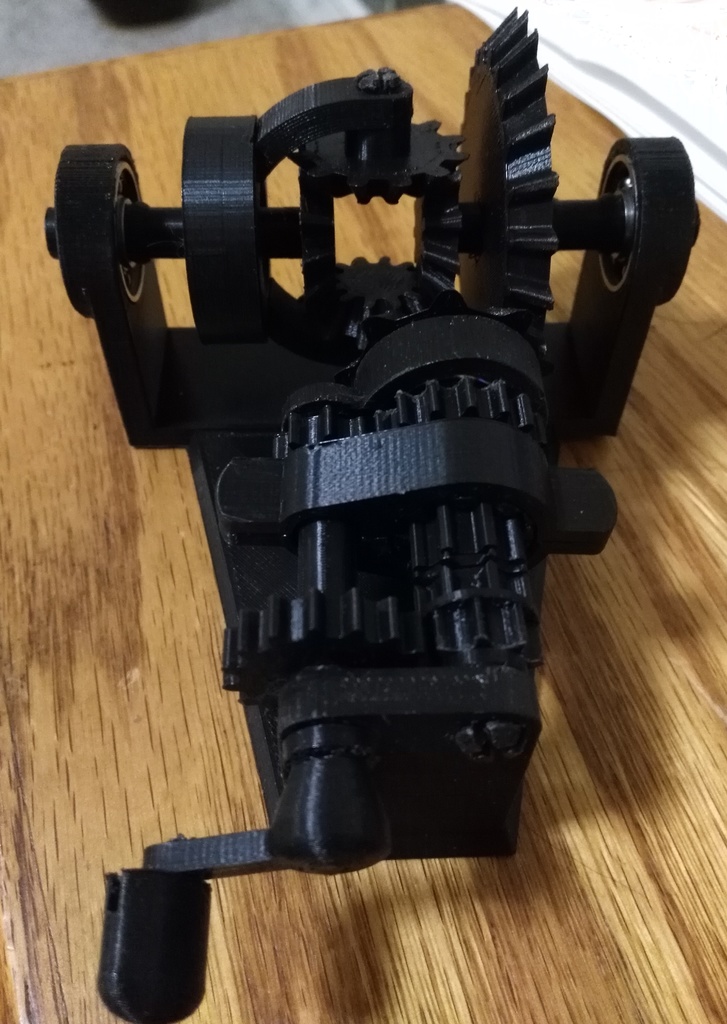
Transmission Model: Shifter & Differential
thingiverse
I designed a hand-cranked manual transmission that snaps together using two ball bearings. The frame is a prototype with 4 bearings, which was too much. It has a differential gear and manual shifter with 1st-Neutral-2nd gear configuration. All the essential parts of a car transmission are included except for the clutch. Printing this in 3 sections worked well, as two required support while the other did not. Two of the three should be printed solid or with high fill. I included a frame that uses ball bearings and one that doesn't - use whichever one you'd like. Each file has its requirements in the file name. Assembly is straightforward: 1. Look closely at the gears with outside teeth - there are 2 "plugs", 2 "squares", 4 "circles", 1 "1-flat", and 3 "2-flat" gears. Notice that the two thicker "circle" gears are really two gears joined together: one of these has triangular 'pointed' teeth. 2. Orient the frame so it looks like a T (that's what I will call it from now on). From the top of the T, put the axle with the gear on it through the hole on the right-hand side of the middle of the frame. Onto this axle put (in this order): - Larger "circle" double gear, pointed teeth toward you - Thin "circle" gear, pointed teeth toward you - Thicker "2-flat" gear... then find the gear (selector) with INSIDE teeth. Slide it over this gear - Thin "circle" gear, pointed teeth away from you - Smaller "circle" double gear, pointed teeth away from you - Small spacer disk 3. Make sure the "2-flat" gear locks into position (you will need to rotate it until it fits) as you push the axle through the hole in the bottom-right of the T. 4. From the bottom of the T, put the other long axle through the left hole in the T. Onto this axle, put (in this order): - Largest "2-flat" gear - Smallest "2-flat" gear 5. Keep the larger "2-flat" gear pressed against the bottom of the T as you push the axle through the hole in the center of the T. Each gear should mesh nicely with the corresponding gear on the other axle. Assemble the crank and attach it on the square end of this axle. 6. Find the two "shifter" pieces - one has 1-N-2 printed on it. Put these above and below the selector (inside-teeth gear) and snap them together. You can shift by sliding this forward and backward. 7. The 2 remaining axles have non-centered spacer rings. (If you're using 20 mm ball bearings, put the shorter ends into the bearings now.) Notice that one axle has a flat surface. Put the large "1-flat" gear on this axle so that the narrowest part of the teeth is away from the short end of the axle. 8. The remaining parts make up the differential in the middle of the T. Put the big ring on the left axle, with the cut-away part to the right. Then place the part that looks like a green lantern symbol (or TIE fighter) onto the left axle. Push the two "square" gears on the inside ends of each axle. 9. Put the "plug" gears in the holes of each curved 'arm' so that the gear is on the concave side. Secure these arms onto the 'green lantern/TIE fighter' piece then slide the ring over the pieces to secure the arms in place. 10. Have fun as you crank, shift, and grind your gears!
With this file you will be able to print Transmission Model: Shifter & Differential with your 3D printer. Click on the button and save the file on your computer to work, edit or customize your design. You can also find more 3D designs for printers on Transmission Model: Shifter & Differential.
