Track Link Calendar
prusaprinters
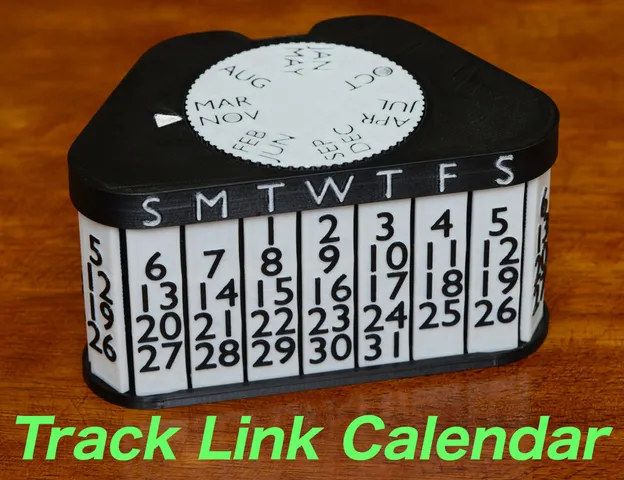
Mechanical perpetual calendars with several advantages.It can display all four types of months from 28 to 31 daysWhen a month is selected, the day of the week is automatically displayed (from March of the year to February of the following year)Adequate widthFully 3D printable, easy snap-fit chain assemblyAssembly process is shown in the video.note : Correct order of 28 panels is shown in the picture in the following description. The order shown in the video is wrong (that can not show some months properly).You can print the all parts with 180mm x 180mm printers. (some parts are necessary to rotate 45 degrees on the table).How to makeOther partsFive M2* 6mm tapping screwsPaintLubricantPrintPrint all parts with supplied posture.The number of copies of parts are indicated by the filename. For example, print 28 instances of link-28copies.stl.Only one parts, top-case.stl should be printed out with support. The other parts can be printed out without support structure.To give different color to the texts, use "Pause at height" function of slicer and change the filament color during print. For the dates (1 - 31), change the material at around h=4.5mm (texts are at the top side). For the texts of months on the month-dial.stl, change the material at around h=0.5mm (texts are at the bottom side).AssembleThe texts of the day of the week (S M T W T F S) should be painted manually.Assemble the chain (track link) by the snap-fit manner. (just push in)Light silicone oil is very helpful to reduce the friction.month-dial.stl is just pushed in (not fixed permanently). It should be detachable.Phase of the all columns (chain guides) are very important. See the figure below.Pause at HeightYou can give different colors for different layers with ordinary FDM 3D printers. Just pause the printer at height, change material then restart. Some slicers, such as Cura has a function to pause the printer at height. The image above is my setting with Anycubic Mega X (it is not compatible with common M0 command, so I use RepRap method).Correct order of 28 panels is shown in the picture above. The order shown in the video is wrong (that can not show some months properly).How to useInitializeAdjust the calendar first, by rotating the month dial.Detach the month dial, then push in so that the current month is at the index.Next monthTurn the month dial so that the coming month is at the index.If the length of the month is not correct, rotate the month dial a full turn then see the display.On Match 1stDo initialize again. (once a year)
With this file you will be able to print Track Link Calendar with your 3D printer. Click on the button and save the file on your computer to work, edit or customize your design. You can also find more 3D designs for printers on Track Link Calendar.