Tomy Pocket Bot Model
prusaprinters
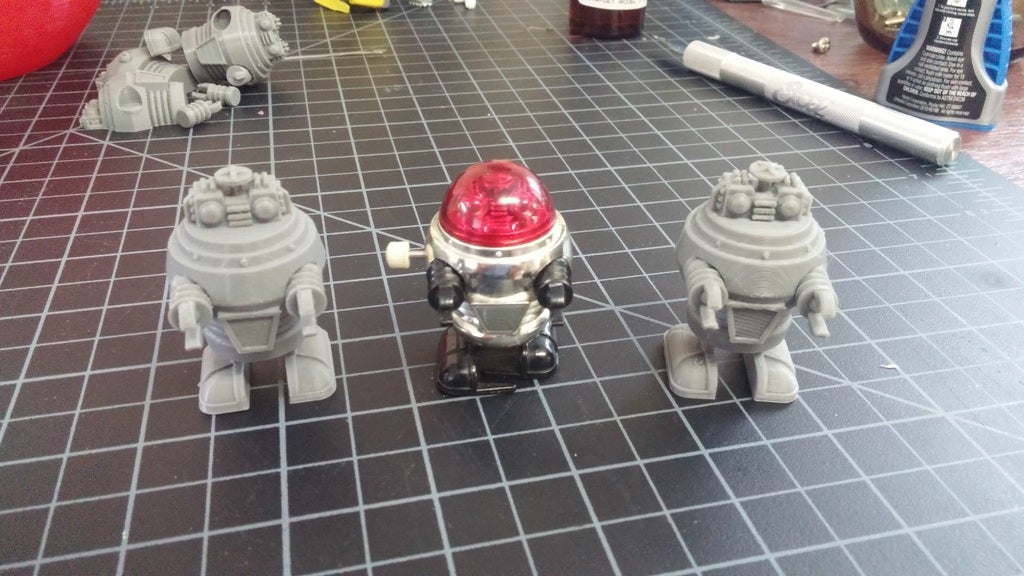
<p>I have always had one of the Tomy Pocket Robots on my desk as I thought they looked really cool. Figured someone else might want a little robot overlord as well. This is modeled on a classic Tomy Pocket Bot. You will have to assemble this model and will need the following pieces (shown in one of the pics)</p> <p>1 Body - I suggest cutting the body at 14.8mm as this seems to be the sweet spot. You can print it standing up but if you do make sure and use supports for the flat vertical overhangs.</p> <p>2 Arms - These will be glued into the arm holes on the body. You can arrange the pincer orientation as desired.</p> <p>1 Bottom - Glue this to the bottom of the body with the angles facing front and back.</p> <p>2 Feet - Glue these to the sides of the angled bottom piece.</p> <p>1 Top Disc - There is a hole in the bottom of the top disc that accepts the post in the center of his head.</p> <p>The original robot is in the center with prints flanking him in one of the photos. You will see he originally had a dome on his head which I tried to print as well but even clear filament wasn't clear enough to see the detail of his "face" so if you can find a hollow half dome that is 20mm you should be able to use it.</p> <p>Have fun and I for one welcome our new robot overlords!</p> <h3>Print instructions</h3><h3>Category: Model Robots Summary</h3> <p>I have always had one of the Tomy Pocket Robots on my desk as I thought they looked really cool. Figured someone else might want a little robot overlord as well. This is modeled on a classic Tomy Pocket Bot. You will have to assemble this model and will need the following pieces (shown in one of the pics)</p> <p>1 Body - I suggest cutting the body at 14.8mm as this seems to be the sweet spot. You can print it standing up but if you do make sure and use supports for the flat vertical overhangs.</p> <p>2 Arms - These will be glued into the arm holes on the body. You can arrange the pincer orientation as desired.</p> <p>1 Bottom - Glue this to the bottom of the body with the angles facing front and back.</p> <p>2 Feet - Glue these to the sides of the angled bottom piece.</p> <p>1 Top Disc - There is a hole in the bottom of the top disc that accepts the post in the center of his head.</p> <p>The original robot is in the center with prints flanking him in one of the photos. You will see he originally had a dome on his head which I tried to print as well but even clear filament wasn't clear enough to see the detail of his "face" so if you can find a hollow half dome that is 20mm you should be able to use it.</p> <p>Have fun and I for one welcome our new robot overlords!</p> <h3> Print Settings</h3> <p><strong>Printer Brand:</strong></p> <p>Prusa</p> <p><p class="detail-setting printer"><strong>Printer: </strong> <div><p>Prusa Mk2</p></div><strong>Rafts:</strong></div></p> <p>No</p> <p><p class="detail-setting supports"><strong>Supports: </strong> <div><p>No</p></div><strong>Resolution:</strong></div></p> <p>.10</p> <p><p class="detail-setting infill"><strong>Infill: </strong> <div><p>15%</p></div></div></p></p></p></p>
With this file you will be able to print Tomy Pocket Bot Model with your 3D printer. Click on the button and save the file on your computer to work, edit or customize your design. You can also find more 3D designs for printers on Tomy Pocket Bot Model.
