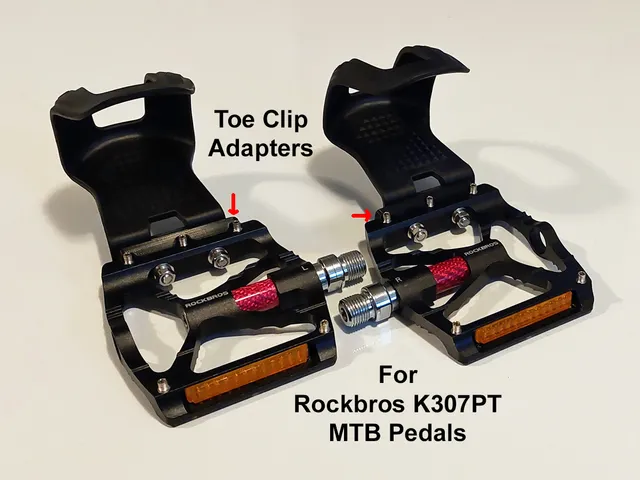
Toe Clip Adapter for Rockbros K307PT Mountain Bike Pedal
prusaprinters
This is a toe clip adapter or mounting bracket that replaces the front reflectors on Rockbros K307PT Mountain Bike pedals, making it possible to install toe clips. It is durable and fits well. However, it does require you to drill two holes in each pedal for the mounting bolts. Drilling the holes is quick and easy using the adapter as a drill guide or template (see 'Instructions' below). The adapter is designed to allow the grip pins to still engage with the sole of the shoe. Note: Besides needing an adapter for a toe clip to mount to, the stock Rockbros K307PT pedals were not designed to accommodate toe straps. For my application, since I will be using ‘half-clips’ (see attached photos), I did not worry about figuring out how to use full toe clips with straps. There are possible solutions, but these would require additional modifications to the pedals. FYI, I purchased the 'Zefal Cristophe Mountain Bicycle Half Toe Clips' for about $11 U.S. (Amazon).NOTE: The face plate on this adapter is 3mm thick. Consequently, it will extend out the functional length of the toe clip by that distance. The K307PTs are fairly wide pedals to start with, so you might find that you need to go with a smaller size toe clip. For example, I used Large/XL clips on my former pedals, but with the K307PTs and adapters, I am going to try Small/Medium clips to bring the ball of my foot closer to being over the pedal spindle. Additional Parts Needed (for two pedals; I prefer stainless steel hardware for bicycle parts):Qty. 2: Toe ClipsQty. 4: 5mm x 25mm bolts (I prefer Hex Socket or Hex Button Cap)Qty. 4: 5mm nutsQty. 4 or 8: 5mm flat washers (8? – I prefer a washer on each side of the assembly)Qty. 4: Split lock washers Object Files:‘Adapter’ – this is the adapter, it is all that you need to print (one for each pedal) for the complete install. It also doubles as the drill template, and probably works better for that purpose than the actual included ‘Drill Template - Optional’.‘Drill Template - Optional’ – this is a simple drill template that helps you drill holes in your pedals for the toe clips bolts. It fits into the socket or pocket that the front reflector fits in. However, after drilling one pedal with this template, and the other pedal using an installed adapter, I found that the adapter is easier and more secure to use as the template for drilling precise holes. Printing:Print two adapters, one for each pedal.100% infill (for stronger parts; I set the infill pattern to ‘Lines’ so that they overlap well).0.16mm layer height (I like a finer layer height; I'm okay with longer print times).4 line brim with 0.25mm brim distance (not necessary, but I wanted to make sure there was no warping on the print face/first few layers because it goes against the toe clip).Supports – yes, but they are extremely minimal; there are three small, 2mm deep vertical circles that interface with the front grip pins. They are insignificant, in terms of filament use and print time, but they improve the fit of the adapter with the pedal grip pins.Filament - PETG Post Printing (minimal clean up is needed):Clean out the support material in the three vertical circular cutouts.Clean off or sand any corners that have expanded beyond the expected 90 degree angles.Clean up any other printing globs and debris. INSTRUCTIONS:Installing the Adapter and Drilling the PedalsMake sure that you determine the front face of the Right “R” pedal (where you want to mount the right clip).NOTE: It is easy to get pedals mixed up, and to accidentally drill the back face of the Left “L” pedal; however, it is not the end of the world if you make this mistake.Unscrew the three front upper grip pins on the “R” pedal; this will release the front reflector (the grip pins are all that is holding in the reflectors).NOTE: The grip pins use a 2mm or 5/64" hex or ‘Allen’ wrench.NOTE: It is not necessary to completely unscrew the grip pins; though they should be unscrewed enough so that their tips do not protrude out of the pedal.Remove the front “R” reflector (it should pretty much drop out).Install an adapter in the “R” pedal; it has a fairly precise fit; the adapter has three cut-aways to clear the three upper grip pins, and two reinforcements on the bottom side (see photos for proper orientation, though the photos are of an “L” pedal).NOTE: The fit is tight enough that you might hear a click when the adapter inserts into the pedal. The fit is such that when fully inserted there should be no gaps between the adapter surfaces and the pedal surfaces.With the adapter fully inserted, screw in the three front grip pins until they are fully tightened. This will secure the adapter in place and make it easier to drill precise bolt holes through the face or front side of the pedal.Using a 13/64" or 5mm drill bit, drill the two holes in the pedal, using the two adapter holes as drill guides or templates.NOTE: The pedal wall is only about 2mm thick, so it shouldn't take too long or too much force to drill through the aluminum. Use oil lubricant if friction is generating too much heat – you don't want to melt the adapter with a super heated drill bit.NOTE: When drilling, use a drill bit stop if you have one, or control the quantity of force with which you are pushing, to make sure that when you have drilled through the pedal you don't keep pushing the drill bit into, and mar, another part of the pedal.Clean up any drill debris.Repeat steps 1 thru 7 for the left pedal.You are now ready to install the toe clips.Installing the Toe ClipInstall two washers, one each on two bolts.Install these through the front of the two mounting holes on the bottom of the toe clip.Insert these through the two holes on the adapter and through the inside surface of the pedal.NOTE: There should be enough threads protruding out of the inside face of the pedal to install the remaining hardware.If using 8 flat washers total (one on each side of the assembly), slide on to the protruding threads of the bolts another flat washer, one on each bolt.Slide on split lock washers, one on each bolt.Install the 5mm nuts, one on each bolt, and finger tighten.Adjust or position the toe clip horizontally by sliding the clip, making sure the clip is level with the pedal.Tighten the nuts and bolts.Repeat steps 1 thru 8.Go for a bike ride and try out your new toe clips. :)NOTE: If you are using toe clips, you will generally always place you feet on the same side of the pedal. Therefore, it is not necessary to have grip pins ("shin rippers") on the bottom of your pedals. I suggest that you remove them and save them to use as replacements when/if the upper grip pins wear out. This will give you 10 replacement pins, and it will also reduce the chance of bodily injury from the bottom of the pedal coming in contact with your shin or calf. The pedals can still ‘do a number on you' but it will be far less painful if you remove those claws that you don't need.NOTE: If you do remove the bottom grip pins, this will release the rear reflectors. If you would like to have rear reflectors, but no bottom grip pins, you can stick on the reflectors using small strips of heavy-duty, permanent, double-sided tape. I used “Scotch Heavy Duty Mounting Tape” and it worked great.
With this file you will be able to print Toe Clip Adapter for Rockbros K307PT Mountain Bike Pedal with your 3D printer. Click on the button and save the file on your computer to work, edit or customize your design. You can also find more 3D designs for printers on Toe Clip Adapter for Rockbros K307PT Mountain Bike Pedal.