Tinylev Stand Modifed for Makerfabs Kit
prusaprinters
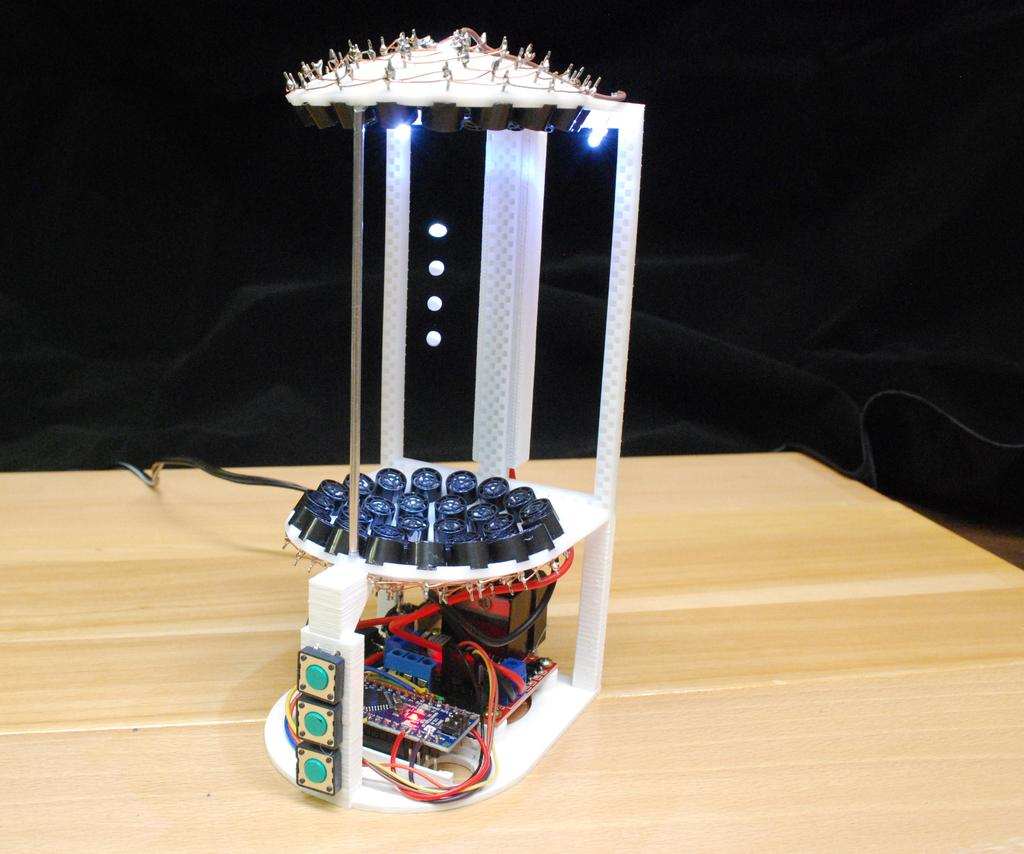
<p>I saw a demo online of the TInylev ( <a href="https://www.instructables.com/id/Acoustic-Levitator/">https://www.instructables.com/id/Acoustic-Levitator/</a> ) and wanted to build one. Instead of sourcing all the parts individually, I purchased a kit from Makerfabs. <a href="https://www.makerfabs.com/index.php?route=product/product&product_id=508">https://www.makerfabs.com/index.php?route=product/product&product_id=508</a></p> <p>When the kit arrived, I saw the need for a stand.<em>jeffbearer</em> uploaded a nice one incorporating all the electronics, so I printed that. The DC jack and switch from the kit were different than he used, so I modified the stand to accept them the old fashioned way; with an X-acto knife. See picture.</p> <p>For better visibility I drilled some holes in the top and added 3 white LEDs, (1) 5mm top dead center, and (2) 3mm LEDs, one on each side. Each LED was connected to the 9 volt power supply thru a 360 ohm resistor. This required 4 more wires going up the back so I designed a simple conduit that snaps on the center upright and hides the wires. I glued a length of 3/32 aluminum tube in front to keep the top and bottom arrays parallel. Without it, the top section would sag a bit and the levitated balls would start to wander.</p> <p>The power amp got pretty hot if left on for a few minutes, so I hot glued a 25mm 5V fan I had in the drawer to the power amp heat sink. Now it runs cool as can be for hours. The Nano that comes in the kit has the header pins sticking out the bottom, and the stand is designed for them to be sticking out the top. So I glued some headers to the stand and inserted the Nano into them to hold it upright. I just soldered the required wires to the top of the header pins.</p> <p>The 9V 1A DC supply that came with the kit struggled to put out 8 V when everything was running so I used a 9V supply that I already had. It can put out 2A without breaking a sweat. This project works great and is a fun project to show off.</p> <h3>Print Settings</h3> <p><strong>Printer Brand:</strong></p> <p>Printrbot</p> <p class="detail-setting printer"><strong>Printer: </strong> <div><p>Printrbot Plus</p></div> <p><strong>Rafts:</strong></p> <p>No</p> <p class="detail-setting supports"><strong>Supports: </strong> <div><p>No</p></div> <p><strong>Resolution:</strong></p> <p>.3</p> <p class="detail-setting infill"><strong>Infill: </strong> <div><p>35%</p></div> <p><strong>Filament:</strong> ExcelFil EVO PLA PLA Snow White</p> </p></p></p> Category: Physics & Astronomy
With this file you will be able to print Tinylev Stand Modifed for Makerfabs Kit with your 3D printer. Click on the button and save the file on your computer to work, edit or customize your design. You can also find more 3D designs for printers on Tinylev Stand Modifed for Makerfabs Kit.