Tiny Mendocino solar motor
thingiverse
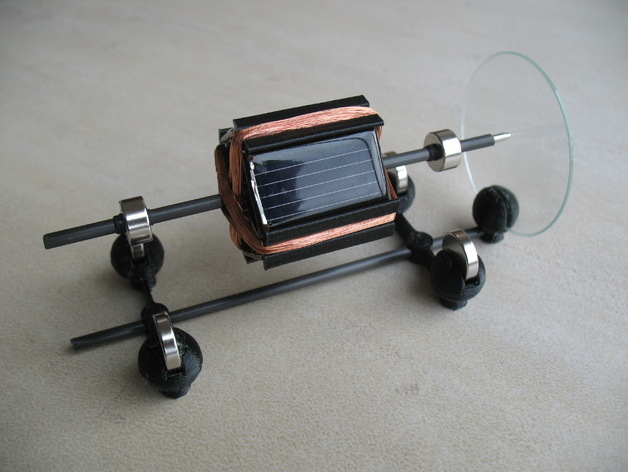
I designed to build the world's smallest 3D printed Mendocino motor here it is with my best wishes for 2015 ;-) See it running here: http://youtu.be/PVJAtb6spAQ The Mendocino motor is a solar-powered light commutated magnetically levitated electric motor. The motor consists of a four-sided rotor block in the middle of a shaft. The shaft is positioned horizontally and has a magnet at each end. The magnets on the shaft provide levitation by repelling magnets in a base under the motor. The rotor block has two sets of windings and a couple of solar cell attached to each winding. When light strikes one of the solar cells, it generates an electric current thus energizing one of the rotor windings. This produces a magnetic field which interacts with the field of the support magnets. The interaction between the magnetic fields produces a force that propels the motor. To build the motor, print the rotor and support parts using a 3D printer. Insert the shaft inside the rotor and attach the ball pen tip to the end of the shaft. Wind the copper wire around the carbon shaft to create the coils. Wire the coils and solar cells as described on "mendo_principle.jpg" (parallel but with reverse polarity). Print the supports and attach them to the magnets. Glue the glass and support at the tip of the second carbon rod shaft. Install the ring magnets on the rotor shaft using shrinking tubing or adhesive tape to adapt the shaft diameter. To levitate, place the extremity magnet 2mm in front of the support magnets (in the direction of the glass) while the back magnet shall be nearly aligned with its support. You should feel a small force pushing it towards the glass while in the cross direction you will feel the magnetic field as if the shaft was installed in a V shaped field of forces... And everything shall be stable here ! If not, changing the distance between the magnets of each support in "ec_magnet = 37; // magnets distance" might help. Once in levitation, statically balance your rotor using some sticky mastic to add mass where needed. Use some sticky mastic to attach a weight or an object of appropriate mass and shape at the bottom end of the motor. And you're done... it's time to put it in sunlight or close to a 60W light bulb, it should turn and accelerate.
With this file you will be able to print Tiny Mendocino solar motor with your 3D printer. Click on the button and save the file on your computer to work, edit or customize your design. You can also find more 3D designs for printers on Tiny Mendocino solar motor.