Three Jaw Clamp
prusaprinters
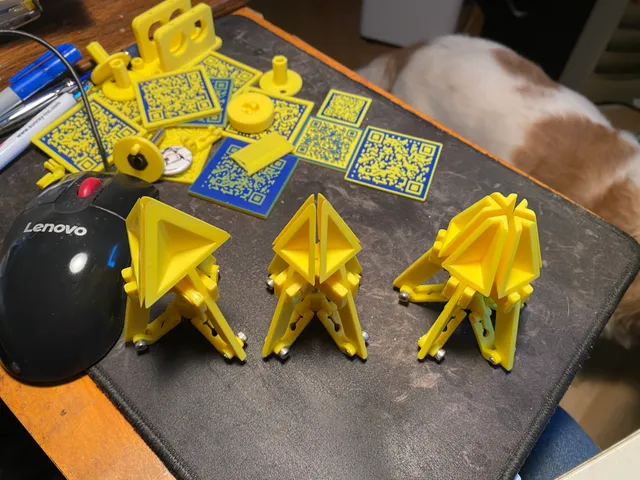
I've designed a series of these: 3, 4, 5 and 6 jaw versions; the photo shows 3, 4 and 5 jaw versions. The one on the left is the simplest with the fewest moving parts. Print three jaws, one web, one spider post, three spider legs and three pins. Install one: M3 x 5mm heat set insert into the top of the web. You'll also need one: M3 x 25mm SHCS, three: M3 x 10mm SHCS, one ball point pen spring and an M3 tap. Push the M3 x 25mm SHCS into the socket in the top of the spider post. Slide the ball point spring onto the long threaded portion. Bolt this assembly into the heat set insert in the top of the web until it's bottomed. Tap the holes in the bent end of the spider legs. Now snap the holes in the flat ends of the spider legs onto the protruding bumps on the fins of the spider post, making sure that the threaded ‘bent’ ends are pointed down. Next press one pin into the large hole in the web, just enough so that it doesn't fall out. Now slide the jaws into the web and fasten them in place by pressing the pins home. Press the tops of each jaw handle into the gap on the bent end of each spider leg and bolt each in place with an M3 x 10mm SHCS; do NOT over tighten the bolt: the link will be a pivot. Now the clamp is done. If you want more grip strength replace the ballpoint pen spring with a stronger one; Harbor Freight sells spring assortments for very little and there will be plenty of choices. It is possible to change the scale of the clamp but you'll have to use different fasteners so pick your scaling factor carefully.
With this file you will be able to print Three Jaw Clamp with your 3D printer. Click on the button and save the file on your computer to work, edit or customize your design. You can also find more 3D designs for printers on Three Jaw Clamp.