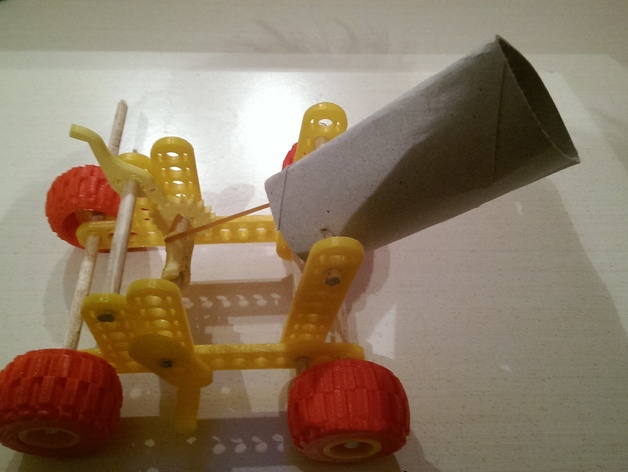
ThinkFun Fire Machine set (cannon)
thingiverse
This is a simple and fun cannon expansion set to build.\nYou can use your imagination to create your own remixed version.\nThe new pieces let you make short but very powerful shots with the cannon.\nOne thing I didn't include is building the cannon machine box, so you'll need to create it yourself.\nThat way, you'll have fun and increase your creativity.\nYou can combine the parts in different ways to create interesting designs, limited only by your imagination!\nI want to apologize if some of the pictures show pieces that don't match the .stl files you can download because I printed them before realizing the contest didn't allow big pieces.\nAnyway, I've uploaded some pictures showing how to make them.\nAnd I want to apologize again for the too-long rods - I finished printing PLA so had to switch to wood.\nAll parts of my design fit inside a 10x10x12.5cm area. PIECES YOU NEED: (download from ThinkFun Maker Studio sets) 7" Rods (3 pieces)\nLarge Connector ThinkFun Maker Studio (4 pieces)\nHub caps (26 pieces)\nHole Punch (1 piece)\nSpool (1 piece)\nP(1 piece)\nR (small spring) or S (big spring) (1 piece)\nC (2 pieces)\nElastic rubber or cable (1 piece)\nT (manovella) (1 piece)\nF (cerchione) (4 pieces) PRINT SETTINGS Printer: Build your own printer, similar to Prusa i3\nRafts: Doesn't Matter\nSupports: No\nResolution: 0.26mm\nInfill: 60%\nNotes: Use support only for F (cerchione) and springs POST-PRINTING STEP 1 Assemble "F (cerchione)" and "D (gomma ruota v1)" as shown in the picture. STEP 2 Assemble one Large Connector ThinkFun Maker Studio with a "C" piece. Use four Hub Caps to attach it. Do this two times. STEP 3 Take pieces "P" and "Q". They'll work together like a trigger, using an elastic rubber for power.\nPlace them on the cannon skeleton carefully so that the trigger (Q) can stop the gear teeth.\nPreset the exact position, then add the Spool with two Hub Caps and attach it to the stick using three more Hub Caps. The stick must be able to rotate in the catapult hole, so insert four sticks for support. STEP 4 Assemble "F (cerchione)", a spring ("R (molla piccola)" or "S (molla grande)"), and one cartoon tube. Use a Hole Punch and some Hub caps to block them. STEP 5 Attach the assembled pieces from STEP 4 to the cannon skeleton with two Hub Caps and one rod. They mustn't be able to rotate freely.\ STEP 6 Connect the Spool to the spring with an elastic rubber. Release it, knot it inside the cartoon tube, and attach its end outside.\ Now you have everything ready! INSTRUCTIONS FOR SHOOTING: 1. Lift the trigger from the gear. 2. Turn the handle to tension the rubber band. 3. Place down the trigger to prevent the gear from turning.\ 4. The cannon is now ready - all you need to do is lift the trigger and... Shot!!!
With this file you will be able to print ThinkFun Fire Machine set (cannon) with your 3D printer. Click on the button and save the file on your computer to work, edit or customize your design. You can also find more 3D designs for printers on ThinkFun Fire Machine set (cannon).
