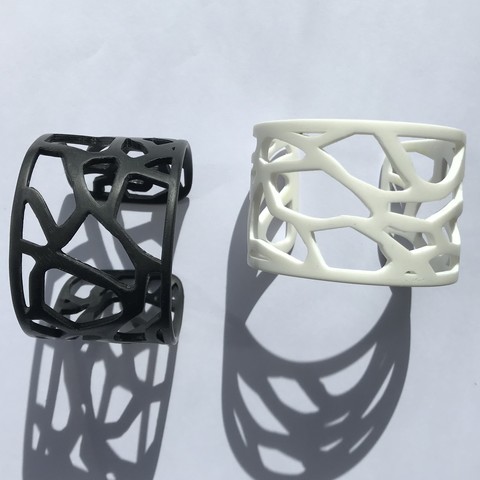
Thermoformed bracelet Mucem
cults3d
A Simple Lifehack for Mastering 3D Printing and Post-Production As a proud owner of a Da Vinci Mini W from XYZ printing, I've learned to make the most of my machine's capabilities. Admittedly, it may not be the best printer on the market, but with some creativity and post-production magic, we can achieve near-perfect results. When designing parts for 3D printing, I always keep in mind the limitations of my printer. I opt for simple designs that can be printed without supports or bridges, taking into account the nozzle diameter, layer height, and other essential factors. This approach allows me to easily correct any printing defects during post-production, resulting in a beautifully finished piece. Here's an example of this process: I designed a stunning bracelet inspired by the Mucem museum in Marseille, which features an impressive outdoor architecture. The design took about 1-2 hours to print, depending on my speed, and required only 20-30 minutes of post-production work. The first step is to rework a high-quality photo of the Mucem's architecture using software like paint.net. I cut out the relevant details in black and white, creating a mesh that will serve as the basis for my design. Next, I export this mesh as a .dxf file, which can be read by most 3D software. From there, it's simply a matter of sending the .dxf file to my favorite 3D design software, repairing any errors, scaling the design, and drawing the contours of the bracelet. Voilà! Post-production is where the real magic happens. It takes only about half an hour to transform the printed piece into a stunning work of art. First, I carefully deburr the cutlery or knife piece to remove any burrs or small clumps of material. Next, I sand the pieces by hand using different grains: 80, 120, 240 (dry), and finally 400 (under water). The dry sanding process is done slowly to avoid overheating the room or damaging the bracelet. When sanding under water, I let go and sand until I achieve a beautiful shiny surface. As I sand, following my PLA's natural grain, it may whiten slightly. However, with sanding under 400-grain water, I can restore its original shade and gloss. I sand both surfaces and the sides, but leave the interior untouched if the impression was correctly carried out. To achieve the perfect fit, I recommend using a metal bracelet of the correct size and shape. To heat the plastic, I use hot water (around 70-80°C) for about half an hour. Then, I submerge half of the bracelet and let it cool before shaping it against the metal bracelet. I repeat this process until the desired shape is achieved. Once the bracelet is nearly in good shape, I switch to warm water (45-50°C) so that I can polish the shape without burning my hands. This temperature allows me to put my hands on one side while the plastic doesn't soften too quickly, making it easier to achieve precise forms. Finally, I use cold water to harden the bracelet quickly, making it easier to handle and more precise in its final form. And that's it! With these simple steps, you can create a unique and perfectly sized bracelet, all thanks to some clever post-production techniques. Attachments: * 2 different STL files for printing * An HD pattern of the mesh (2143mm x 1541mm x 2.5mm in .stl and .igs formats) * A universal 3D file format that can be reworked in 3D software
With this file you will be able to print Thermoformed bracelet Mucem with your 3D printer. Click on the button and save the file on your computer to work, edit or customize your design. You can also find more 3D designs for printers on Thermoformed bracelet Mucem.
