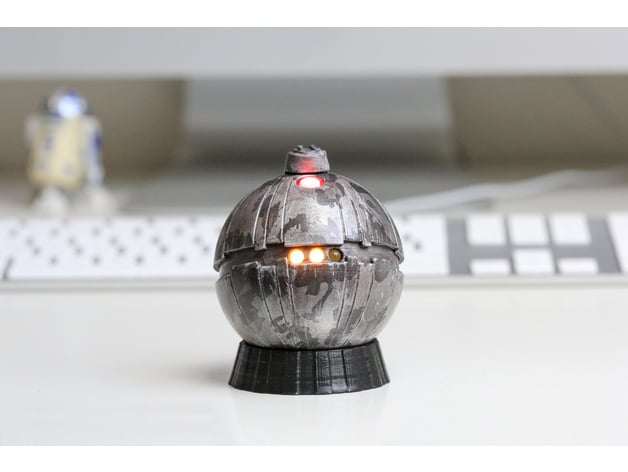
Thermal Detonator
thingiverse
This is a Thermal Detonator, comprising four sections: the top and bottom halves of the sphere, a sliding button designed to fit on top, and a small cap that will cover an LED in the top half of the sphere. The design accommodates four holes that can accommodate three 5mm LEDs and one 3mm LED. The sliding button clips into place in the slot on the top half of the sphere and serves as a mechanism for attaching and activating a button for electronics housed inside. Watch this YouTube video for more information: https://www.youtube.com/watch?v=GELZkQZjxAA Here's the Arduino code for controlling blinking LEDs: Integers are assigned to specific pin connections: int led1 = 5; // Left Orange LED connected to pin 5 int led2 = 7; // Middle Orange LED connected to pin 7 int led3 = 9; // Right Orange LED connected to pin 9 int led4 = 11; // Red LED connected to pin 11 Setup Routine: void setup() { pinMode(led1, OUTPUT); // Digital pin 5 initialized as an output pinMode(led2, OUTPUT); // Digital pin 7 initialized as an output pinMode(led3, OUTPUT); // Digital pin 9 initialized as an output pinMode(led4, OUTPUT); // Digital pin 11 initialized as an output } Loop Routine: void loop() { Digital pins are set high to turn on LEDs: digitalWrite(led1, HIGH); // Turn the Left Orange LED on digitalWrite(led2, HIGH); // Turn the Middle Orange LED on digitalWrite(led3, HIGH); // Turn the Right Orange LED on delay(600); // Wait for 600 milliseconds LEDs are turned off: digitalWrite(led1, LOW); // Turn the Left Orange LED off digitalWrite(led2, LOW); // Turn the Middle Orange LED off digitalWrite(led3, LOW); // Turn the Right Orange LED off delay(600); // Wait for 600 milliseconds Sequence of lights: // Light Status 1 digitalWrite(led4, HIGH); // Turn on the Red LED digitalWrite(led1, HIGH); // Turn on the Left Orange LED delay(600); // Wait for 600 milliseconds digitalWrite(led1, LOW); // Turn off the Left Orange LED delay(600); // Wait for 600 milliseconds // Light Status 2 digitalWrite(led2, HIGH); delay(600); digitalWrite(led2, LOW); delay(600); // Light Status 3 digitalWrite(led3, HIGH); delay(600); digitalWrite(led3, LOW); delay(600); // Light Status 4 digitalWrite(led1, HIGH); // Turn on the Left Orange LED digitalWrite(led2, HIGH); // Turn on the Middle Orange LED delay(600); // Wait for 600 milliseconds digitalWrite(led1, LOW); // Turn off the Left Orange LED digitalWrite(led2, LOW); // Turn off the Middle Orange LED delay(600); // Wait for 600 milliseconds // Light Status 5 digitalWrite(led1, HIGH); // Turn on the Left Orange LED digitalWrite(led3, HIGH); // Turn on the Right Orange LED delay(600); // Wait for 600 milliseconds digitalWrite(led1, LOW); // Turn off the Left Orange LED digitalWrite(led3, LOW); // Turn off the Right Orange LED delay(600); // Wait for 600 milliseconds // Light Status 6 digitalWrite(led3, HIGH); delay(600); digitalWrite(led3, LOW); delay(600); // Light Status 7 digitalWrite(led1, HIGH); delay(600); digitalWrite(led1, LOW); delay(600); // Light Status 8 digitalWrite(led2, HIGH); // Turn on the Middle Orange LED digitalWrite(led3, HIGH); // Turn on the Right Orange LED delay(600); // Wait for 600 milliseconds digitalWrite(led2, LOW); // Turn off the Middle Orange LED digitalWrite(led3, LOW); // Turn off the Right Orange LED delay(600); // Wait for 600 milliseconds // Light Status 9 digitalWrite(led1, HIGH); // Turn on the Left Orange LED digitalWrite(led3, HIGH); // Turn on the Right Orange LED delay(600); // Wait for 600 milliseconds digitalWrite(led1, LOW); // Turn off the Left Orange LED digitalWrite(led3, LOW); // Turn off the Right Orange LED delay(600); // Wait for 600 milliseconds
With this file you will be able to print Thermal Detonator with your 3D printer. Click on the button and save the file on your computer to work, edit or customize your design. You can also find more 3D designs for printers on Thermal Detonator.
