Theft deterrent mount for Opel Ampera charging cable with meter
prusaprinters
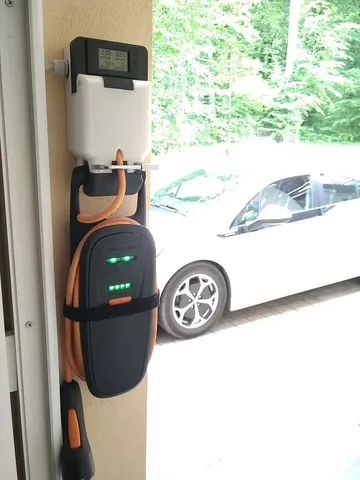
I wanted to make a safe station to connect the charging cable of my Ampera to the mains socket outside my home. The safety goal was: "cable not easily removable without crowbar." I also wanted some protection from elements (it is mounted outside, but under the roof). I added a cheap energy meter to get an overview of energy used and to be able to check charger function. For standard EU in-wall receptacles with earth contact (schuko). Please be safe and install only if you have the necessary knowledge about safety of electrical installations. It should also work with other charging cables of a similar design (max. 35mm thick handle). Print Settings Printer: Heavily modded Craftbot Rafts: No Supports: Yes Resolution: 0,15 or 0,20 mm Infill: 33 or 50 % Notes: Print both models in PETG with 3 mm thick walls and slightly hotter than usual, this should give you enough strength for a basic level of protection. These are advanced level prints that will take long to print and will use a lot of plastic (about 1 kg altogether in my case). Post-Printing What you need Cable 3x 1,5 mm2, long enough to reach your connection point Cable gland for your cable 2x wood screw 6 x 120 mm 2x wood screw 6 x 80 mm 4x wall dowels 8 mm 6 mm rod, about 20 cm long Padlock with at least 50 mm long and max. 7 mm thick bar (see pictures) Standard European power receptacle for in-wall mounting (see pictures) PZEM-021 energy meter, just look for it on e.g. e-bay Non-acidic silicone A little bit of epoxy glue Assembly Decide on location of cable entry and drill the cable gland hole. Remove about 25 cm of cable sheath, enough to reach from cable gland to the receptacle. Insert the cable through cable gland and tighten. Connect earth conductor to receptacle. Prepare two 20 cm long 1,5 mm2 insulated wires (black/brown and blue) and connect them to the receptacle (phase/neutral). Screw in the receptacle, use short (10 mm) wood screws. Mount the decorative cover etc. Connect the two wires from the receptacle to the load connection on the PZEM-021 (outer two connections). Connect the phase and neutral wires from your cable to the PZEM-021 (inner two connections). Do not install the PZEM-021 yet, TEST the assembly first! Installation Choose the mounting position: The design is suitable for a sheltered out door location, e.g. under the entrance awning, with no direct exposure to rain. Mark the positions for the four fixing screws on the wall. Drill 8 mm holes in the wall and insert dowels. Screw the housing on the wall using the two long screws on top and two short ones on the bottom. Connect the assembly to power (16 A fuse is mandatory!), hang the charger cable on the hook, connect the plug to the receptacle, test if everything works as it should. Once test is successful, cut power and add some silicon on the rim of the hole for the meter module. Insert meter module (it is a snug fit). Add a thin trace of silicon on the outer edges of the display and a dab of silicon on the button hole (the meter is not waterproof unless you do that). Mount the cover: First check the fit and sand off any sticking areas, the fit is very snug. Cut the 6 mm rod to proper length for the hinge. Mix up a bit of epoxy glue and coat the inside of the cover hinge hole on the left. Mount the cover and insert the cut 6mm rod until it sticks out about 3 cm on the right. Coat the part sticking out with some more epoxy and push in the rod so it is flush with the hinge hole. Fill any remaining hole up with epoxy on both sides. Wait for the glue to cure, you are done. Category: DIY
With this file you will be able to print Theft deterrent mount for Opel Ampera charging cable with meter with your 3D printer. Click on the button and save the file on your computer to work, edit or customize your design. You can also find more 3D designs for printers on Theft deterrent mount for Opel Ampera charging cable with meter.