The1987Lite - A Handwired 65% revision of The1987 TKL with OLED and RGB!
prusaprinters
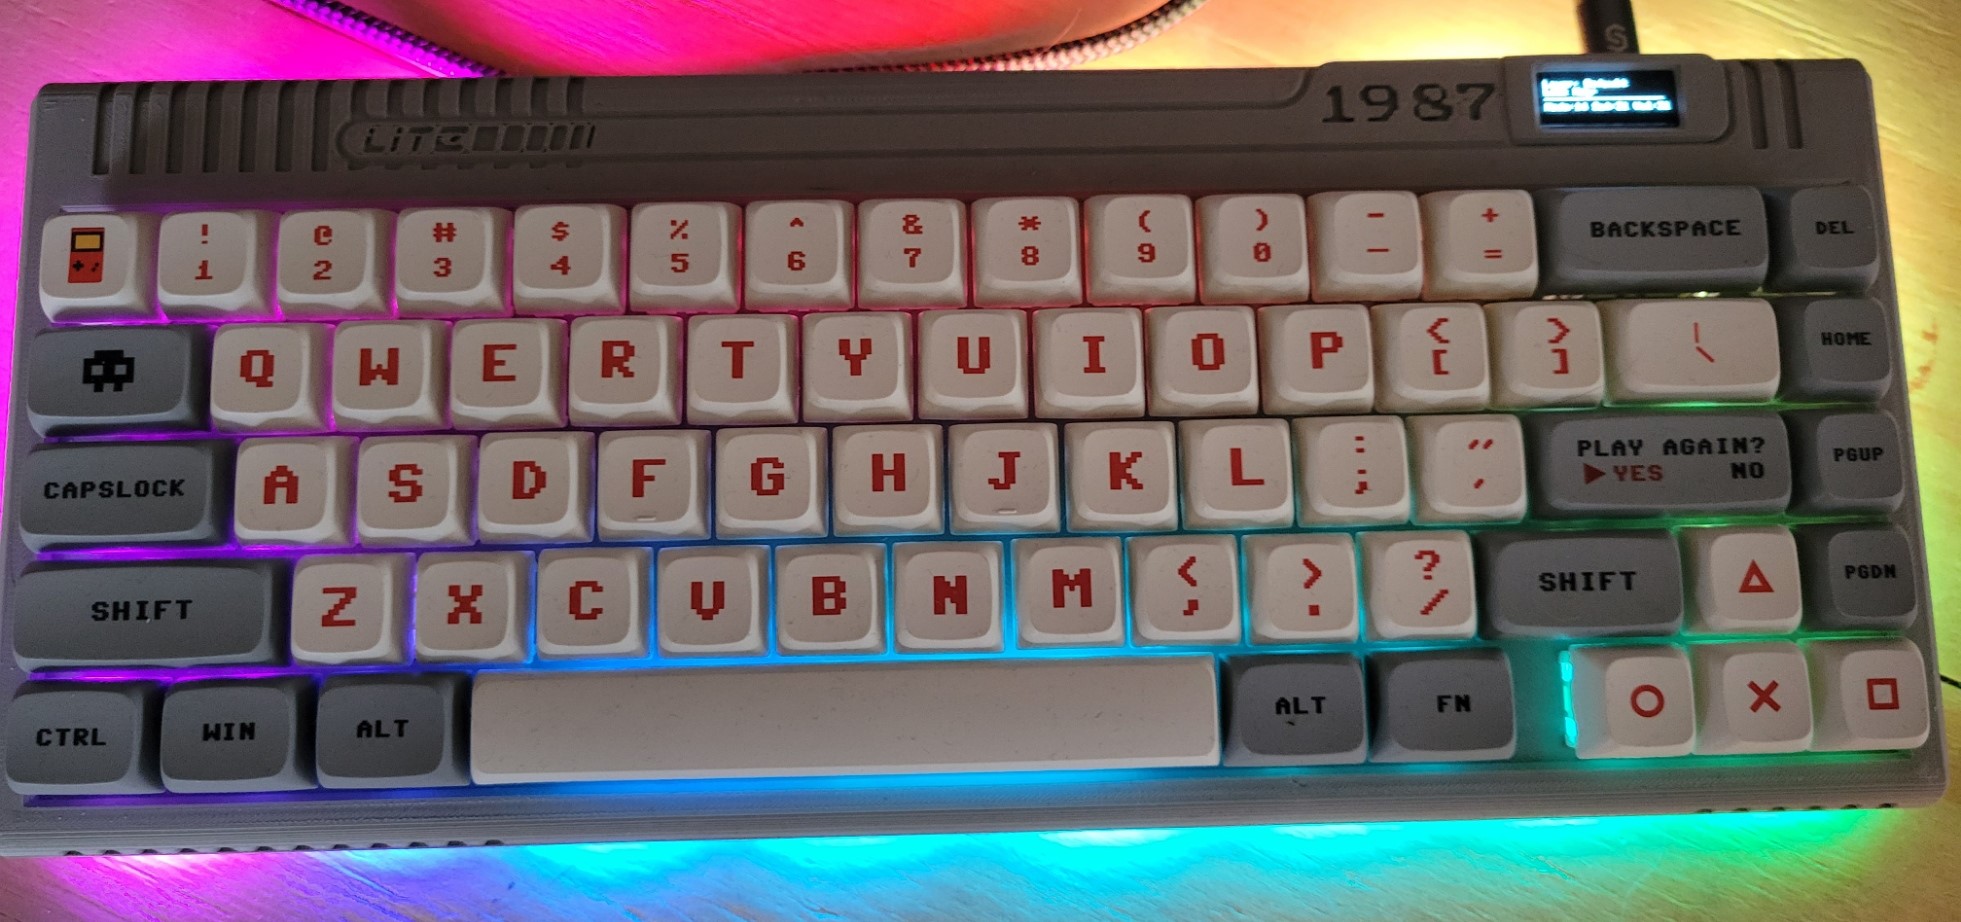
<p>Since my first published keybboard was The1987 (https://www.printables.com/model/299777-the1987-a-modular-retro-inspired-87-key-mechanical) and it's fairly popular, and its designed around the Phantom circuit board and Teensy 2.0, which are no longer available, i felt it was time to take the design concept - and make something new! good for all of us right?</p><p>I wanted to recreate this keyboard that pulled from 80's design styles - especially consumer electronics, PCs and video game systems. I still love the 80's grey everything that my 12 year old self drooled over and i needed to recapture it again. So like the designers in the 90's - i took the successful 80's design, made it smaller and added some lighting and gadetry and called it the something something Lite! Exciting!</p><p>the name was originally a play on the TKL (87 keys) and the 1980's ... but whats in a name...its the though that counts...not shamelessly playing on the popularity off a thing while loosing a little of the meaning right?</p><p>i don't know, let me know what you think in the comments</p><p>Parts list:</p><ul><li>67x Cherry MX style mechanical key switches</li><li>A set of Keycaps - I used these awesome videoarcade themed ones <a href="https://www.amazon.com/dp/B08T9BJ34H?psc=1&ref=ppx_yo2ov_dt_b_product_details">https://www.amazon.com/dp/B08T9BJ34H?psc=1&ref=ppx_yo2ov_dt_b_product_details</a></li><li>I had a Proton-C available, so the firmware is there if you have one, as well as a bottom case</li><li>Or A Keeb.io Elite-C <a href="https://keeb.io/products/elite-c-low-profile-version-usb-c-pro-micro-replacement-atmega32u4">https://keeb.io/products/elite-c-low-profile-version-usb-c-pro-micro-replacement-atmega32u4</a> or Elite-Pi <a href="https://keeb.io/products/elite-pi-usb-c-pro-micro-replacement-rp2040">https://keeb.io/products/elite-pi-usb-c-pro-micro-replacement-rp2040</a></li><li>18x Ws2812B RGB LED Modules <a href="https://www.amazon.com/dp/B01DC0J3UM?psc=1&ref=ppx_yo2ov_dt_b_product_details">https://www.amazon.com/dp/B01DC0J3UM?psc=1&ref=ppx_yo2ov_dt_b_product_details</a> (way more than enough light, and no power issues)</li><li>1x 0.91 Inch I2C OLED screen <a href="https://www.amazon.com/dp/B08L7QW7SR?psc=1&ref=ppx_yo2ov_dt_b_product_details">https://www.amazon.com/dp/B08L7QW7SR?psc=1&ref=ppx_yo2ov_dt_b_product_details</a></li><li>67x IN4148 diodes - i keep these around <a href="https://www.amazon.com/gp/product/B079KJ91JZ/ref=ppx_yo_dt_b_search_asin_title?ie=UTF8&psc=1">https://www.amazon.com/gp/product/B079KJ91JZ/ref=ppx_yo_dt_b_search_asin_title?ie=UTF8&psc=1</a></li><li>8x M3x12mm pan head machine screws (to assemble the case)</li><li>2x M3x6mm pan head machine screws (to attach the feet)</li><li>8x M3x4x5 Brass threaded inserts (to heat insert into the TOP PLATE screw holes)</li><li>Clear or White filament for the bottom of the case i used this</li><li>Various wire, soldier, etc. etc.</li></ul><p>Print Settings</p><p>Anycubic Large Size Chiron</p><p>Rafts: No</p><p>Supports: Yes</p><p>Resolution: 0.2 mm should be fine</p><p>Infill: i used 15%</p><p>Filament brand: Hatchbox Gray PLA and Clear for the first 4mm (I used Sunulu Clear PLA)</p><p>Notes:</p><p>Print the Bottom plate to about 4mm in clear and switch to your filament from clear to a the Grey or a color like i did.</p><p> </p><p>Post-Printing</p><p><img src="https://cdn.thingiverse.com/assets/3a/d1/84/6e/35/9be8684a-bd40-487d-ae10-c8601207642b.jpg"><img src="https://cdn.thingiverse.com/assets/03/00/8a/95/ab/2525495f-21c7-45d9-ba28-2e214c16e667.png"></p><p> </p><p>The Column to Row wiring diagram is reversed, so it appears just as it would when you have the back of the key plate facing you during soldering.</p><p>Then the Column and Row numbering in that image correspond to the pin assignments in the Elite-C and Elite-Pi pin-outs</p><p> </p><p>RGB and OLED:</p><p>For the OLED, i had to bend the pins slightly to add some clearance inside the case, YMMV<br>The OLED Displays Layer Info,, Lock Keys (CAP , SCR, and NUM) and the RGB Mode, Color Saturation and Color Value numbers</p><p>For the RGB Buttons, i glued the mount discs and then wired and hot-glued the buttons into place. The firmware provides for 18 (you can use fewer if you choose, but some animations may have a gap). I paced 8 across the front edge, 3 on each side, and 4 across the back.</p><p> </p><p>Key Map:</p><p>The Key Map is essentially the same as TheAlternate and match the keycaps in the photos - these are the function keys:</p><p>Fn+Q = resets the keyboard (no bootloader)<br>Fn+R = Resets to bootloader for flashing<br>Fn+the number row = F1 through F12 (Minus and Equals are F11 and F12)<br>Fn+P = Print Screen<br>Fn+[ = Scroll Lock<br>Fn+] = Pause<br>Fn+Del = Mute<br>Fn+Home = End<br>Fn+Right Arrow = Insert<br>Fn+PgUp = Volume Up<br>Fn+PgDn = Volume Down<br>Fn+Caps Lock = Cycles RGB Modes Forward (Adding Shift Reverses)<br>Fn+A = Cycles RGB Hue Increase (Adding Shift Decreases) - this only applies to some modes<br>Fn+S = Cycles RGB Saturation Increase (Adding Shift Decreases)<br>Fn+D = Cycles RGB Value Increase (Adding Shift Decreases)<br>FN+F = Toggles RGB On and Off</p><p> </p>
With this file you will be able to print The1987Lite - A Handwired 65% revision of The1987 TKL with OLED and RGB! with your 3D printer. Click on the button and save the file on your computer to work, edit or customize your design. You can also find more 3D designs for printers on The1987Lite - A Handwired 65% revision of The1987 TKL with OLED and RGB!.