The Ultimate Fidget Cube
prusaprinters
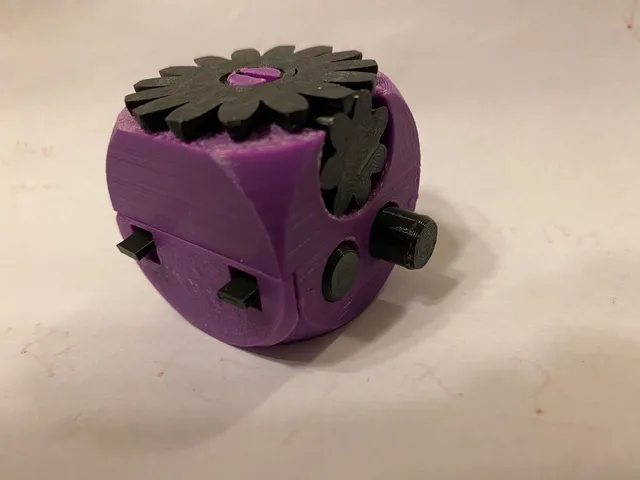
This is my attempt at a fidget cube. I saw lots of fidget toys that are printable, but they're just a single thing, I wanted more “things” to satisfy my fidgeting. So I designed this cube to be a lot of fidget toys in one. You can even unscrew it in half and use the bottom as a…. well…. top! (A spinny top!) Print it in fun colors! SOME ASSEMBLY REQUIRED!I really tried to make this “print in place" and if any of the parts of the cube were alone, they could be printed in place, but the simple fact is that since all of these things are on different planes, it's extremely difficult to make them print in place. The assembly is VERY easy, but it still needs to be done. I will post assembly pictures shortly. You do NOT need glue, although some may choose to use it. (I haven't glued mine and it's perfect.) PRINTING SETTINGSBecause of the small parts and holes present on this model, you should print at 0.1 mm layer height. I used a 0.4 mm nozzle and 0.4 mm width. Some of the parts (like the spring) absolutely will not print at 0.2 mm height. The body can be printed with 0.2mm height if you wish, although it's really not a long print so I still printed at 0.1mm height. Everything should ALREADY be rotated to be the correct way up for printing. You should not have to rotate anything. Only two files require support, one is the “nut side” and one is the “slider switch”. The rest can and should be printed without support. The ones that DO need support only need support to the baseplate. ASSEMBLY INSTRUCTIONSThe “slider spring," “slider switch," and “slider cover” all go on the side of the cube with the long thin rectangle. The “spring” goes in first (it'll only fit nicely one way), then the switch, then the cover obviously. Make sure the holes that the cover pushes into are unobstructed or you'll end up breaking the parts that go into the holes. If you are worried that this cover will fall off, put a tiny drop of superglue in each of the holes. But it's REALLY not required. Mine shows no hints of falling off. The two “rocker switches” go on the other side of the screw half They can only really go one way, just shove the pin down into the hole. You have to approach it at an angle, but it'll go in. Also make sure there are no strands of filament between the “tines” of the pins preventing them from compressing. Then put the rocker cover on, same advice as for the other side. The “switch handle” and “switch pin” are both used in the lightswitch like side. The switch handle only goes in one way (look at the beveled edge). You may have to tap the pin in with something hard as it's a tight fit (it has to be to get that satisfying “click”). You HAVE to install this before installing the top gear (because the top gear prevents this thing from being removed.)The gears (big gear and small gear) can only fit one place. And they are TIGHT. At least they were for my prints. Don't worry about breaking the tines on top. they're pretty dang strong. The buttons just get pushed into the holes, pretty simple. You may want to touch the bumps on the buttons with a bit of sandpaper to get a smoother button push. But it'll eventually develop that eventually. Finally, screw both halves of the cube together. They should “snap” together in the correct orientation when it's tight enough. You'll feel it. Yes I did that on purpose because I would be SUPER annoyed if, when it was tight, it wasn't aligned. POST ASSEMBLY INSTRUCTIONSThis model gets better with time. Everything will be a bit tight when you first put it together, but move everything back and forth a bunch and it'll smooth out. The only thing I would recommending sanding (not at all required) is the bumps on the cylindrical push buttons. They'll make that action much smoother and more satisfying. I just literally touch mine with a single swipe of sand paper and it's good. SCALINGI would not recommend scaling this thing down much more than it already is. The “buttons” and gears likely work at 66%, but the other fidgets would be impossible to print. If that's all you want, then by all means, print it smaller. I actually designed this to be ~25mm^3, but some of the parts were impossible to print at that size so I scaled it up to 150%. If you had a resin printer, then you could very likely get it to work at 66%. I HAVE confirmed that the buttons and gears do work at that size though. No, it was definitely not because I forgot to scale them to the final size before hitting the print button. That's definitely not the reason. Not at all. I definitely don't have at least a full cube's worth of smaller parts I forgot to scale. FILES TO DOWNLOADI have organized the files a couple of different ways. The first way is “supports" vs “no supports.” If you do not care about multiple colors, simply download these two files and print the “no supports one” without supports, and the “needs supports” one WITH supports. If you want to make it multicolored, I have separated them further by base color and contrasting color and supports. Finally, I have attached the individual files if you want to make them all sorts of wild colors!
With this file you will be able to print The Ultimate Fidget Cube with your 3D printer. Click on the button and save the file on your computer to work, edit or customize your design. You can also find more 3D designs for printers on The Ultimate Fidget Cube.