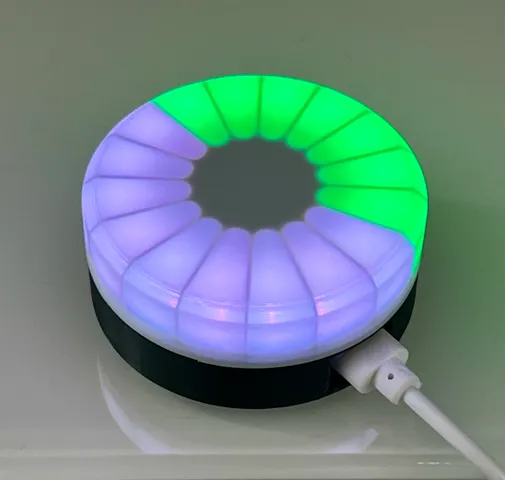
The Ultimate 3D printed case for LED Ring and D1mini ESP8266
prusaprinters
A fully 3D printed enclosure to create a progress circle and alert notifier using a WS2812B 16 LED ring and ESP8266 D1mini. Using WLED firmware enable WiFi control, accessible through the WLED app or your home automation software, such as Home Assistant.For instance, I've placed mine in the living room. It displays the ongoing 3D print progress, change color when finished and display the temperature, then flash green once the bed is lower than 30°C. It also flashes white/red to notify when the garage door is open.Fusion 360 and STEP files are included to allow remix culture :-).Print instructions Diffuser.2mm quality layers vase modePETG white translucideNo brimNo supportOther partsStandard .2mm quality layersPLA filament (print separator in black)No brimNo supportRequirementsBasic knowledge of soldering wiresD1mini like ESP8266 board (AliExpress for example)16 Led ring (AliExpress for example)2 M3x5mm screwsWLED Firmware (online installer is super simple and include WiFi setup)5V/1A charger with correct USB cable to power the D1miniInstallationAssemble the LED ring and the D1mini into the 3D printed parts to make sure they fit into and check how you are going to solder the wires.In my case, the LED ring consumes less 0.5A max (and I don't often go max brightness for all leds & colors), so I decided to directly power the LED ring using the D1mini pins, and power the D1mini with a regular 5V/1A charger connected to its USB connector. With that level of current, this didn't create issue on my side so far.Cut the connector and shorten the LED ring wires to limit the amount of wire into the case. I tried to reduce the form factor as low as possible.Solder the 3 wires to the +5V, D4, GND D1mini pins (check the official WLED doc for further details).Flash the D1mini with the WLED firmware (online installer is super simple and include WiFi setup), check everything is working by connecting to WLED using the app or the web interface, go to Settings, Led Preferences, set Led outputs/length to 16 and save/restart. You should be good to go.Once the wires are connected, Leds response correctly using WLED, and everything fits into the body, just glue the diffusor to the main body.Enjoy!
With this file you will be able to print The Ultimate 3D printed case for LED Ring and D1mini ESP8266 with your 3D printer. Click on the button and save the file on your computer to work, edit or customize your design. You can also find more 3D designs for printers on The Ultimate 3D printed case for LED Ring and D1mini ESP8266.
