The Tekhenu lamp
prusaprinters
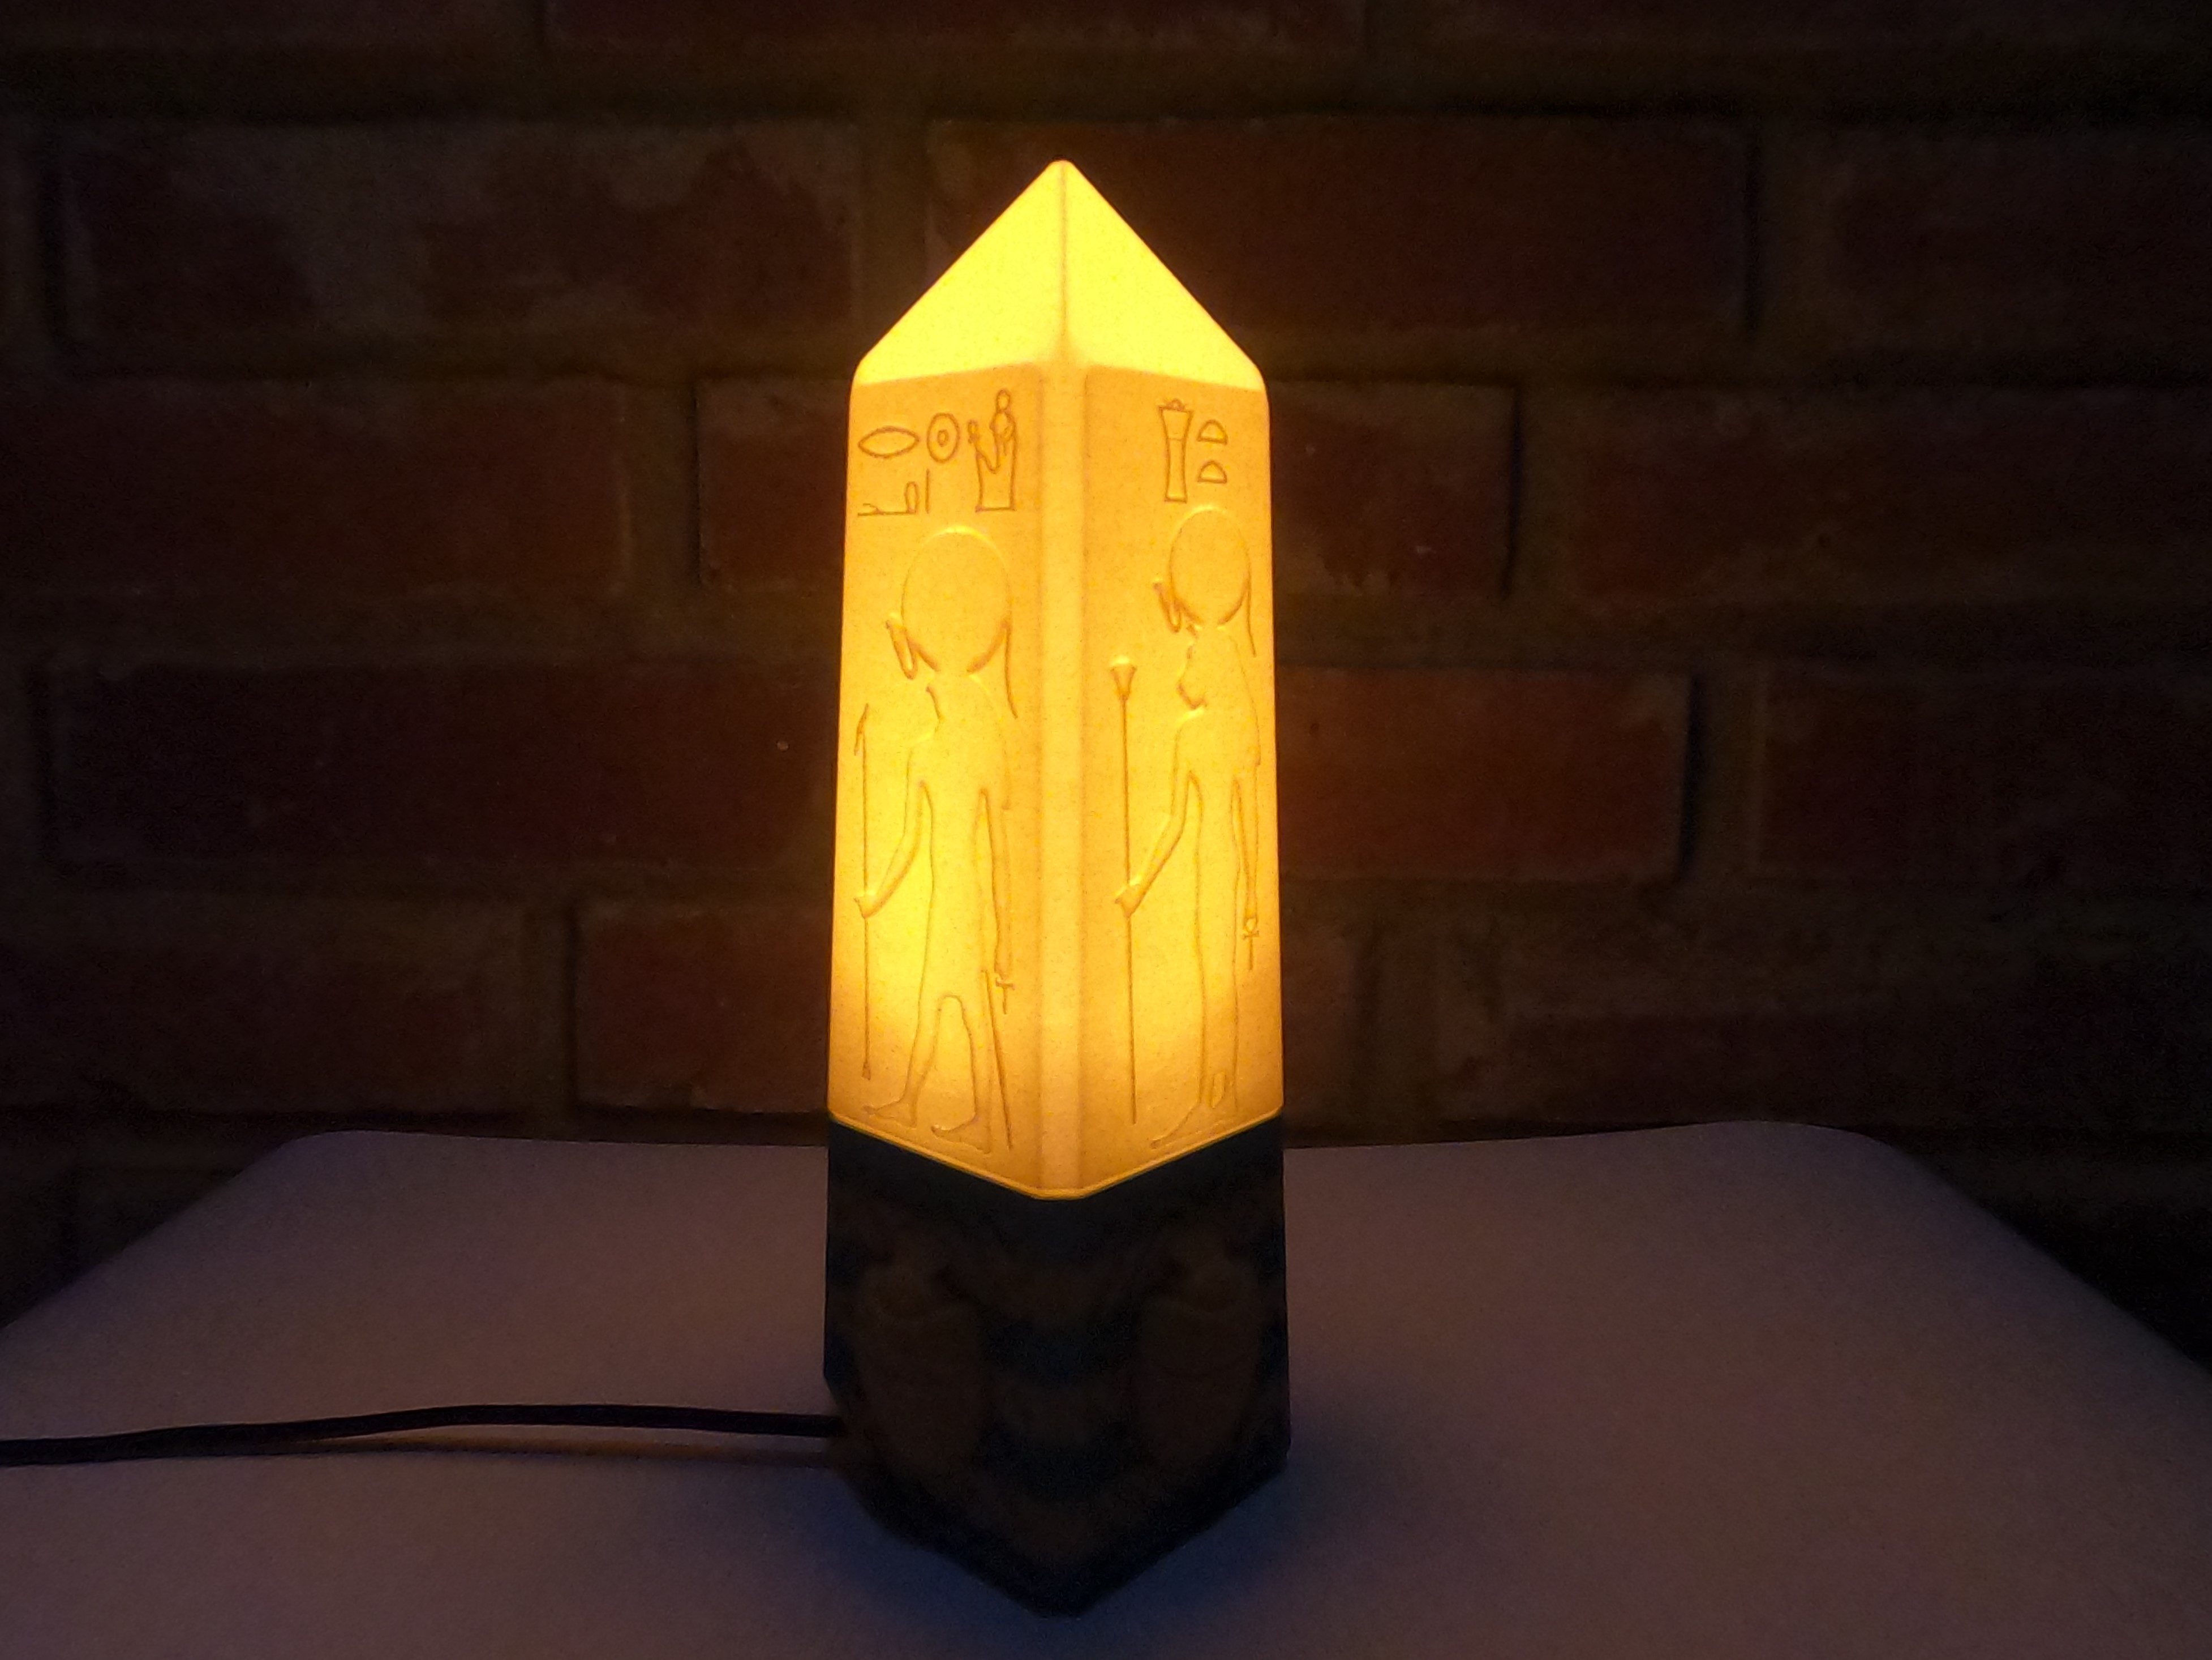
<p><b>The Tekhenu lamp</b></p> <p>All parts of the lamp are optimized for FDM 3D printer. They are designed to be printed without supports, and are ready to assemble without additional post process.<br/> Dimensions: 241.5mm X 69,7 X 69,7<br/> The lamp consist of two parts - lampshade and base, which are connected by Easy mount system with Neodymium Disc magnets. The advantage of this system is that you do not need to deal with any screws, nuts and rings to install the lampshade, simply dock it. The assembly process is very easy.<br/> Thanks to high-quality Prusa printer, assembled Tekhenu lamp will look very nice and beautiful.</p> <p>The Tekhenu 3D printed lamp is designed in ancient <a href="https://en.wikipedia.org/wiki/Obelisk">Egyptian Obelisk stone</a> style.<br/> Each side of the lampshade has unique (different) relief of ancient Egyptian deity representing its own meaning:<br/> <a href="https://en.wikipedia.org/wiki/Ra">Ra</a> - God of the sun, a principal god, creator of the universe and the source of life;<br/> <a href="https://en.wikipedia.org/wiki/Bastet">Bastet</a> - Goddess of cats, love, the home, joy, motherhood, childbirth and women;<br/> <a href="https://en.wikipedia.org/wiki/Thoth">Thoth</a> - God of wisdom, writing, science, magic, art and judgment;<br/> <a href="https://en.wikipedia.org/wiki/Horus">Horus</a> - God of kingship and the sky.<br/> Each side of the base has an important Egyptian symbol of immortality, resurrection, transformation and protection - <a href="https://en.wikipedia.org/wiki/Scarab_(artifact)">scarab</a>.<br/> <b>The Tekhenu Lamp will fill the room with warm desert light of the Era of the ancient pharaohs. </b></p> <h3>Print instructions</h3><p><b>Printing:</b><br/> All parts are printed on Prusa I3 MK3S, all the settings are in 3MF files except:<br/> Base, base top cover and base plug are printed on Textured PEI Powder-coated Sheet to achieve the best look;<br/> Shade is printed on Smooth PEI sheet to achieve the better adhesion while not using the brim.</p> <p><b>Filament:</b><br/> In this design two colors of Fillamentum filament are used.<br/> <a href="https://fillamentum.com/collections/pla-extrafill-filament/products/pla-extrafill-turquoise-blue">Turquoise Blue</a> and <a href="https://fillamentum.com/products/pla-extrafill-mukha">Mukha</a></p> <p><b>Parts and tools <u>(Pic1)</u>:</b></p> <ol> <li>Shade</li> <li><a href="https://www.amazon.co.uk/Spider-Magnetics-Ltd-Neodymium-diameter/dp/B00Z70N1GI/ref=sr_1_9?dchild=1&keywords=neodym+magnets+5mm+x+3mm&qid=1600117587&sr=8-9">Neodymium Disc magnets 5mm x 3mm</a> - 4pcs</li> <li><a href="https://www.tme.eu/hu/en/details/56324300/light-sources-lighting/philips/8718696728291/">GU10 led lamp</a>- the best choice is 225-280lm and 3000K lamps.<br/> <u>Lamp recomendation:</u> do not choose too powerful and bright lamp as it may be too hot, also the shade will be very bright and not so good looking. Also the length of the GU10 lamp has to be 53-54mm.</li> <li>Base top cover</li> <li><a href="https://www.amazon.co.uk/Spider-Magnetics-Ltd-Magnets-Neodymium/dp/B00Z6RCPE6/ref=sr_1_2?dchild=1&keywords=neodym+magnets+5mm+x+3mm&qid=1600117587&sr=8-2">Neodymium Disc magnets 5mm x 1mm</a> - 4pcs</li> <li><a href="https://www.tme.eu/hu/en/details/b3x12_bn13577/screws/bossard/2000261/">Screws for plastic 3x12</a> - 2pcs</li> <li><a href="https://www.tme.eu/hu/en/details/pw-d.3187/light-sources-holders/pawbol/d-3187/">GU10 lampholder</a></li> <li>Base</li> <li>Scarab - 4pcs</li> <li><a href="https://www.tme.eu/hu/en/details/s1w-2_07_1.5bk/universal-and-computer-power-cords/goobay/51350/">Cable with on/off switch</a></li> <li>Base plug</li> <li><a href="https://www.google.com/search?q=Nylon+cable+ties&sxsrf=ALeKk006VweiGFz7QXZABxMj706Yk_U4sA:1600190990611&source=lnms&tbm=isch&sa=X&ved=2ahUKEwjfkMX81-vrAhUllYsKHSXIB1YQ_AUoAXoECA0QAw&biw=1536&bih=722">Nylon cable ties</a> - 1pc</li> <li>Superglue gel</li> <li>Sand or cement</li> </ol> <p><b>Assembly instructions:</b><br/> The lamp consist of two parts - lampshade and base, which are connected by magnets, so the first step is to glue the magnets to the base top cover and to the shade.<br/> <b>ATENTION:</b> before gluing the magnets make sure you are installing them all in the same polarity, if you mess up the polarity the shade will not connect to the base properly.</p> <p><b>To avoid messing the polarity follow next steps:</b></p> <ol> <li>All 8 magnets join in one tower - 5x1 magnets on one side 5x3 on the other <u>Pic2</u>;</li> <li>Drip some glue into the installation spots on the base top cover <u>Pic3</u>;</li> <li>Push the 5x1 side of the tower into the spot and slide away - first magnet is installed, continue with all the 4 pieces of 5x1 mm magnets <u>Pic4</u>;</li> <li>Flip the base top cover and attach two pieces of electrical insulation tape;<br/> <i>Next step will be to glue the magnets into the shade - so electrical insulation tape will protect the base top cover from gel glue which can drop down by accident and ruin the best look of the surface</i>;</li> <li>One by one join the magnets from the rest of the tower <u>Pic5</u>;</li> <li>Apply gel glue into all 4 mounting places on the shade <u>Pic6</u>;</li> <li>Gently press the shade on to the magnets <u>Pic7</u>;</li> <li>Pinch the magnets in places with your fingers <u>Pic8</u>;</li> </ol> <p><b>Gluing parts:</b><br/> <b>ATENTION</b> Before applying glue make sure there are no filament anomalies (retraction and unretraction spots, over extrusion marks, stringings e.g) in places of gluing, if there are so - clean them away.</p> <ol> <li>Apply gel glue on each scarab and press it to each side;</li> <li>Apply gel glue onto the places of gluing on the base, and press the base top cover to the base <u>Pic9</u>;</li> <li>Let the glue to cure for some time;</li> </ol> <p><b>Wiring:</b></p> <ol> <li>Сut and strip wires on cable and lamp holder, make the overall length as short as possible (3-4cm) <u>Pic10</u>;</li> <li>Insert the cable into the base <u>Pic11</u>;</li> <li>Join them together;<br/> <b>ATENTION:</b> - pay full atention to safety when isolating the wires. They <b>MUST NOT</b> contact each other - the better way is to use heat-shrink tubing <u>Pic12</u>;</li> <li>Fasten the nylon cable tie - it will prevent the cable from sliding out of the base <u>Pic13</u>;</li> <li>While pulling on the cable, route the wires inside so that they pass between the mounts;</li> <li>Screw the lampholder <u>Pic14, Pic15</u>;</li> <li>Install the lamp;</li> <li>Dock the shade to the base.</li> </ol> <p><b>Weight balancing:</b><br/> The base is printed with no infill to save a lot of filament and printing time. Also, even printed with 15-20% of infill it is still not heavy enough and may easily slide down from the table and brake.<br/> To balance the weight there is a hole in the bottom of the base. You may fill the base simply with sand, and glue the plug.<br/> But if you fill it with concrete, there will be a feeling of a more solid and quality product.<br/> <b>ATENTION:</b> if you choose to balance with concrete than you need to do it before wiring procedure or remove all wiring and lampholder. Freshly prepared concrete contains water, so water can penetrate through the walls and wet the wires. So pour concrete, let it dry for 1-2 days to absorb all the water, and only then assemble the wirings.</p> <p><b>Enjoy the spirit of ancient egypt</b></p>
With this file you will be able to print The Tekhenu lamp with your 3D printer. Click on the button and save the file on your computer to work, edit or customize your design. You can also find more 3D designs for printers on The Tekhenu lamp.