The PickleWhoop (20, 25 & 30) : cinematic whoop frame
prusaprinters
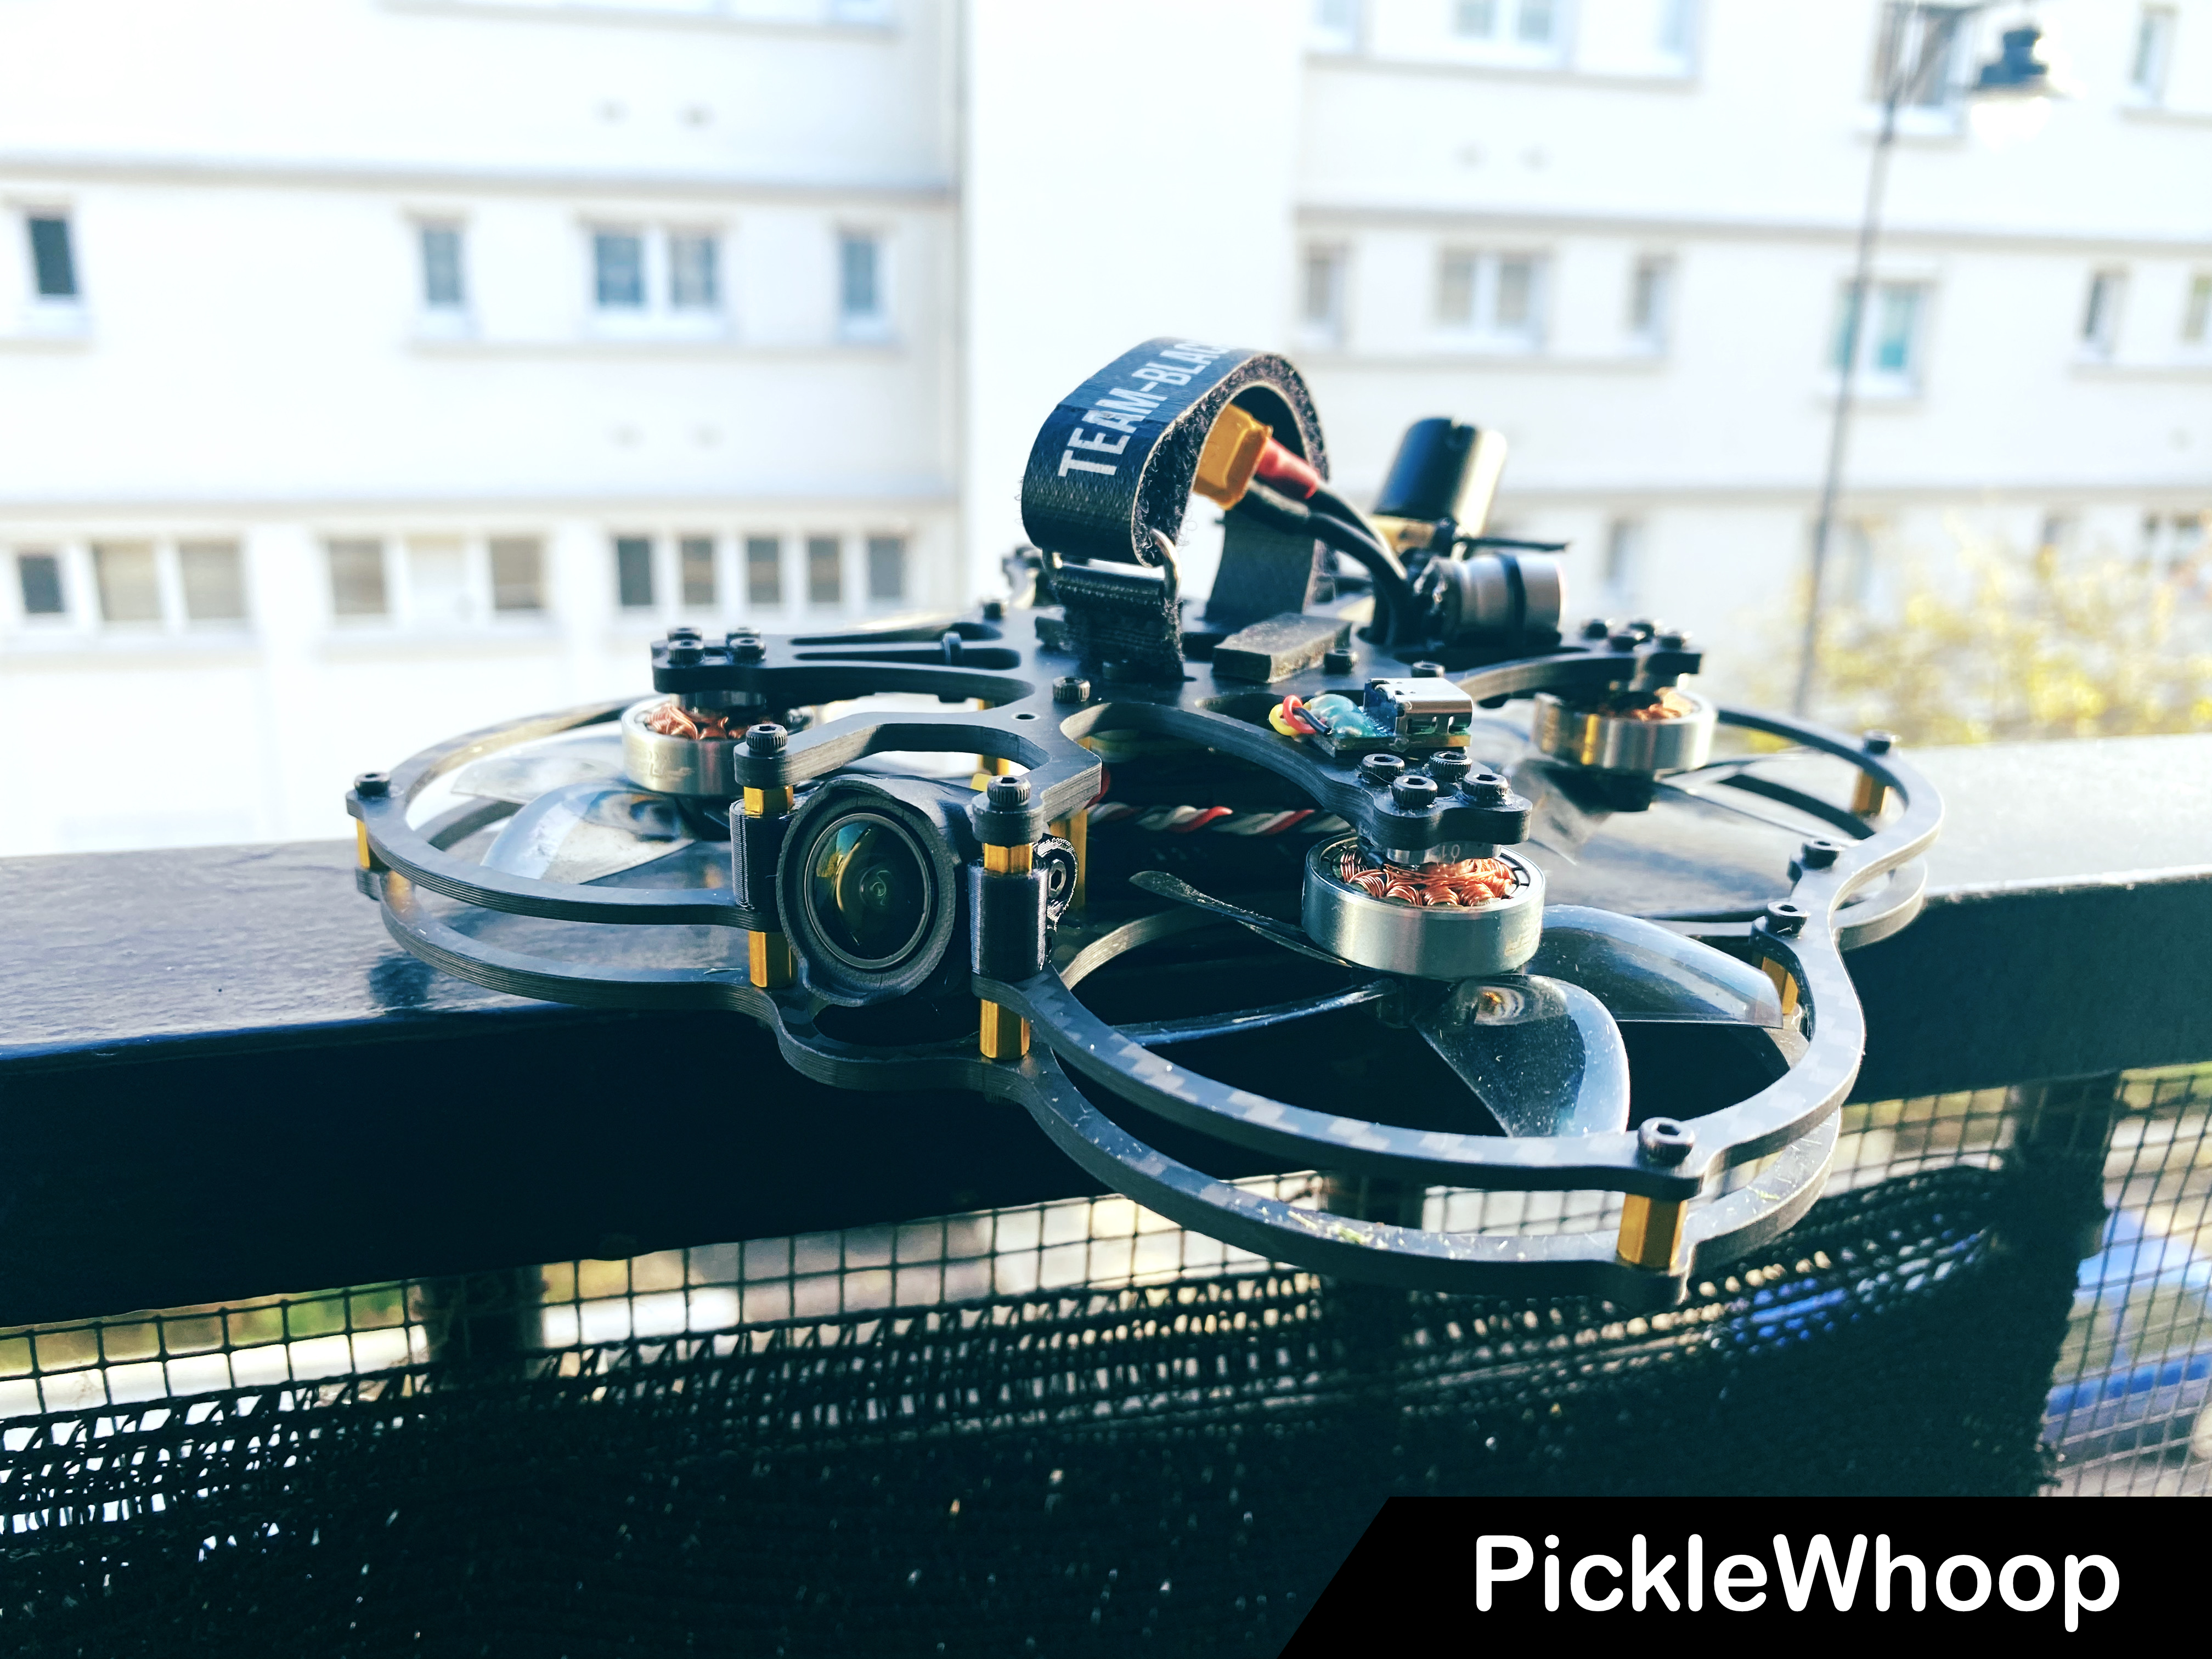
<p>Reach me on social medias for questions, news and support [<a href="https://www.instagram.com/ledrone.club/">Instagram</a>] [<a href="https://www.facebook.com/ledrone.club">Facebook</a>] [<a href="https://www.youtube.com/c/ledroneclub">YouTube</a>]</p><p>If you like my work you can [<a href="https://ko-fi.com/ledroneclub">support me via ko-fi</a>]</p><p>------</p><h4>Updates</h4><ul><li>2022/11/26 : added my Betaflight 4.3.2 cli dump for the pw25 + DJI O3</li><li>2022/11/25 : added a better fitting camera mount (v1-1) + antenna support </li><li>2022/11/23 : added a camera mount for the new DJI O3. It should work fine on the 25 and the 30.</li><li>2022/10/25 : added a V2 version of the PW25. I remade quite a few details but all components can individually mixed with V1 elements (all mounting hole patterns are the same). What's new on the V2 : redesigned ducts with an outer continuous line (allowing easy led fitting), the frame itself now have 4 holes to fit the HD camera adapter. The camera sits a lot back thus having a better center of gravity, you need 4 M2 pressnuts for those holes. I also made the arms slightly wider (+0.5mm) to stiffen them further. The overall carbon weight went up by 1.5g but the frame should work better and be more convenient.</li><li>2022/10/19 : added a specific bottom plate for the PW20 + a better mount for the nebula pro nano (the camera sits better in the frame)</li><li>2022/10/07 : added 20 (2inch) version + specific cam mounts</li><li>2022/09/29 : added DJI Avata / Axis C157 motor support on the 3" version !</li><li>2022/09/26 : added 30 (3 inch) version</li></ul><p> </p><p>Meet the PickleWhoop, it's a tiny FPV cinematic frame with prop guards for slow and proximity flights.</p><p>I wanted something that's easy to build and to produce so i gave up on printable ducts. Those are heavy and requires specific materials for the best results. So here only carbon, just to prevent propellers to hit something or someone.</p><p>The result is a frame that weights a bit less than a same size Foxwhoop or CL25 frame that is easier to build, have more room for gear and that is more silent in flight.</p><figure class="media"><oembed url="https://www.youtube.com/watch?v=hsjlG1eXs5A"></oembed></figure><h4> </h4><h4>Frame Specs</h4><ul><li>3 sizes : 20 (2" props), 25 size (2.5" props) and 30 size (3" props)</li><li>WideX Layout</li><li>PW20 : supports 9x9 motors only</li><li>PW25 & PW30 : Supports 9x9 and 12x12 motors (+10x10 3 hole on the 3" for DJI Avata & <a href="https://www.axisflying.com/product/axisflying-c157-motor-for-dji-avata-to-get-more-powerful/">Axis C157 motors</a>)</li><li>Support AIO FC (25.5x25x5 mount)</li><li>AIO and 20x20 mounts on the bottom plate (for the vista or other, easy access for work with detachable bottom plate)</li><li>HD Cam shoe that support Foxwhoop and CineLog cam mounts (M3 screw though)</li><li>Normal or toilet tank battery installation.</li><li>Adjustable height prop guard (you can go from very thin to cover the whole side just by playing with standoffs size, more on that below</li><li>frame weight : <ul><li>PW20 : 25g of carbon</li><li>PW25v2 : 41.5g of carbon (add 10-12g of hardware)</li><li>PW30 : 49.5g of carbon (add 10-12g of hardware)</li></ul></li></ul><p> </p><h4>Fitting the DJI O3 AIR UNIT</h4><p>It's a bit tricky but it can be done on the 25 and the 30 versions. Beside the specific mounts provided here you have to fit the air unit in the center of the frame. I needed to use 2mm nuts to lower the bottom plate and get a total of 25mm build height. </p><p>The AIO FC (no stack would fit) must be installed as low as possible. I used 10mm screws to attach the FC to the frame. For the Air Unit itself the best option to install it is upside down (the serial and compliance infos facing up). To attach to the bottom plate the best option is … 3M VHB tape, thin one. </p><p>The screws of the air unit are unusable to attach it to anything (thin M1.4 screws) and using a TPU case will be bulky, heavy and add height.</p><p>To sum up : tricky but doable.</p><p> </p><h4>Mounting harware</h4><p>the frame is intended to have a relatively low profile guards so my recommended hardware is for 6mm between guards, though many combinations are possible.</p><p>for a 6mm between guards and 18mm from plate to plate (it fits a naked vista) you need :</p><ul><li>12 x <a href="https://www.aliexpress.com/item/4001231358869.html">M2 6mm standoffs</a> (attaching the guards)</li><li>4 x <a href="https://www.aliexpress.com/item/4001231358869.html">M2 10mm standoffs</a> (front and back to give the correct height)</li><li>4 x <a href="https://fr.aliexpress.com/item/32958289804.html">M2 18mm standoffs</a> (central part of the frame)</li><li>4 x M2 14mm screws (attaching the front and back standoffs and guard)</li><li>16 x M2 5mm screws (attaching outer standoffs of the guards)</li><li>12 x M2 7mm screws (attaching the taller standoffs to the guards and frame)</li><li>I also use M2 12mm for the fc and vista (add 4 + 4 then)</li><li>PW20 : 5 x <a href="https://betafpv.com/products/m2-clamping-nuts">M2 pressnuts</a> : 4 on the bottom plate to screw down the Vista or any 20x20 or 25.5x25.5 vtx (Analog, Walksnail, HDZero, whatever). 1 pressnut on the lower guard front hole to attach the bottom plate.</li><li>PW25 : 9 x <a href="https://betafpv.com/products/m2-clamping-nuts">M2 pressnuts</a> : 4 on the bottom plate to screw down the Vista or any 20x20 or 25.5x25.5 vtx (Analog, Walksnail, HDZero, whatever). 1 pressnut on the lower guard front hole to attach the bottom plate. 4 pressnuts for the camera mount.</li><li>PW 30 : 7 x <a href="https://betafpv.com/products/m2-clamping-nuts">M2 pressnuts</a> : 4 on the bottom plate to screw down the Vista or any 20x20 or 25.5x25.5 vtx (Analog, Walksnail, HDZero, whatever). 3 pressnuts on the lower guard front hole to attach the bottom plate.</li></ul><p>→ Check in the images, there's a hardware table by element & quantity. </p><p>You can adjust the height between the guards by picking standoffs of different tallness, just take into consideration that the upper guards are 2mm thick so there must be a 2mm difference between core standoffs and outer standoffs (that attaches the guards). </p><p>Ex : my setup have 6mm between guards and 18mm core standoffs so i need additional 10mm standoffs front and back to have same height everywhere. You can also make guards 8mm between them + 8mm to give the raise to 18mm. Or say crap i want a boxed frame (guards to the top) so you can use 16mm standoffs for the guards all around + 18mm standoffs for the core. You get the idea ? If any doubt ask me.</p><p> </p><h4>Getting the frame cut</h4><p>My recommended places are [<a href="www.cncmadness.com">www.cncmadness.com</a>] (CA/US/Worldwide) and [<a href="www.carbon-posten.de">www.carbon-posten.de</a>] (EU/Germany), [<a href="https://www.facebook.com/profile.php?id=100083354461958">CNC DRONE 91</a>] (EU/France), [<a href="https://www.facebook.com/Hautvarfpv">Haut Var FPV</a>] (EU/France). Great quality cuts and fair pricing/delivery time.</p><p>you need to send the provided DXF files with the following instructions :</p><h5> </h5><h5>PW20 (2" props) :</h5><ul><li>1 x PW20 frame : 2.5mm thick Carbon Fiber</li><li>1 x PW20 lower guard : 2.5mm thick Carbon Fiber (try 2mm for ultralight builds)</li><li>2 x PW20 upper guards : 2mm thick carbon Fiber</li><li>1 x PW20 bottom plate : 1.5mm thick carbon fiber (or 1mm if you prefer to save ~1g)</li></ul><h5>PW25 (2.5" props) :</h5><ul><li>1 x PW25 frame : 3mm thick Carbon Fiber (try 2.5mm for ultralight builds)</li><li>1 x PW25 lower guard : 3mm thick Carbon Fiber (try 2.5mm for ultralight builds)</li><li>2 x PW25 upper guards : 2mm thick carbon Fiber</li><li>1 x PW bottom plate : 1.5mm thick carbon fiber (or 1mm if you prefer to save ~1g)</li></ul><h5>PW30 (3" props) :</h5><ul><li>1 x PW30 frame : 3mm thick Carbon Fiber</li><li>1 x PW30 lower guard : 3mm thick Carbon Fiber</li><li>2 x PW30 upper guards : 2mm thick carbon Fiber</li><li>1 x PW bottom plate : 1.5mm thick carbon Fiber</li></ul><p>You can optionally ask for countersunk holes on the top plate and have your screws sitting flush (center and rear holes eventually).</p><p>Feel free to ask me for directions and help.</p><p> </p><h4>My Setup (PW25)</h4><ul><li>T-Motor P1604 3800 Kv Motors</li><li>Diatone Mamba F722 MK1 aio (running BF 4.3.1 + BlueJay esc firmware)</li><li>Naked CaddxFPV Vista + Nebula Pro cam</li><li>TBS Crossfire RX + Minimortal-T antenna</li><li>650 mAh lipo</li><li>Naked gopro or Thumb or whatever light HD cam (a full gopro may work too i guess)</li></ul><p> </p><h4>Configuration Dumps </h4><ul><li>PW25 + DJI O3 on Betaflight 4.3.1 + BlueJay + RPM Filters : <a href="https://pastebin.com/HkhzHnRq">https://pastebin.com/HkhzHnRq</a> </li></ul><p> </p>
With this file you will be able to print The PickleWhoop (20, 25 & 30) : cinematic whoop frame with your 3D printer. Click on the button and save the file on your computer to work, edit or customize your design. You can also find more 3D designs for printers on The PickleWhoop (20, 25 & 30) : cinematic whoop frame.