The "OptiCooler" part cooling solution for Wanhao Di3
cults3d
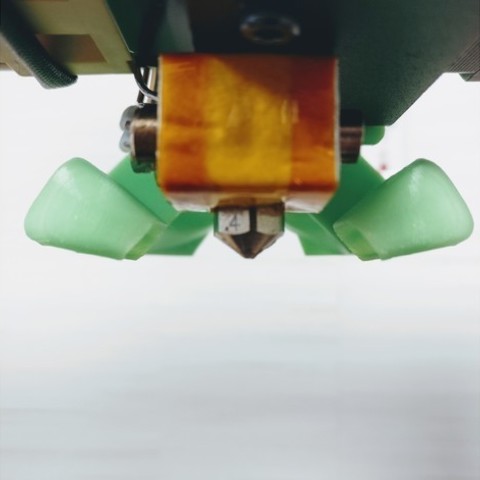
What This is a dual blower cooler that I've been working on for over a year in various iterations. It's designed to meet my specific requirements and I believe it performs exceptionally well. The water test to see where the air goes is conducted at 50% fan speed: https://youtu.be/R7mXLyg_j9s It prints without support and is relatively lightweight at 80g, including all hardware. The stock fan and shroud weigh in at 60g. The fans and funnels are snap-on, making them easy to change or replace. Why Powerful 360° cooling at an acceptable noise level is a major advantage. You may need to PID-tune after installation, but I've made sure that the airflow cools the heated block very little. Using two blowers instead of one allows me to run them slower for the same cooling effect, reducing noise. When used at high speeds, it's possible to print overhangs and small parts faster since with less effective cooling you would otherwise have to slow down in order for the part to cool enough between layers. The nozzle is visible and accessible. Since the funnels are snap-on, it's really easy to work on the hotend without having to remove anything else. Easy installation requires only two screws. Performance I can print smooth overhangs well up to 70° and acceptable up to 75° at a layer height of 0.2mm. I can print textured overhangs well up to 60° and acceptable up to 75°. The cooling is even around an octagonal (8-sided) test-object with edges starting to curl up at 75°, in equal amounts on all sides. Compatibility V2.1 printers: Print the "SpacerPlasticblock". V2.0 printers: Print the "SpacerAlublock", you need to tap the threads in the block all the way through. PLUS versions: Print the files beginning with PLUS... (no spacer needed). Hotends: Works with the stock and Microswiss hotends. The fan-bracket is adjustable in height and should hopefully work with most common other hotends, like the E3D. It can be lowered 8mm. Let me know if it still doesn't work for you. Feel free to remix this. (The Fusion 360 files are a nightmare to edit. Use for reference) Hardware needed: Two 5015 blowers (get the correct voltage for your printer model). I recommend Sunon maglev. Europe: https://www.tme.eu/gb/details/mf50151vx-a99/dc12v-fans/sunon/mf50151vx-b00u-a99/. A suitable connector to the wires (You need to get double wires in the connector, or just improvise without a connector). Two M4x25mm (M4x20 works for the plus version). Either hot glue or two M4x35mm and nuts for connecting the fans to each other. I use hot glue. Print recommendations: 0.16mm layer height. 3 walls for the FanBracket. 4 walls for the Spacer. 0% infill on all. You probably need a brim on the funnels. If you are only printing at PLA temps, you can use PLA for this. PETG or ABS is recommended for anything hotter. But make sure you can print them with good layer adhesion. The funnels are only two walls thick. Post processing: Break away the "Break away support" from the FanBracket. Thoroughly remove any brim from the funnels. Installation: See pictures. Assemble the screws, spacer and funnels. Install it on the machine. Make sure the funnels are about 1-1.5mm above the nozzle. Shorten the wires if you want. Connect and solder the black wires to each other and the red wires to each other. Use a suitable connector if you have one or improvise. Black goes to black, red to red. Install the fans either one at a time and glue or screw them together afterwards. Or glue them together before installation and snap them in place. Insert the inner fan's left side first and then press down the outer fan. Pro tip: preheat the fans on the heated bed at 50° to make the hot glue adhere well and give you some time for adjustment. Check that the heater cartridge wires are not in contact with the funnels. Carefully bend them away if needed. Re-check that the funnels are centred and print away! I usually print PLA at 50-75% (with the really powerful Sunon blowers). If the hotend is having trouble keeping the temp up, do a PID-tune with the fans enabled at around 50% or what % you think you will print at.
With this file you will be able to print The "OptiCooler" part cooling solution for Wanhao Di3 with your 3D printer. Click on the button and save the file on your computer to work, edit or customize your design. You can also find more 3D designs for printers on The "OptiCooler" part cooling solution for Wanhao Di3.