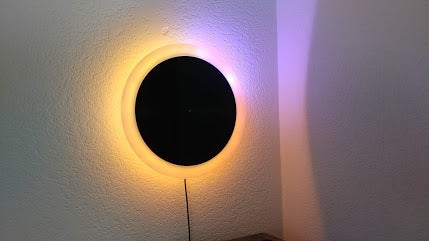
The Light Clock
prusaprinters
<p>The design of the electronics and code was taken from this great Instructables post by chrismelba. My build is faithful to his instructions except for the files uploaded here which are of my own creation.<br/> <a href="https://www.instructables.com/id/The-Light-Clock-IoT/">https://www.instructables.com/id/The-Light-Clock-IoT/</a></p> <p>Chris' housing:<br/> <a href="https://www.thingiverse.com/thing:941191">https://www.thingiverse.com/thing:941191</a></p> <p>I decided I didn't like his housing so I went and designed my own from scratch. I also made a decorative black disc as part of the facia which is a little larger in diameter than the housing itself. For the frosted disc, I bought an acrylic 13" disc and applied many coats of Krylon Frosted Glass spray paint until I achieved a suitable opacity.<br/> <a href="https://www.lowes.com/pd/Krylon-Flat-White-Frosted-Spray-Paint-Actual-Net-Contents-11-oz/1000212297">https://www.lowes.com/pd/Krylon-Flat-White-Frosted-Spray-Paint-Actual-Net-Contents-11-oz/1000212297</a></p> <p>I customized the support locations in Simplify3D when printing the main body to just the area where the wires pass through for the LED strip and the plate that allows the clock to be mounted to the wall. All parts are attached to the housing using hot glue. You will need a printer with a 300mm x 300mm or larger bed to get the print to fit.</p> <p>I have uploaded the STL files for different versions of the body, one with the plate to mount the hardware to that is flush with the rest of the race and one that is recessed as well as versions with and without marks at 3, 6, 9, and 12 o'clock to help locate the LED strip. Mine was printed with the mounting plate flush to the face and no marks.</p> <p>I have also included the Fusion360 archive files so anyone can easily modify my design and see how I built it. I will be the first to admit I am a complete novice at Fusion360 and I can guarantee my workflow is lacking but I am happy to share.</p> <h3> Print Settings</h3> <p><strong>Printer Brand:</strong></p> <p>Creality</p> <p><p class="detail-setting printer"><strong>Printer: </strong> <div><p>CR-10S</p></div><strong>Rafts:</strong></p> <p>No</p> <p><p class="detail-setting supports"><strong>Supports: </strong> <div><p>Yes</p></div><strong>Resolution:</strong></p> <p>0.2mm</p> <p><p class="detail-setting infill"><strong>Infill: </strong> <div><p>20%</p></div><br/> <strong>Filament:</strong><br/> Inland PLA+ <br/> <p class="detail-setting notes"><strong>Notes: </strong> </p><div><p>Will need a print bed of 300x300 or larger.</p></div></p> </p></p></p> Category: Electronics
With this file you will be able to print The Light Clock with your 3D printer. Click on the button and save the file on your computer to work, edit or customize your design. You can also find more 3D designs for printers on The Light Clock.
