The Happy Rooster
myminifactory
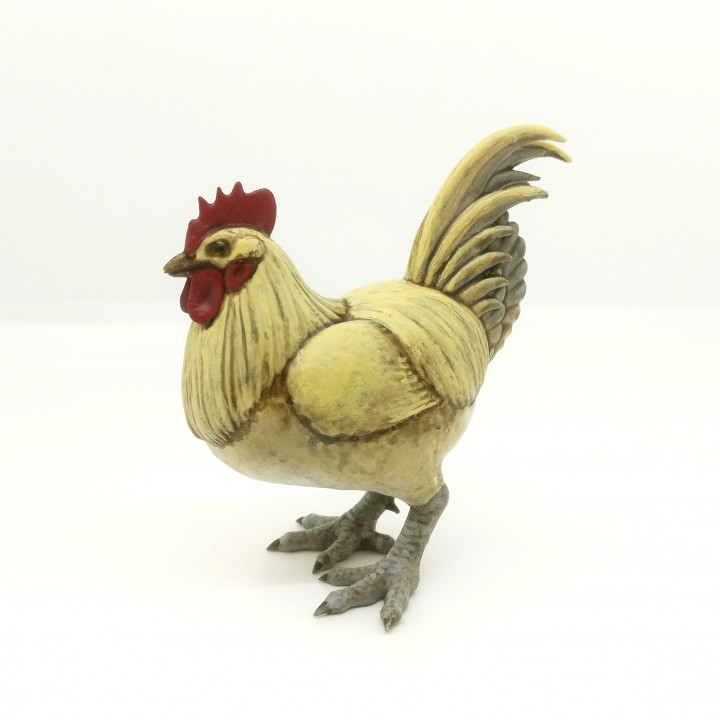
A cheerful rooster in the style of my earlier hen model, The Happy Chicken (should have called that one "Happy Hen" but didn't know I'd make another chicken at the time!). This rooster model stands on its own but I still recommend a base for smaller models to avoid tipping if on uneven surfaces. The small round base from The Happy Chicken is what I used in the photos. Printing at 32mm tall will put this model to scale with a 25.4mm tall happy hen. This model has solid and hollowed verions. The solid version should be used for most smaller models (32mm or under). There is a supported chitubox file for a 32mm solid rooster. The hollow version maintains the center of gravity so the model balances well but will be lower strain on the FEP for larger resin prints, but it still has reasonably thick walls for a sturdy feel to the final result at a larger scale such as 64mm. The nature of the supports required will vary with scale; place them abundantly along the center line of the underside, and give attention to other areas depending on the print angle: underside of tail feather arches, underside of back of comb, and back side of lower legs. I like to place a few extra lighter supports along the underside of the wings too to help stabilize the model. The final hollow model will need some time to drain fully in a standing position before final curing, otherwise the drain holes may clog/seal leaving some liquid inside. Painting ideas: roosters often have a larger variety of colors on them than hens, although they can also be a solid color too. The hackle (neck) and saddle (back) feathers are shiny and often brighter. Black feathers can have a dark green metallic sheen to them. My example small painted mini (with the base) used the following colors on the feathers: black base, reddish brown drybrush, orange layered gradually onto the hackles and saddle feathers, dark metallic green on the tail, and a darker wash at the end. The larger, free-standing model used a white base, gray legs/tail, cream colored drybrush on the hackles/saddles and upper body, sepia wash, then bringing out highlights on the hackles/saddle/tail with the cream color again.
With this file you will be able to print The Happy Rooster with your 3D printer. Click on the button and save the file on your computer to work, edit or customize your design. You can also find more 3D designs for printers on The Happy Rooster.