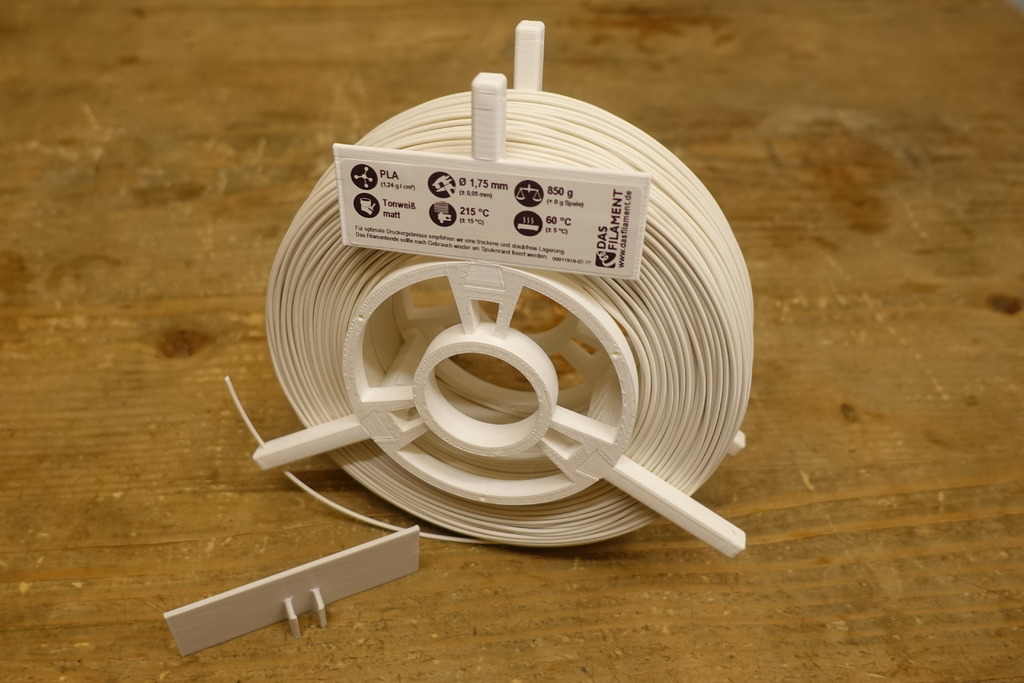
The Fully Customizable Minimal MasterSpool
prusaprinters
<p>Inspired by <a href="https://www.thingiverse.com/thing:2911695">PIRASP's<i>minimal MasterSpool</i></a> I finally found some time to design a MasterSpool for small printers which is quick and easy to assemble and disassemble, e.g. no screws, glue or other stuff.</p><p>In contrast to the inspiration source this design doesn't rely on the spool's pressure only. The woodworking-inspired dovetail joints keep everything together and make it more sturdy.</p><p>See the print instructions in the <i>Print Settings</i> section below before printing anything.</p><h4>Notable Features</h4><ul><li><strong>Can be printed on small printers</strong></li><li>Friction fit assembly - no additional stuff required</li><li>Customizable axle and spool diameter (mostly everything is customizable)</li><li>Option for standoffs</li><li>Test-parts to fine tune your print settings for optimum friction fit and adjust the filament holes with virtually no waste of filament</li><li>Adjustable label plate dimensions</li><li>Use the clip on label to label you spools or re-use the sticker</li></ul><p>You can generate spokes with label as well</p><h4>Notes</h4><p>If you make the spokes long enough you can store the spool upright in your shelves...</p><p>For 1kg refills simply adjust the width and print a set of spokes. The hubs can be reused!</p><h4>Filament usage</h4><p>For a spool with 80 mm axle diameter, structural size of 8 mm, printed with 15% infill, no rafts and no supports:</p><figure class="table" style="float:left;width:150px;"><table><tbody><tr><td>Hub:</td><td><strong>23 g</strong></td></tr><tr><td>Spoke:</td><td><strong>9 g</strong></td></tr><tr><td>Label:</td><td><strong>12 g</strong></td></tr></tbody></table></figure><p> </p><p><br><br><br> </p><p>Total for spool with two hubs with standoff, three spokes and one clip-on label: <strong>85g</strong></p><h4>Print Settings</h4><figure class="table"><table><tbody><tr><td><strong>Printer</strong></td><td>Cetus 3D</td></tr><tr><td><strong>Rafts</strong></td><td>Doesn't matter</td></tr><tr><td><strong>Supports</strong></td><td>None</td></tr><tr><td><strong>Resolution</strong></td><td>Layer 0.2 mm, Nozzle 0.4 mm</td></tr><tr><td><strong>Infill</strong></td><td>See below</td></tr><tr><td><strong>Filament</strong></td><td>DasFilament PLA Tonweiss Matt Refill</td></tr><tr><td><strong>Notes</strong></td><td>Everything but the spoke with label can be printed without supports.</td></tr></tbody></table></figure><h4>How to print this</h4><p>Do not just print the STLs which come with this thing. To get the best results:</p><ol><li>Print the test elements provided with this thing - note that their orientation matches the default print orientation of the final parts</li><li>Check their fit - if it's good (some force should be required to push the hub onto the spoke), you're good to go and can print the other pregenerated STLs or generate different versions of it</li><li>If not, open this design in <i>Customizer</i></li><li>Set the <i>play</i> parameter to something you think could fit your printer</li><li>Generate the <i>spoke test element</i>, <i>hub test element</i> and the <i>filament test element</i> and print them</li><li>Check their fit, adjust the <i>play</i> parameter (smaller means stronger fit) and iterate until you get a decent fit which sits firm and does not wiggle</li><li>Then generate all other parts with your <i>play</i> setting and print them</li></ol><h4>Notes</h4><ul><li>The pre-generated STLs have been rendered with a <i>play</i> setting of 0.025 which is virtually zero.</li><li>If a <i>play</i> of zero doesn't help (because your printer is under extruding or so) adjust your extruder settings.</li></ul><p>The <i>Customizer</i> is a bit squeamish. One thing I did to remedy this was to reduce the number of facets for the preview (currently there's no way to detect preview within OpenSCAD and apply different settings for preview and rendering, but something's on its way). So <strong>don't forget to crank up the number of facets to - let's say - 50 for the final rendering (</strong><i><strong>Create Thing</strong></i><strong>)</strong>. </p><h4>Parts Orientation</h4><p>The STLs are oriented for printing without support. To get stronger spokes you can print them laying flat on the bed but this requires supports. Also the friction fit changes when printing parts in different orientations.</p><h4>Infill</h4><p>The hub isn't critical, I usually print it with 13 %. Spokes profit from more infill though, say 25 %.</p><h4>Revisions</h4><h5>2019-09-08</h5><p>Spool radius didn't appear in Customizer - fixed.</p><h4>Assembly</h4><p>1 - Prepare yourself :)</p><figure class="image"><img src="https://media.prusaprinters.org/media/prints/115716/rich_content/07ce306a-72e2-4907-a974-761f43484240/01_preparation.jpg#%7B%22uuid%22%3A%22fd60bded-c964-411f-a14f-f85448b8aca6%22%2C%22w%22%3A1500%2C%22h%22%3A1000%7D"></figure><p>2 - Mount the spokes. Note: position the inner filament end such that it is centered between two spokes:</p><figure class="image"><img src="https://media.prusaprinters.org/media/prints/115716/rich_content/a86ace75-ca06-4194-afa6-8fa9d6c247be/02_spokes.jpg#%7B%22uuid%22%3A%221dd2e242-eda4-40b6-92b6-e4fe749c4261%22%2C%22w%22%3A1500%2C%22h%22%3A1000%7D"></figure><p>3 - Mount the first hub ring:</p><figure class="image"><img src="https://media.prusaprinters.org/media/prints/115716/rich_content/7ae43daf-6afe-4640-8587-b8bf6c4a04f6/04_first_hub.jpg#%7B%22uuid%22%3A%221d2e9443-7ca9-46ec-9818-0a0e57d46610%22%2C%22w%22%3A1500%2C%22h%22%3A1000%7D"></figure><p>4 - I turned the spool around because the filament end was on the bottom:</p><figure class="image"><img src="https://media.prusaprinters.org/media/prints/115716/rich_content/002ea1d0-8b23-4fb0-882e-18438af8d65e/05_inner_filament.jpg#%7B%22uuid%22%3A%22eb850e65-dd10-4693-9581-4f83618229da%22%2C%22w%22%3A1500%2C%22h%22%3A1000%7D"></figure><p>5 - Insert the inner filament end into the dedicated hole in the second hub ring and mount it on the spokes:</p><figure class="image"><img src="https://media.prusaprinters.org/media/prints/115716/rich_content/1c51a84a-7f56-4515-af7a-64f17b1193d0/06_inner_filament_end_in_hole.jpg#%7B%22uuid%22%3A%22d69b0eb2-23ce-46de-9f26-bf58ba6f8373%22%2C%22w%22%3A1500%2C%22h%22%3A1000%7D"></figure><p>6 - Secure the outer filament end in one of the spoke's filament holes:</p><figure class="image"><img src="https://media.prusaprinters.org/media/prints/115716/rich_content/a019a6a0-478d-4238-a3e2-05f37b4dcc9a/07_outer_filament_end_in_hole.jpg#%7B%22uuid%22%3A%224f102c3f-80b5-4716-a0f3-d5271b65ce1b%22%2C%22w%22%3A1500%2C%22h%22%3A1000%7D"></figure><p>7 - Clip the label plate on:</p><figure class="image"><img src="https://media.prusaprinters.org/media/prints/115716/rich_content/256cbe3e-8892-4f83-be8f-d4b702d4e8f1/08_mount_label_plate.jpg#%7B%22uuid%22%3A%224694889d-3c03-434e-bb3e-c5ed6fad1934%22%2C%22w%22%3A1500%2C%22h%22%3A1000%7D"></figure><p>8 - Stick the sticker!</p><figure class="image"><img src="https://media.prusaprinters.org/media/prints/115716/rich_content/b80bdb78-2490-47ef-ac3e-68aef51f2dcb/09_sticker.jpg#%7B%22uuid%22%3A%22d3512c85-5bce-4dee-8048-a0a00406a7ec%22%2C%22w%22%3A1500%2C%22h%22%3A1000%7D"></figure><p>9 - Done! Don't forget to cut the cable ties before printing (this refill had a broken one so I had to assemble it pretty cautious).</p><figure class="image"><img src="https://media.prusaprinters.org/media/prints/115716/rich_content/6e8f717d-3fa5-4e64-9fdc-ab696e0dbcf3/10_done.jpg#%7B%22uuid%22%3A%227978f666-8959-4bf7-b69e-b5fad925ffc0%22%2C%22w%22%3A1500%2C%22h%22%3A1000%7D"></figure>
With this file you will be able to print The Fully Customizable Minimal MasterSpool with your 3D printer. Click on the button and save the file on your computer to work, edit or customize your design. You can also find more 3D designs for printers on The Fully Customizable Minimal MasterSpool.
