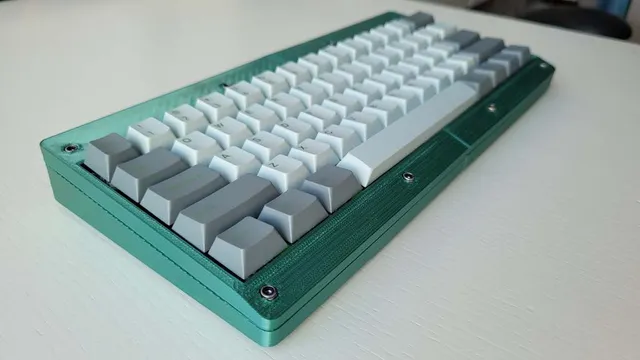
The Château d'If - A Kit for Converting a 60% Tray-Mount Into a Taco Bumper Gasket-Mount Keyboard
prusaprinters
INTRODUCTION: This is a kit for converting a 60% tray-mount keyboard into a taco bumper gasket-mount keyboard. It will work with (1) any standard 60% plate and PCB (e.g., GH60 and DZ60) or (2) any 60% plate and PCB with five 1u keys in the lower right portion of the keyboard. The kit consists of (1) a case and (2) gasket wings, which clip onto the plate. The gasket wings are rigid enough to keep the plate anchored to the case, but flexible enough to provide a softer and more delicate typing experience than other mounting methods. INGREDIENTS M3 20mm screws x 4 (for upper portion of keyboard) M3 12mm screws x 4 (for bottom portion of keyboard) M3 nuts x 8 adhesive poron, to be cut to size (I used the following 2mmT x 125mm x 1M poron: https://item.taobao.com/item.htm?spm=a1z09.2.0.0.67002e8dcgt1rA&id=596691601583&_u=820rh52kbe7d) a standard 60% tray-mount PCB and plate (e.g., GH60 or DZ60) internal weight (optional) https://item.taobao.com/item.htm?spm=a1z09.2.0.0.67002e8dcgt1rA&id=560138068179&_u=820rh52k68c4 case foam (optional) ASSEMBLY INSTRUCTIONS (1) Print out the case. If your build size is sufficient (length >= 296 mm, width >= 132 mm, height >= 27 mm), then you will be able to print out the entire "CASE TOP HALF" and "CASE BOTTOM HALF" at once. For build sizes of <= 150 mm^3, I have subdivided the case into four parts: "case top left," "case top right," "case bottom left," and "case bottom right." (2) Print out the gasket wings: If you have a standard 60% plate and PCB, print out the following wings: (a) "60 wing - upper left, upper right 2u" x 2 (b) "60 wing - upper center 3u" x 1 (c) "60 wing - bottom left, bottom right 2.5u" x 2 If you have a 60% plate and PCB with five 1u keys at the lower right, print out the following wings: (a) "64 wing - upper left, upper right 2u" x 2 (b) "64 wing - upper center, bottom right 3u" x 2 (c) "64 wing - bottom left 2.5u" x 1 Note that the 3u upper center wing is optional in both versions. The remaining wings are sufficient to support the plate. (I have not tried omitting any of the corner wings.) (3) Affix the adhesive poron (or some other gasket material) to the gasket wings, forming a "taco" bumper around the wing. Lengthwise, the bumper should extend beyond the wing by about 0.5 mm on each side. This will prevent the sides of the wing from contacting the case. (4) Insert switches and keycaps into plate and PCB. (5) Clip the gasket wings onto the plate (not the PCB) so that they line up with the gasket wells in the case. (6) Once clipped into the plate, align the gasket wings with the corresponding gasket wells on the case; sandwich the wings between the top and bottom halves of the case; and screw the top and bottom halves together. The 20 mm screws are for the upper portion of the case, and the 12 mm screws are for the bottom portion of the case. If you print out the case in four parts (i.e., "case top left," "case top right," "case bottom left", and "case bottom right"), you might, depending on the tolerances of your printer, consider gluing together only "case bottom left" and "case bottom right." That way, it will be easier to line up the screw holes on the top and bottom halves of the case. The gasket wells are 4.5 mm high and the gasket wing height (without poron) is 1.5 mm. Thus, if you use poron of 2 mm thickness, the combination of the 1.5 mm gasket wing and 2 mm poron (folded over the wing, so the thickness is doubled) will result in a bumper of about 5.5 mm thickness. This means that the poron will compress about 0.5 mm total in the gasket wells. Print Settings Printer Brand: XYZprinting Printer: da Vinci miniMaker Rafts: No Supports: Yes Resolution: 300 Infill: 10 Filament: PolyMaker PLA Category: Electronics
With this file you will be able to print The Château d'If - A Kit for Converting a 60% Tray-Mount Into a Taco Bumper Gasket-Mount Keyboard with your 3D printer. Click on the button and save the file on your computer to work, edit or customize your design. You can also find more 3D designs for printers on The Château d'If - A Kit for Converting a 60% Tray-Mount Into a Taco Bumper Gasket-Mount Keyboard.
