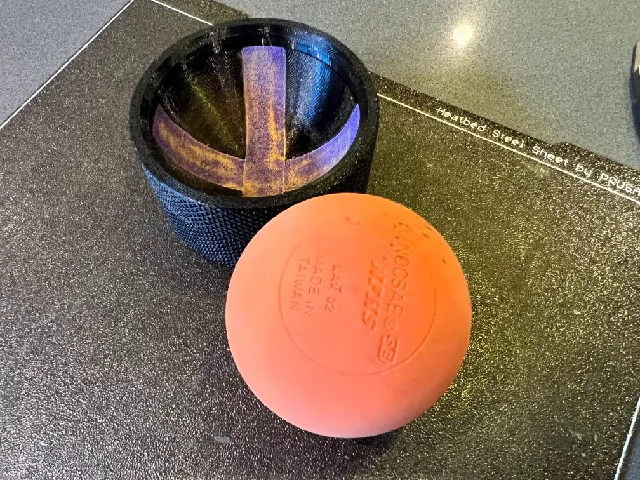
The Ball Scratcher - Lacrosse Ball Cleaner and Resurfacing Tool
prusaprinters
Lacrosse balls typically last only 2-3 weeks with daily use. They get dirty, grimy, or “greasy” with regular play and are often discarded.The Ball Scratcher (v3) was born from my son's request to extend the life and usability of his bucket of lacrosse balls—and we've seen great results! The Ball Scratcher can reduce waste by gently cleaning and scratching the surface of existing lacrosse balls, resurfacing them, and giving you more use for your existing equipment. Don't throw them out… JUST SCRATCH EM! Unlike other designs, this unit does not require specialized “refills” or repurchasing hard-to-locate materials. It uses standard sandpaper sheets (60grit, 100grit, or 120grit—entirely your choice, depending on the surface you are looking for) cut to size to make grit-strips. Note: Each print will require two (2) grit-strips of 15mm (9/16in) x 105mm (4 1/8) sandpaper. (see: Grit-Strips.jpg) Print Instructions:Print with 3 perimeters, 5% infill (gyroid is recommended), .15mm layer height, no supports needed.I prefer PETG prints but has been tested successfully with PLA, PLA+, and PETG filaments.Orientations: (see: Print-Orientations.jpg)base unit - Place with the text surface facing the print bed. As imported.pressure ring - As imported.top unit - Inverteted. Place with the top surface facing the print bed. Assembly Instructions:Press fit two grit-strips into the base unit changes, the rough surface facing up. Strips should extend slightly beyond the upper edge of the base unit, forming grit-strip wings. (see: Assembly_Step_1a.jpg, Assembly_Step_1b.jpg)Bend the grit-strip wings down flush against the top surface of the base unit. (see: Assembly_Step_2.jpg)Place the pressure ring, textured side down - against the rough face of the grit-strip surface. Once assembled, the top ring will lock the grit-strips into place. (see: Assembly_Step_3.jpg)Screw the top ring over the pressure ring and onto the base unit. The ring should be hand-tightened; there is no need for excessive force. The downward pressure of the pressure ring will lock the grit-strips into place. (see: Assembly_Step_4a.jpg, Assembly_Step_4b.jpg) Using The Ball Scratcher:Start with an assembled Ball Scratcher. (see: Use_1.jpg)Place your dirty, grimy and greasy lacrosse ball into The Ball Scratcher. (see: Use_2.jpg)Gently rotate The Ball Scratcher back and forth while you hold the lacrosse ball still, or gently rotate the lacrosse ball back and forth while you hold The Ball Scratcher still.Repeat on other sides of the lacrosse ball as needed. (see: Use_3.jpg) Fusion360 Design Playback [GIF]Prototype 1: see: TBS_v1.jpgPrototype 2: see: TBS_v2.jpg
With this file you will be able to print The Ball Scratcher - Lacrosse Ball Cleaner and Resurfacing Tool with your 3D printer. Click on the button and save the file on your computer to work, edit or customize your design. You can also find more 3D designs for printers on The Ball Scratcher - Lacrosse Ball Cleaner and Resurfacing Tool.
