The 4th Doctor's Sonic Screwdriver
pinshape
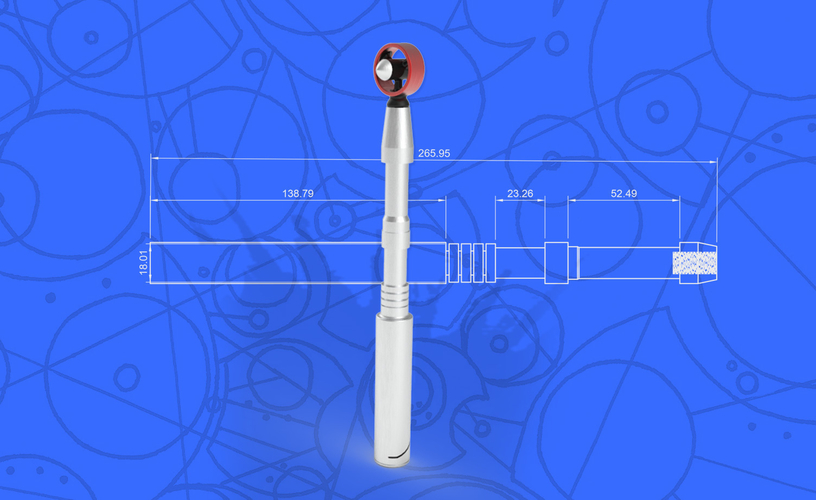
Been too swamped this year to come up with a fresh Halloween costume, so I'm revamping my 4th Doctor costume. In the past, I've used the 11th Doctor's sonic screwdriver (ugh!) and thought it was time to make the costume more accurate by crafting Tom Baker's original sonic device. I've provided the sonic in two pieces, so you can orientate them for optimal print quality while minimizing overhangs and support material. Or you can do what I'm doing, and machine the base from aluminum using the attached CAD drawing. How to model this using Fusion 360 Creating an Aluminum Base Start by opening a new project in Fusion 360. Set your units to millimeters and create a new part. Name it "Aluminum Base." In the browser, right-click on "Features" and select "Extrude." This will give you a solid body that represents the base of the sonic device. Next, use the rectangle tool to draw a rectangle that matches the size of the sonic device's base. Extrude this rectangle by 10mm to create the thickness of the aluminum. You can adjust this value as needed depending on your specific requirements. Now, use the circle tool to draw two circles for the screw holes. These should be centered and equally spaced from each other. Make sure they are at least 2mm deep so that they fit securely into the sonic device. Finally, use the chamfer tool to add a slight radius to the edges of the base. This will make it easier to attach the sonic device to the aluminum base. With these features in place, your aluminum base is now ready for machining or printing. You can export this model as an STL file and send it off to be 3D printed or use Fusion 360's built-in CAM tools to create a machine-ready G-code file.
With this file you will be able to print The 4th Doctor's Sonic Screwdriver with your 3D printer. Click on the button and save the file on your computer to work, edit or customize your design. You can also find more 3D designs for printers on The 4th Doctor's Sonic Screwdriver.