TH3P4G3 Chassis
myminifactory
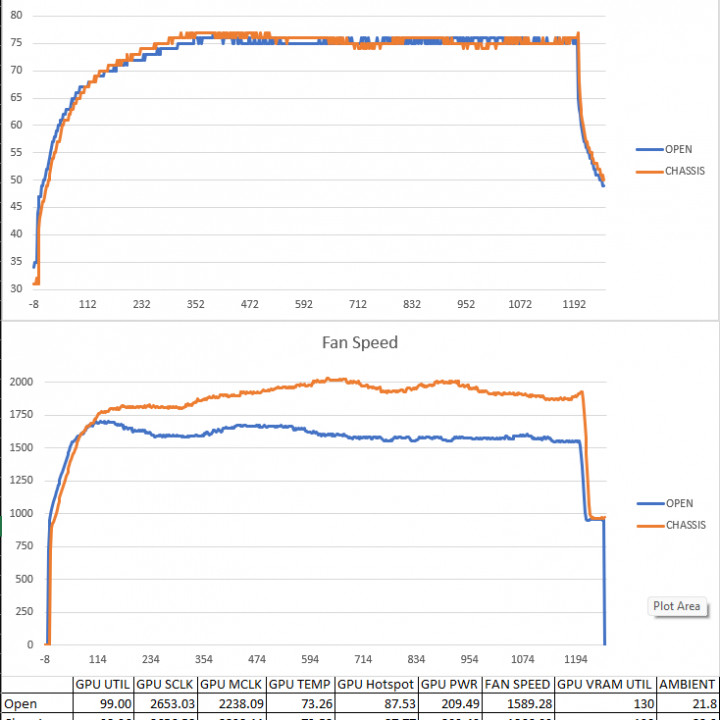
Disclaimer: I learned how to CAD in college, which was over 10 years ago, I probably made a lot of amatuer mistakes. If you have a better way of doing something, let me know and I'll update the part if I have time or motivation. The one printed in the pictures was the first one I printed and I have modified the files since, just making it 10mm taller and moving the screw points around for the bottom and top pieces. Another Disclaimer: I designed this chasses around an SFX PSU and specifically the MSI RX 6750 XT MECH 2X 12G OC with dimensions of 249x 132 x 52 mm, if the GPU you're putting in is larger than that, it might not fit. I'm working on modeling a 100mm extension that will go in the middle so you can go up to a 350mm card, but haven't worked on making it taller or wider. Real Info: I didn't like how large all the other chassis available on the market, so I decided to make my own chassis. This is designed around the TH3P4G3 you can find on AliExpress or whereever they are sold. I would print with 100% infill, its not that much plastic and will make the screw points sturdier. The picture of the graphics is a burn in test of running FurMark on the GPU for 20 minutes. Short version: I can keep the same temps in or out of the chassis, but the fans run on average 276RPM faster inside the chassis. Other Hardware Required: 23- M3x6mm Flat Head Screw 4- M3x10mm Flat Head Screw 4- M4x6mm w/nut Flat Head Screw 4- Fan Screws 92mm Fan (optional but recommended) Print 2 of the GPU sides, they are the same in the picture Assembly Instructions: Screw the two bottom pieces together and the two top pieces with the M3x10mm screws Take the TH3P4G3 apart by removing the 4 torx screws and removing the 4 rubber bumpers on the bottom Attach the SFX PSU bracket to the TH3P4G3 Screw the TH3P4G3 to the bottom printed pieces with the 4 M4x6mm screws Reattach the top part of the TH3P4G3 Install the GPU and PSU of your choice as long as the GPU is smaller than noted above and an SFX PSU The top 2 screws of the PSU are used to secure the rear panel, so you can attach the rear panel here after the GPU, or wait until you attach the rest of the panels. Attach the fan (optional but recommended) Screw on the side panels in the right spots All side Panels use the M3x6mm screws except the rear Dont' forget to plug the fan The GPU sides have the larger gap of no holes on the bottom, but can be put on how you like. Attach top panels and screw in the sides. Enjoy!0 I wrote these instructions off the top of my head, so if they don't make sense, please let me know.
With this file you will be able to print TH3P4G3 Chassis with your 3D printer. Click on the button and save the file on your computer to work, edit or customize your design. You can also find more 3D designs for printers on TH3P4G3 Chassis.
