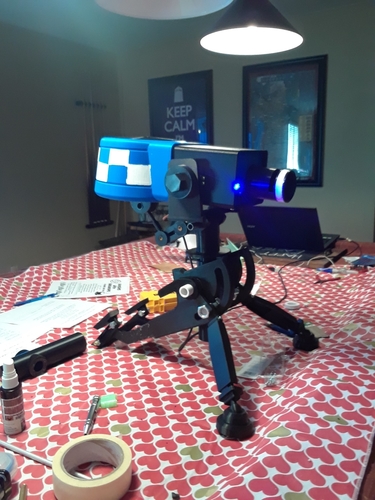
TF2 Combat Mini Sentry
pinshape
I adore that small gun so much now that I've created my own. This project is still a work in progress, and I'm aware of its many design flaws, including the inability to lift when the piston-like mechanism at the back is attached, and the front legs are extremely fragile. The model now has the beacon light, which should be easily printable without supports, but I don't have transparent blue filament. The gun is divided into three parts: the stand, adapter, and head. Unfortunately, I'm unable to upload folders to keep them separate. The stand stops at the planet gear, and the adapter stops at the caster pin. I use the xN notation to indicate how many copies are needed if one is missing; you'll only need one without an xN. EDIT: I've uploaded a new experimental style of double bars (which I haven't printed myself), which lacks appearance compared to the old one but should be far more flexible. I've also added holes for the servo in the Neck file. This design was created with fully autonomous sentry gun functionality in mind, and the servo placement has already been worked out, along with holes for routing wires. Note that connecting the neck to the crossbar requires a servo or the ServoStandIn on one side; I forgot to add holes for the screws to hold the servo in the neck, but there's a quick fix with a drill. I'll update the design with these holes soon, as this servo/stand-in is crucial for holding the neck to the adapter. Where Leg2 meets Leg1, the loops on Leg2 should have an extremely high infill percentage due to the crushing force of the screw and nut to keep the two parts stationary; maybe around 80%. If you have any questions, feel free to ask. I'm probably overlooking many details that seem obvious to me. Most parts don't need support, but some do; I strongly recommend NOT using supports on the Shell file. You will still need: 2x 15mm threaded rods (5cm long) and 4x 15mm nuts for the legs 2x 15mm threaded rods (11cm long), which should be inserted into the rod holder and then placed in the very front of the sentry, this is a very important counterweight 1x 1/2 inch/12.7mm PVC pipe (16cm long) for the center of the tee 2x 10mm threaded rods (3cm and 12cm long), along with 6x 10mm nuts for the end of the back leg and the deployable back feet 2x 9mm smooth pipes (25mm long) for the piston-like thing under the shell 1x 13mm smooth pipe (10 cm long) for the adapter under the crossbar 1x 7.15mm smooth pipe (5cm long) for the pan servo used to connect stand to adopter 2x 4m screws (32mm long), which cannot be shorter, for connecting leg1 to leg2 parts 4x 4m screws to hold face plate and shell to neck, along with additional 2x 4m nuts to hold the shell to neck If you want to act like a sentry, you will need an additional: 2x MG996R 55g servos; one will need its screw arms cut off to fit in the pan house I use Project Sentry Gun for everything to control it, which is an involving task.
With this file you will be able to print TF2 Combat Mini Sentry with your 3D printer. Click on the button and save the file on your computer to work, edit or customize your design. You can also find more 3D designs for printers on TF2 Combat Mini Sentry.
