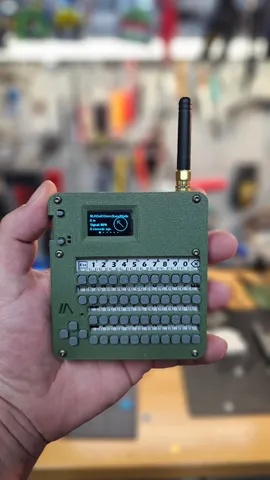
TextMesh (Heltec V3 Edition)
prusaprinters
The TextMesh Device, built around the Heltec LoRa V3, offers essential functionality in a portable, stand-alone design. Equipped with GPS, a buzzer, a 3000mAH battery, a keyboard, and a power switch, it's designed to be straightforward yet effective.The casing was crafted with simplicity in mind, ensuring ease of printing and assembly. Avoiding the need for an acrylic keyboard cover or intricate button design, the pass-through cutout allows clear visibility of the original M5Stack CardKB PCB letters, enabling immediate use for any user.Back Base (2 Versions): You have options for both the back and front covers. The Standard Back Base snugly accommodates the specified parts, while an alternative base offers an open form factor for customization, though self-component securing is required in this case.ORFront Cover (2 Options): For the front face cover, you can choose between integrated buttons for user interaction and reset functions on the Heltec ESP board, or opt for a design with cutouts for additional buttons, allowing customization with colored buttons protruding from the case.Fit and Finish: While it may seem that the keyboard holes on the front cover don't align perfectly with the CardKB before assembly, this intentional design maximizes the visibility of the printed letters on the PCB. Rest assured, despite appearances, each key depresses as intended.The screws are designed to be friction fit, allowing users the flexibility to choose between M2.5 and M3 sizes for a snug fit. Alternatively, common pointed wood screws can also be used. To ensure the safety of the electronics and battery, the holes are strategically positioned to prevent any damage or puncturing during assembly.KeyBoard: Navigate to Radio Configuration, then Module Configurations, and select Canned Messages to activate them. In the "Allow Input Source" field, input "CardKB" without using quotation marks. Upon the initial boot of the Heltec node, you may encounter a message saying "Canned Message Module Disable." Simply press the reset button, and the node should boot correctly, allowing you to begin typing.Additional Information: Whenever you activate the unit, an error regarding the pre-programmed messages will appear. Simply press the reset button on the health tech, and this action will restart the device, clearing the error. You have the option to utilize either the GPIO pin connectors for the GPS and Heltec, or you can opt to solder the wires directly onto the PCB. I've experimented with both methods, and the case is engineered to accommodate pin connectors.Below is the wiring diagram detailing the configuration I've utilized for my setup. However, feel free to customize your GPIO outputs within the software or select your preferred power or ground terminal for flexibility.List of parts for this build:3000mAH 105050 LiPo Battery: https://amzn.to/3wVR5sLBuzzer: https://amzn.to/498F4xqHeltec LoRa V3: https://amzn.to/43nry7QGPS Module: https://amzn.to/3IBW7NA2 Position Switch: https://amzn.to/3IDWSFOTransistor: https://amzn.to/3IG1nj6M5Stack CardKB: https://amzn.to/43kNUGVAmazon does not seem to keep a solid stock of the CardKB's so I order them from here as well: https://www.mouser.com/ProductDetail/M5Stack/U035-B?qs=vvQtp7zwQdP58CzuvFQT0A%3D%3DPrinting: I opted for PETG when printing the back base and front cover, although PLA, ABS, or other materials are viable alternatives.For the keyboard buttons and user interface buttons, I recommend TPU for its flexible fit and tactile feel while typing. While I've tested other materials, TPU consistently yields the best results.Utilizing standard settings on the BambuLabs P1S at 0.20 layer height and 25% infill proved successful for me. However, feel free to experiment with these settings for optimal results.Notably, this print doesn't necessitate any support, simplifying the printing process.This marks my initial endeavor in creating a 3D design tailored to fit real-world components seamlessly. The outcome was pretty good, with everything printing accurately and fitting as desired. Despite utilizing SketchUp, which may not be the optimal tool, it served its purpose proficiently. Should you have any suggestions for enhancements, I'm receptive to feedback. This serves as a notification to inform you that the links provided herein are affiliate links. They won't incur any additional costs for you, but they will generate a small commission for me, aiding in funding future projects. Your support is greatly appreciated.
With this file you will be able to print TextMesh (Heltec V3 Edition) with your 3D printer. Click on the button and save the file on your computer to work, edit or customize your design. You can also find more 3D designs for printers on TextMesh (Heltec V3 Edition).
