Test Print - Crush Ribs - Version04
prusaprinters
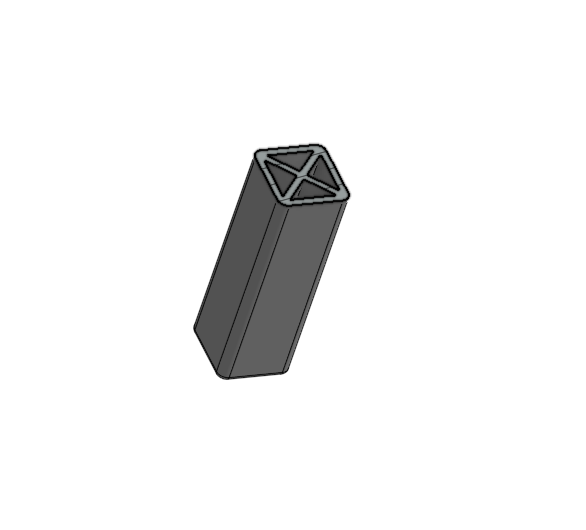
<p>This is an additional test of "crush ribs" which I learned about from this video from this video :</p> <p> <figure class="media"> <oembed url="https://youtu.be/0h6dCeATkrU"></oembed> </figure> </p> <p>See also :</p> <p><a href="https://www.prusaprinters.org/prints/43586-test-print-crush-ribs-version-01">https://www.prusaprinters.org/prints/43586-test-print-crush-ribs-version-01</a></p> <p><a href="https://www.prusaprinters.org/prints/43599-test-print-crush-ribs-version02">https://www.prusaprinters.org/prints/43599-test-print-crush-ribs-version02</a></p> <p><a href="https://www.prusaprinters.org/prints/43628-test-print-crush-ribs-version03">https://www.prusaprinters.org/prints/43628-test-print-crush-ribs-version03</a></p> <p>Short version :</p> <p>A general solution to the problem of getting one printed part to fit firmly into another while allowing for small discrepancies in print accuracy.</p> <p>Longer version :</p> <p>This print illustrates the basic design feature of a cylindrical shape that needs to fit firmly into a round hole. The ideal design for this is a "press fit" - the cylinder is just slightly large than the hole so that it fits tightly into the hole and is held in by friction. The problem with this design is that getting the precise fit is usually a matter of trial and error. Further, what works for one make of filament and printer may not work with a different filament or printer.</p> <p>This print differs from previous versions by using a square hole and square "cylinder." If you look at the photos you will see a picture of Version03 in which I broke the cylinder trying to remove it. This turned out to be a lucky accident as it showed the following:</p> <p>First - cylinders printed in that version had poor bending strength (already knew that, actually).</p> <p>Second (and more important) - what makes the crush ribs work is not so much that the ribs themselves are crushing, as that the walls of the cylinder are bending inward.</p> <p>Third - the infill in the cylinder is essentially a set of internal ribs which potentially work against the crush ribs if not oriented properly.</p> <p>The solution to the weak cylinder problem is to print the cylinder on its side, so that the filament is extruded in a more optimal direction. In order to print the cylinder on its side, a square profile works better. The square "cylinder" is further strengthened by a set of longitudinal ribs (see cross section in photos); these ribs are oriented corner-to-corner (to allow the wall to bend inward). Since there is no method using infill to create these internal ribs, they must be designed into the print. The resulting "cylinder" is much stronger - I even tried to bend/break it without success.</p> <p>The hole piece was created with the following drafts and results :</p> <p>Bottom row, through holes (left to right) :</p> <ul> <li>1/2° draft = very tight fit, very difficult to remove</li> <li>1° draft = tight fit, difficult to remove</li> <li>2° draft = good fit, difficult to remove</li> </ul> <p>Top row, all 1° draft, various depths (left to right):</p> <ul> <li>7mm depth, tight fit, removed with minor difficulty</li> <li>6mm depth, tight fit, removed with minor difficulty</li> <li>4mm depth, tight fit, removed easily</li> </ul> <p>The prints provided here serve these purposes :</p> <ul> <li>introduce the concept of crush ribs</li> <li>show how crush ribs work in practice</li> <li>develop a conceptual model for testing the method</li> <li>develop 3D CAD methods</li> </ul> <p>The last one is only indirectly related to 3D printing, but is important for me at least if I am going to be able to apply this method more generally.</p> <p>OnShape 3D CAD files for this :</p> <p><a href="https://cad.onshape.com/documents/b4493acd7fc8145bc0e7f9e7/w/567793688a7f5ef5584f3b04/e/25e93a0018f17576c3d09a97">https://cad.onshape.com/documents/b4493acd7fc8145bc0e7f9e7/w/567793688a7f5ef5584f3b04/e/25e93a0018f17576c3d09a97</a></p> <h3>Print instructions</h3><p>Print in PLA using the 3mf files provided.</p> <p>I printed the cylinder separately as it prints with 0% infill, but both pieces could be printed at the same time with an appropriate modifier on the cylinder.</p>
With this file you will be able to print Test Print - Crush Ribs - Version04 with your 3D printer. Click on the button and save the file on your computer to work, edit or customize your design. You can also find more 3D designs for printers on Test Print - Crush Ribs - Version04.
