Tesla coil using simple Slayer exciter
thingiverse
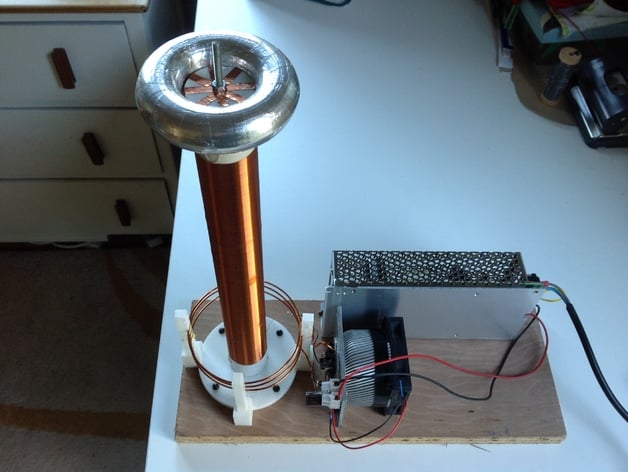
Human: I blame the neighbor; he said, "How about building a Tesla coil?" I had thought about it in the past, but the gauntlet was thrown. This is the simplest method I could find - a single transistor oscillator which is basically a tank oscillator but with the tuned or resonant circuit attached to the base of the transistor. The secondary is only attached physically at one end; the other end (top load end) is connected via capacitive coupling, which is essentially what this device demonstrates so well. Tuning is a real issue with Tesla coils, but this design only has a tuned secondary, which dictates what frequency the oscillator works at. This makes the thing self-tuning. Having said that, it's a simple circuit, but it's very capable; if you're not careful, you can easily get a nasty burn. This device can also damage electronic devices if you have a pacemaker or any other medical equipment - don't use this thing. I can't accept responsibility for any stupid action you decide to take with this, so please exercise some common sense. You'll also be producing Radio Frequency Interference in the medium wave; yes, I know what that is. This is more powerful than most Slayer circuits you'll see by virtue of the transistor I've used. Don't get me wrong - a 2N3055 is a wonderful old device which I've used for more than 40 years, but it's a bit out of its depth here. The real star here is the transistor; I spent some time looking at specifications before choosing this one. Yes, it is a grunt at 180 watts, but the important point is that it has a lot of gain at the frequency we're using, according to the spec. There are two grades; I've only seen the O grade on sale, which has a minimum DC gain of 80 and an FT of 30 MHz - so it should work well at 1Mhz. Base unit / Primary coil: Place the coil supports into the base in order 1,2,3,4 or 4,3,2,1; this will dictate whether you wind clockwise or anti-clockwise. It's essential how the coils are connected - my circuit diagram shows an S to indicate the start if both coils are wound the same way. You may need to sand the ends of the supports first. If you get stuck, heat the offending part with boiling water and then snug them down. The coil wire can be straightened by holding one end in a vice and applying some stretching force - take care not to end up on your backside! Earthing is required; I've been lazy and used the mains earth connecting it to the -Ve or 0V side of the PSU radiator or water pipe connection, or even an earth rod. If you can't get the exciter to oscillate, the most likely cause will be the orientation of the coils - we need to achieve a 180-degree phase shift for oscillation to occur. I would suggest reversing the connections on the primary if you've eliminated other mistakes. Power mad! Although I'm pleased with the results, I'm sure I'll be using the coil components to make a more powerful version; I've allowed for more coils on the base unit as you can see. You may have a lot of fun exceeding the performance of what I've suggested yourself - but I offer this as a good starting point.
With this file you will be able to print Tesla coil using simple Slayer exciter with your 3D printer. Click on the button and save the file on your computer to work, edit or customize your design. You can also find more 3D designs for printers on Tesla coil using simple Slayer exciter.