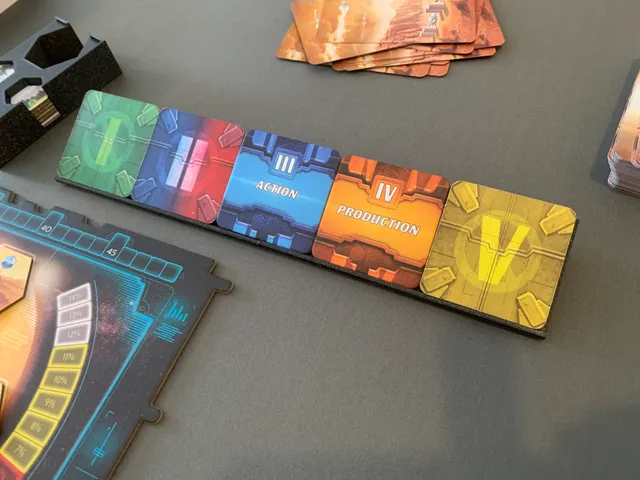
Terraforming Mars: Ares Expedition: Phase Card Holder
prusaprinters
MotivationI wanted a nice way to display phase cards in Ares Expedition, so put together a design to show them in a prominent way. The cards are also easy to flip over on the holder, as they protrude slightly over the top to make them easy to pick up.ModelsThe holder is designed to be printed in two pieces so that it fits in the box. The holder pieces slot in nicely when using these boxes to store the other components: https://www.thingiverse.com/thing:4898476Unjoined (not recommended)The unjoined model has no means to be joined together. Print two and place them next to each other.Peg joined (recommended)The peg joined models join together with pegs that slot together. Print the male and female models and slot them together when playing. The peg joinings make it easier to keep the two pieces togetherMagnet joined (highly recommended)The magnet joined models include slots to insert magnets to allow the pieces to be joined while playing without having to add protruding pegs.The STL files are for 9.3 x 9.3 x 3.6 mm square-shaped magnets.MEASURE YOUR MAGNETS to make sure that they will fit.If you have different sized magnets: edit the OpenSCAD file to customise the magnet_[width,height,depth] variables. There are no tolerances added on top, I would recommend adding 0.1 mm to caliper measurements of magnets, and an extra 1 mm to the Z axis (called depth in the SCAD file) to account for some space for superglue.Print the left and the right model, or, print two of the “both sides” model.Inserting the magnetsAlways take great care and follow the safety instructions when handling magnets.When slicing, be sure to add a pause command to allow insertion of the magnetsMake sure you keep track of magnet orientations so that they stick togetherMark the poles with permanent marker to be sureWhen the print pauses, carefully add a small blob of superglue into the bottom of the slotGently but firmly push the magnet into the slot in the correct orientationAllow 30-60 seconds for the glue to set. Gently ensure the magnets are set into the glue and cannot be wiggled, and that they do not foul the top of the printAbort the print if the magnet protrudes above the existing layers!!Add a tiny bit of gluestick glue to the top of the magnet, if it's a snug fit at the top Continue the printPrint Settings0.15mm layer height or smaller recommended to get a smoother finish and avoid scratching the cards too much when flipping them15% infillNo supports, rafts, or brim neededI have only tried printing these in PLA. The example in the pictures is Prusament Galaxy Black PLA.FeedbackIf you try making these, please comment to let me know if you have any questions or feedback. Constructive feedback is always appreciated.
With this file you will be able to print Terraforming Mars: Ares Expedition: Phase Card Holder with your 3D printer. Click on the button and save the file on your computer to work, edit or customize your design. You can also find more 3D designs for printers on Terraforming Mars: Ares Expedition: Phase Card Holder.
