Tenspiral defeating gravity
prusaprinters
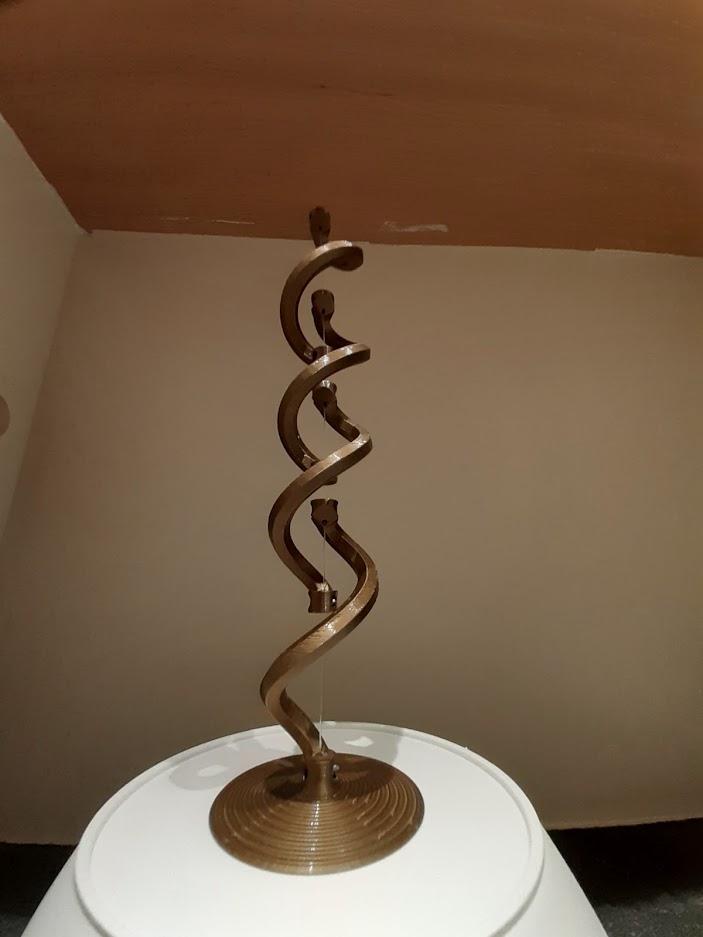
<p>Tensegrity model maintaining stability with one single wire.</p><p>Materials needed:</p><p>0.5 mm nylon wire<br>7x M3 nuts<br>7x M3x10 mm Allen screws (longer ones were cut to the right size)<br>wooden plank of about 55 cm<br>2x 50 mm wood nails</p><p>The spiral parts are designed to be printable without the need for supports. Nevertheless a support was used in my prints to provide sufficient<img class="image-style-align-right image_resized" style="width:31.73%;" src="https://media.prusaprinters.org/media/prints/108183/rich_content/d11da28d-35af-4d7b-a30c-d54f038c16a0/support.jpg#%7B%22uuid%22%3A%22db097891-8335-4d4a-be98-c72de7bde5df%22%2C%22w%22%3A430%2C%22h%22%3A686%7D"> base area for the print to keep stable when printing the top part. Paint-on support was used.</p><p>The base spiral with foot can be printed without any support.</p><p>Both PLA and PETG can be used. PETG has the advantage that it is more “spring-like”. This property could be used during assembly to put extra tension on the wire by compressing between both ends. I didn’t try this yet.</p><p>This multi part spiral is kept up with a single wire. In order to maintain its stability, the wire needs to be firmly tensioned. The more tension, the more stable the structure. A 0.5 mm nylon wire was used.</p><p>To assemble:</p><p>Knock the 2 nails in the wooden plank to obtain a fixture tool. Thread the nylon wire through the printed spirals. Do this in such a way that the end of the previous spiral and the start of the next is in between the ends.</p><p><img class="image-style-align-left image_resized" style="width:45.37%;" src="https://media.prusaprinters.org/media/prints/108183/rich_content/1f3e2cd2-4254-435a-bab2-2a75d758a2b2/20211229_172246.jpg#%7B%22uuid%22%3A%228027aea4-ef04-43b2-bdf7-cb8072ebf95e%22%2C%22w%22%3A1174%2C%22h%22%3A880%7D">Tie a loop at each end of the extends of the nylon wire. The length between the loops should be smaller than the distance between the fixing nails. It’s a good idea to test this before threading. Remember that tension increases stability of the structure.</p><p>When the nylon wire is tensioned between the nails, the spiral parts can be fixed to the wire at the ends with the screw and nuts. Try to tighten them as much as possible, without breaking the nylon wire.</p><p>When all is tightened, take of the <img class="image-style-align-right image_resized" style="width:31.64%;" src="https://media.prusaprinters.org/media/prints/108183/rich_content/8d5d7299-4467-44a5-bc46-bbfff1726d5f/nut-and-screw.jpg#%7B%22uuid%22%3A%225affaf0f-7f40-4478-81f7-efd379aa0745%22%2C%22w%22%3A975%2C%22h%22%3A826%7D">nylon wire from the fixture. Put the structure upright and it should stand straight and stable. The spirals still have some freedom to rotate along the wire. The only resistance to the rotation is the torsion in the nylon wire. When satisfied with the result, cut the nylon wire excess length at the underside of the foot and at the top end.</p><p>My structure has 4 spiral parts, but the number is only limited by the maximum tension the nylon wire can accommodate. Consider it a challenge!</p><p>Notes:</p><p>At first I tried to glue the parts to the nylon wire. It never worked for me. Hence the nuts and screws. </p><p>Nylon is prone to creep. This is the tendency of materials to deform under constant pressure over time. This results in a relaxation of the tension forces and compromises the stability over time. Be gentile when manipulating the structure as this can strain the wire, resulting in a reduction of the tension.</p>
With this file you will be able to print Tenspiral defeating gravity with your 3D printer. Click on the button and save the file on your computer to work, edit or customize your design. You can also find more 3D designs for printers on Tenspiral defeating gravity.