Tensegrity Table
prusaprinters
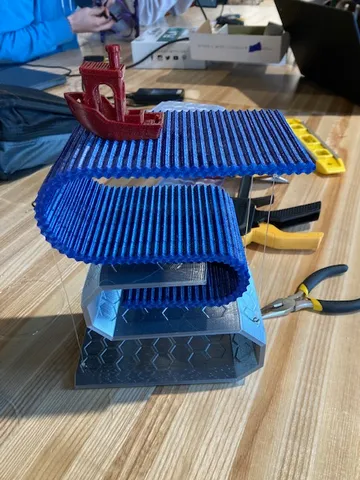
I did work with a partner. Here's the link to his project: https://www.printables.com/model/377909-3d-benchy-tensegrity-sculpture Problem Statement:With a partner, you will design and create a single custom Tensegrity Structure of equal complexity or greater as the tables depicted above (as determined and approved by the instructor).Parts List:PegBoatWavy “S”Geometric “S”Assembly Instructions for Tensegrity Sculpture:Recommended tools: Small Phillips or Flathead ScrewdriverSmall Nose Needle PliersWire CuttersSandpaperSuper Glue or Epoxy (Epoxy would be the strongest option)9x Small Eyelet Screws (There are slightly different steps later on depending on size)Fishing line (Braided may be easier to tie)Step 1: Print the parts necessary Print Leric_1_3dBenchy,Leric_1_BoatPeg, Leric_1_Geometric, and Leric_1_Wave. We used PETG for some parts; however, PLA will be more than strong enough. An infill of 15%+ is recommended. Increasing the wall count may also create a stronger surface for the hooks. Step 2: Marking Holes First, mark with a pencil where each hole should be created. The holes should align so, once they are put them in, the hooks are vertically aligned with each other. Step 3: Creating the Holes This step depends heavily on the size of your eyelet screws. There are two methods for creating the holes:Method 1: Heat up a needle or soldering iron that has a dimension that is slightly smaller than the diameter of your eyelet screw. Press the heated needle or soldering iron where you created your markings. Press only as deep as the "shaft" of your screw. The middle eyelets' hole positions are extremely hard to reach. We created a hole that went through the part entirely to the other side; however, you may also be able to bend a needle 90 degrees to reach inside the gap. We used method 2 due to the small size of our eyelet. Method 2: You can follow the same procedure as method one using a small drill bit with a diameter slightly smaller than your eyelet screw. This depends heavily on the size of your eyelet, so I recommend buying larger eyelets for this method. Note: This method works very well, however, due to the size of the drill bits it is very easy to snap them. Step 4: Inserting The EyeletsHalf of the eyelets are screwed into the holes by hand or using pliers. The other half of the eyelets are individually knotted with fishing line and then inserted into the holes opposite to the ones with already inserted eyelets. Then, the unknotted side of the fishing line is tied to the eyelets yet to be connected. Step 5: Tying the String15cm and 12cm long (2cm in between) To tie the string, you will need two sections of 15cm in length, two sections of 12cm in length, and one section of 2cm in length. To facilitate later knot tying add 6cm+ to the total length of the string. Tie one end of the string to the hook (this can be done before the eyelets are inserted to make tying easier). We used the Double Uni Fishing knot (As shown in this video: Link). This knot looks great and is very strong; however, you can also use a square knot for this step. Recommend: using a square knot for the other side which will be attached to the eyelet because it is easy to tie and extremely strong. (Video on tying a square knot: Link) Refer to pictures as needed. Note: We opted to use a chain in the center of the sculpture, however, prettying a string to a 2cm length between the hooks may be easier. Step 6: "Tensioning"Adjust strings as necessary to maintain equal tension across the sculpture. This can be done by loosening the square knots and re-tightening them. This is the step where you check if everything is level, the tension is even, and the wire is the appropriate length. Step 7: TENSEGRITY ACHIEVEDYou’re done. Relax. Turn on the radio. Eat a sandwich. Listen to some jazz. Learn to ride a scooter or a motorcycle. Fly a kite. 'Cause why not? Design Choices:We had created many designs, but this "S" shaped design was what we gravitated towards because of it's simple and clean design.Near the end of our project, we noticed that the geometric “S” was looking really plain and simple. Too plain and simple. So, we added a hexagonal pattern throughout the part, and it added some nice texture.Something else we changed was the shape of the pegs. Unlike the hexagons, an aesthetic change, this was a functional one. The drafted shape of the peg before had a decent amount of grip, but the undrafted, cubic shaped peg's grip was significantly better.There was only one major mishap with printing. The filament that we chose kept breaking apart and being extremely difficult to work with overall. Luckily, this was an easy fix; we chose different filaments – a metallic grey, a shiny blue, and a dark red.
With this file you will be able to print Tensegrity Table with your 3D printer. Click on the button and save the file on your computer to work, edit or customize your design. You can also find more 3D designs for printers on Tensegrity Table.
