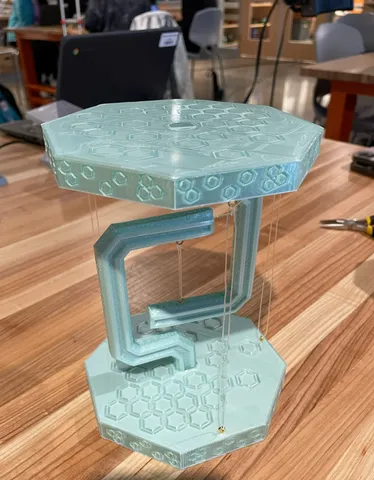
Tensegrity Table
prusaprinters
How I Designed This: My partner and I first sketched 4 different tensegrity tables of what we may want to makeAfter deciding which design we wanted we changed the original base design from a circle to a hexagon to better match the shape of the beam.We then added hexagonal detail to all sides of the basesAfter designing the beam and base in solid works, we decided to also add a hexagon design to the beam so that the beams and bases were more alike. After assembling our first design, both of us decided to scale the entire table, base and beam, up by 1.5 because the table that we originally printed was too small We also collectively decided to move the design on the beam to the two other sides because of how it printedWe decided to precut the screw holes in both the bases and beams to make screwing in the hooks easierI also picked a new colour for my table. Instead of printing it a gold colour I used Hatchbox Silk Mint because the filament used before was not good for small designs. After finalising we reprinted the pieces, assembled and re-updated our assembly instructions as we went along as needed to based on the new pieces. Parts List: Beams 2xBases 2xAssembly Instructions Section: Tools needed for assembly: A Phillips head screwdriver, 2 pairs of small needle nose pliers, a ruler, a pencil, and a pair of scissors.Components needed to complete the tensegrity: Fishline string, 8 gold hooks. Lay out all four pieces in two organised piles2 bases 2 beamsCut off the excess amount of filament that hangs loosely from the main pieces if needed INSERTING HOOKS:Identify where the premade holes are on the base Using the smallest possible Phillips head screwdriver:Place the point of the screwdriver on the premade hole Twist the phillips head screwdriver to widen the premade holeRepeat with the other holes on the baseUsing pliers, pick up a hook and place it into the hole and screw it in The hook doesn’t need to be all the way in, just far enough that if lightly tugged on it will not move. Orientation of the hook doesn’t matter. Repeat two more times in the other two holes.It should look like this when doneTake the second base and repeat steps 3-5, then move onto step 8Identify where the premade hole are on the beamUsing the smallest possible Phillips head screwdriver:Place the point of the screwdriver on the premade hole Twist the phillips head screwdriver to widen the premade holeUsing pliers, pick up a hook and place it into the hole and screw it inThe hook should be straight up. The orientation is not important but it should be straight up and down. Make sure to screw the hook in until only the circular part of the hook is visible Repeat steps 8-10 on the second beam, then move onto step 12ASSEMBLING THE TENSEGRITY:Pair 1 beam with 1 baseIf needed (if the beam moves in the base) hot glue a small strip at the end of the beam that goes into the baseThis will secure the beam in the base so that it doesn’t move aroundAlign the beam with the hole in the centre of the base. GENTLY push the beam into the base. Too much pressure could push the beam out the other end of the base. If that happens, apply pressure on all areas of the beam and push down. Repeat steps 12-14 with the second beam and baseThis is what both parts should look like when they are completed STRINGING IT TOGETHER:Start by getting 3 pieces of 54 cm fishing line and one piece of 30 cm fishing line. Tie the two center hooks together leaving around a 4 cm gap between the 2 beams (preferably with a Square Knot.)To tie a square knot align the corresponding hooks on either base so that everything lines up. Take one end of the fishing line which should be cut to the desired length (about 2-3 times the distance between two hooks) and loop it through one hook and take the other end of the fishing line and loop it through the other corresponding hookNext bring both ends of string together and cross them so they make and ‘X’Take the end of the string thats end is on the left side and loop it one time around the other string so that the two ends of string appear to be twisted togetherNext take either end of the string and cross them again so they form another ‘X’ Take the string thats end is on the right side and loop it around the other string so that they appear to be twisted againTake pliers to tighten the knot and when tightened and made to be the desired length tie another knot to reinforce the knotThen, go around to the other hooks and tie a square knot through all of them as well. There should be around a 16 cm gap between the two bases. Use a level to make sure your tensegrity is evenly balancedNOTE: If the bubble is not in between the two black lines, slightly tighten the strings on the opposite side of the bubble to balance the tensegrity out. Using cutters trim off the excess amount of string. Do not cut it too short but do not leave it too longMove the now trimmed knots to the top hookMove the three knots that connect the base and the knot that connects the beamsThe final tensegrity should look like this:
With this file you will be able to print Tensegrity Table with your 3D printer. Click on the button and save the file on your computer to work, edit or customize your design. You can also find more 3D designs for printers on Tensegrity Table.
