Tensegrity stool
prusaprinters
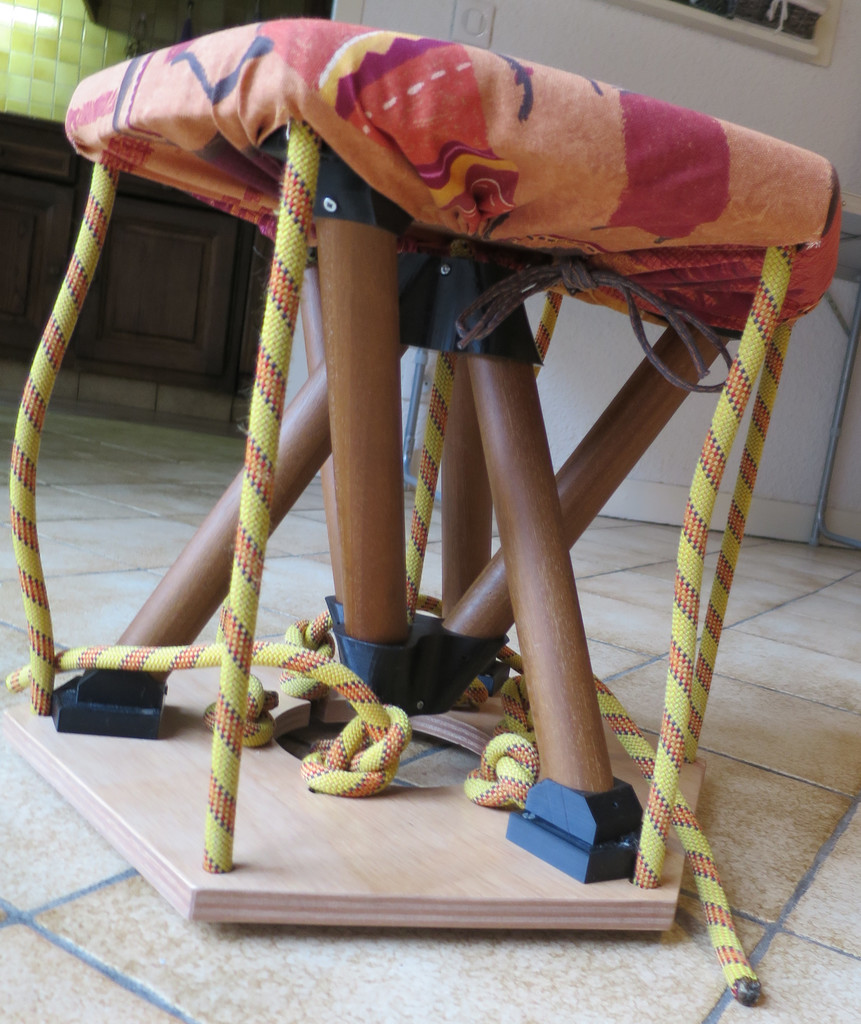
<p>Inspired by the "impossible table", this stool is built to sustain the weight of a person with</p> <p>two tripods mounted upside-down for an optimal force transfer.</p> <p>As it is build around climbing rope which are elastic by nature, this stool is naturally unstable. That's what makes it fun !</p> <p>As 3D printed parts are transmitting the full weight, extra care should be ported to the choice of the printed material and to the slicing in order to maximize the strength of those parts. I chose PET-G and the finished stool stands my weight. Fiber-reinforced filament are probably a better choice.</p> <h3>Print Settings</h3> <p><strong>Printer Brand:</strong></p> <p>Prusa</p> <p class="detail-setting printer"><strong>Printer: </strong> <div><p>i3 MK2S</p></div> <p><strong>Rafts:</strong></p> <p>No</p> <p class="detail-setting supports"><strong>Supports: </strong> <div><p>No</p></div> <p><strong>Resolution:</strong></p> <p>0.2</p> <p class="detail-setting infill"><strong>Infill: </strong> <div><p>10%</p></div> <p><strong>Filament:</strong> Dailyfil PET-G Black</p> <p><br/> <p class="detail-setting notes"><strong>Notes: </strong></p> </p><div><p>5 full layers (up, down and sidewalls) for strength</p></div> How I Designed This =================== <p><strong>Bill of material:</strong></p> <div><ul><li> 2x discs of plywood, 15mm thickness, diameter 380mm or slightly larger <p>6x sticks of wood 35mm diameter, 295 mm in length. I sew an old curtain rod.</p> <p>6m of climbing rope (typically 10 to 12mm diameter)</p> <p>6x M3x25 screws</p> <p>6x M3 square nuts</p> <p>18x 3x30 wood screws</p> <p>6 (up to 24) 2x12 wood screws</p> <p>2 printed parts called "head"</p> <p>6 printed parts called "foot"</p> <p><strong>Step 1: Upper and lower plates</strong></p> <div><p>Draw a 380 mm diameter circle on the plywood.<br/> Drill 6x 12mm holes in hexagon shape, slightly outside the circle. <p>To assemble a tripod, use 1 head, 3 wood sticks and 3 feet.</p> <p>You can secure the mount with 2x12 wood screws.</p> <p>Those screws are just for mounting, no forces are transmitted.</p> <p>Ensure the tripod aligns well in the 380mm circle.</p> <p>Repeat this procedure 2 times: one for the upper and one for the lower plate.</p> <p><strong>Step 2: the central rope</strong></p> <p>This rope will be holding all the weight: special care must be put on this step.</p> <p>Put the M3 square nuts and screws in place in the head part (tripod summit) without tightening the screws.</p> <p>Ensure each tripod has 3 screws, that they are engaged in the nut but that the 12mm hole is wide open.</p> <p>Cut the central rope at 30cm long.</p> <p>Insert each end into a tripod (from the bottom) until it comes out (close to the screws).</p> <p>Don't tighten those M3 screws yet.</p> <p><strong>Step3: bottom tripod</strong></p> <p>Screw the 3 feet of the bottom tripod on the bottom plate, aligned inside the 380mm circle drawn in step1, using 9 of the 3x30mm wood screws.</p> <p><strong>Step 4: Wire the side ropes</strong></p> <p>Use a piece of rope of ~2m and engage it in 2 adjacent holes on the upper plate, so that it forms an upside-down U shape.</p> <p>Repeat the procedure 3 times to fill the 6 holes drilled in hexagon.</p> <p>Engage each of the 6 rope ends in the 6 holes of the bottom plate.</p> <p>Thanks to the stiffness of the rope, the structure is already pretty rigid, which allows to turn it upside-down.</p> <p>Screw the upper plate to the feet of the upper tripod, again aligning in the 380mm circle.</p> <p><strong>Step 5: Tighten the different rods</strong></p> <p>Adjust the central rope length and tighten the 6 M3 screws.</p> <p>Tighten the 6 outer roped to maintain the structure in place, using knots of 8.</p> <p>I drilled 6 other holes to have those knots located in the upper-side of the bottom plate.</p> </p></div></li></ul></div></p></p></p> Category: Kitchen & Dining
With this file you will be able to print Tensegrity stool with your 3D printer. Click on the button and save the file on your computer to work, edit or customize your design. You can also find more 3D designs for printers on Tensegrity stool.
