TEN MINUTE RINGS
prusaprinters
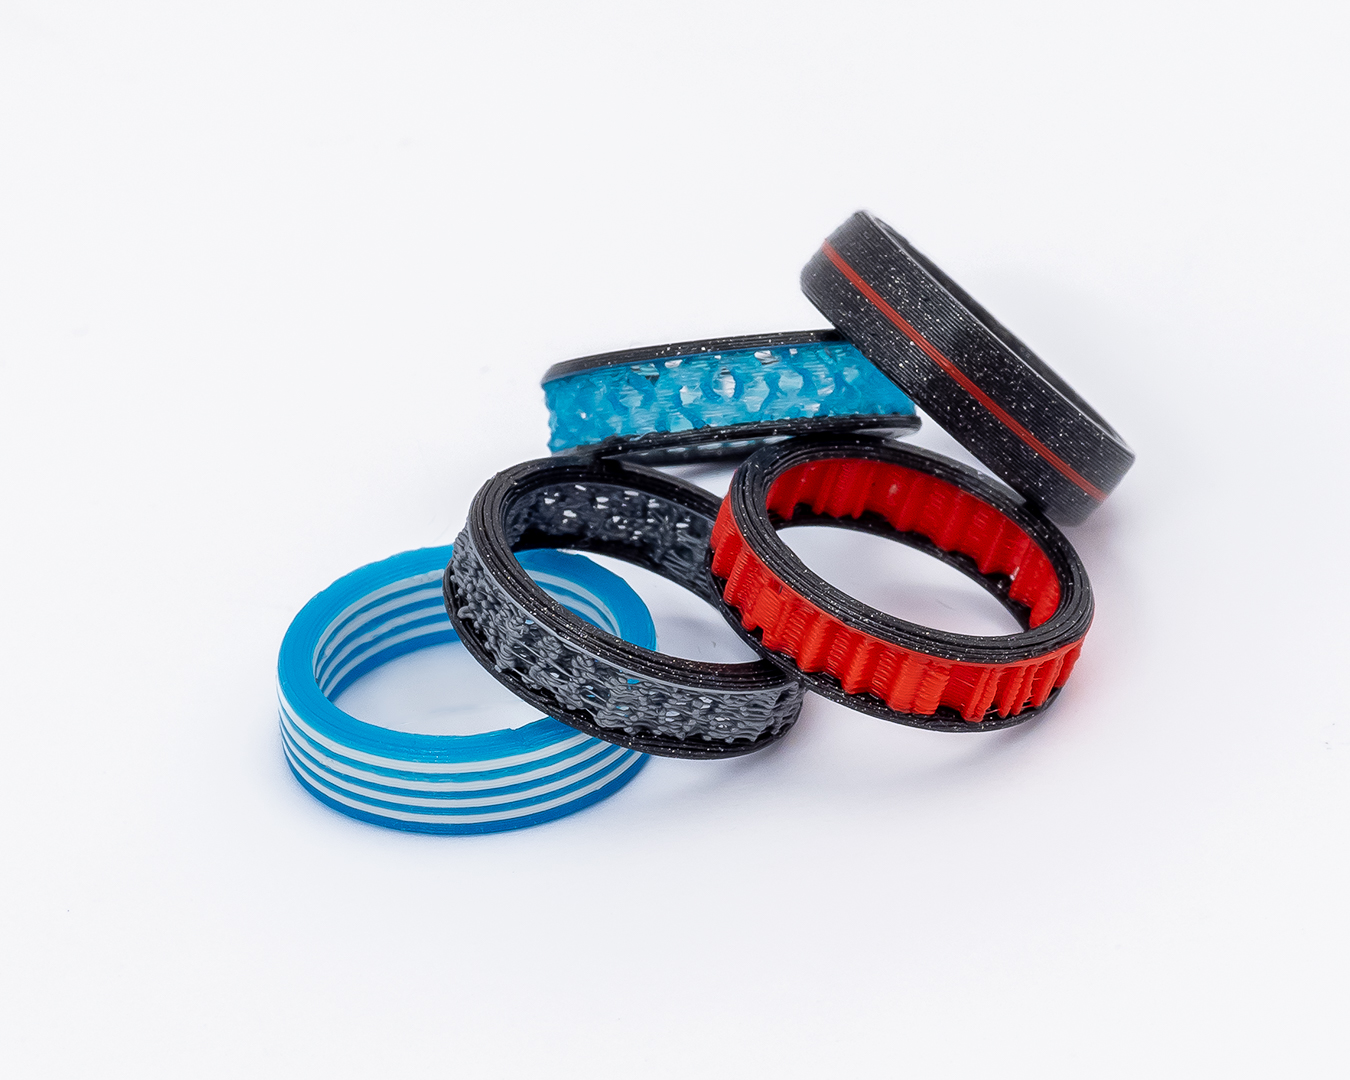
<p>Now it's possible to change your ring every day to match your mood using only ten minutes of your time, a tiny bit of filament and a bit of patience while you change colours every minute or so! </p><p>You can use the pre-sliced files to create your own combinations of colours, or why not play a little with some of the textures in the attached slicer files or add your own? <br><br>Each ring displayed above has an 18mm internal diameter and an overall diameter of 22.6mm. Simply scale it up or down in the slicer to customise the fit to your purposes. </p><p>If you add 4.6mm to your required diameter and use the result as the “X” dimension in your slicer the ring will scale correctly.</p><p>The sample rings are as follows, but since they use little time or material, don't be afraid to experiment. </p><p>*****</p><p><strong>3 Stripes</strong></p><p>An eleven minute print (the longest of this series) with two colour changes - leave a thin strip around the centre or use three different colours. Of course there's nothing to stop you adding more changes and varying the width - the world is your oyster!</p><figure class="image image-style-align-center"><img src="https://media.prusaprinters.org/media/prints/134101/rich_content/4eebc45a-b2d2-4cf1-b921-f4d9062b45c1/22-02-14-at-19-24-14.jpg#%7B%22uuid%22%3A%22b922a6b2-fcb9-4757-97da-7e2a28842269%22%2C%22w%22%3A1430%2C%22h%22%3A1080%7D"></figure><p> </p><p>***** </p><p><strong>9 Stripes</strong></p><p>Nine minutes of print time plus however long it takes you to change out the colour nine times. Use nine different colours or just two, or any other combination that takes your fancy. </p><p>Vary them a bit, edit the 3mf file to skip a change or two - have fun!</p><p><img src="https://media.prusaprinters.org/media/prints/134101/rich_content/50a84dd4-5510-48be-a17f-d934c9e36f16/22-02-14-at-19-25-17-edit.jpg#%7B%22uuid%22%3A%225e588a6c-6acd-4a60-ab8a-af11df400d02%22%2C%22w%22%3A1387%2C%22h%22%3A1080%7D"></p><p> </p><p>***** </p><p><strong>3D Honeycomb</strong></p><p>This ring features two colour change positions with a height modifier deleting external perimeters. <br><br>3D Honeycomb infill at 25% is shown and gives a lovely organic pattern, but increase or decrease the fill density for a surprising range of textures.. </p><p>The colour changes are optional of course or add more if you really must. </p><p>This ring can be yours in 8 minutes of printing time (if you are really slick at changing the colours).</p><figure class="image image-style-align-center"><img src="https://media.prusaprinters.org/media/prints/134101/rich_content/bdee5bad-c106-4fb4-a318-00e0a7414ba3/22-02-14-at-19-25-35.jpg#%7B%22uuid%22%3A%22596ae2e2-7532-4bb2-a7cb-a5873b456e32%22%2C%22w%22%3A1358%2C%22h%22%3A1080%7D"></figure><p><strong> </strong></p><p><strong>***** </strong></p><p><strong>Gyroid</strong></p><p>This example Gyroid infill at 25% with the same two colour change positions and height modifier. </p><p>My Azure Blue filament is starting to suffer from humidity but I actually like the stringiness in this particular model - it really gives the feeling it's made of melting ice. The bigger the infill at this scale, the greater the sense of melting or decay, conversely as the density of fill increases, so does the rigidity of the geometry (in appearance).</p><p>I might even print one without the colour change before I dry out my filament if I have seven minutes to spare.</p><figure class="image image-style-align-center"><img src="https://media.prusaprinters.org/media/prints/134101/rich_content/15d60a50-9014-4c60-b9f9-3e4103c1bb0e/22-02-14-at-19-24-31.jpg#%7B%22uuid%22%3A%223bafb119-474c-45d3-aa97-f093bd1b2c15%22%2C%22w%22%3A1350%2C%22h%22%3A1080%7D"></figure><p> </p><p>***** </p><p><strong>Stars</strong></p><p>Star infill at 50% gives a random geometric pattern around the perimeter, because it's a two dimensional infill there will be some vertical gaps which add a feeling of lightness to it, although they are barely visible from this angle. <br><br>Decreasing the fill results in more spaces with a series of columns appearing at irregular spaces on the perimeter - increasing gives a much tighter pattern. <br><br>Eight minutes is all it takes to make a piece of art with your personal stamp on it.</p><figure class="image image-style-align-center"><img src="https://media.prusaprinters.org/media/prints/134101/rich_content/ff496672-d882-450c-b6bf-8bacc310c9f2/22-02-14-at-19-23-49.jpg#%7B%22uuid%22%3A%223a307c44-145f-40b3-9255-d2054bd57dcf%22%2C%22w%22%3A1350%2C%22h%22%3A1080%7D"></figure><p> </p><p><br> </p>
With this file you will be able to print TEN MINUTE RINGS with your 3D printer. Click on the button and save the file on your computer to work, edit or customize your design. You can also find more 3D designs for printers on TEN MINUTE RINGS.