Tefifon Replacement Part: Cassette Drive
prusaprinters
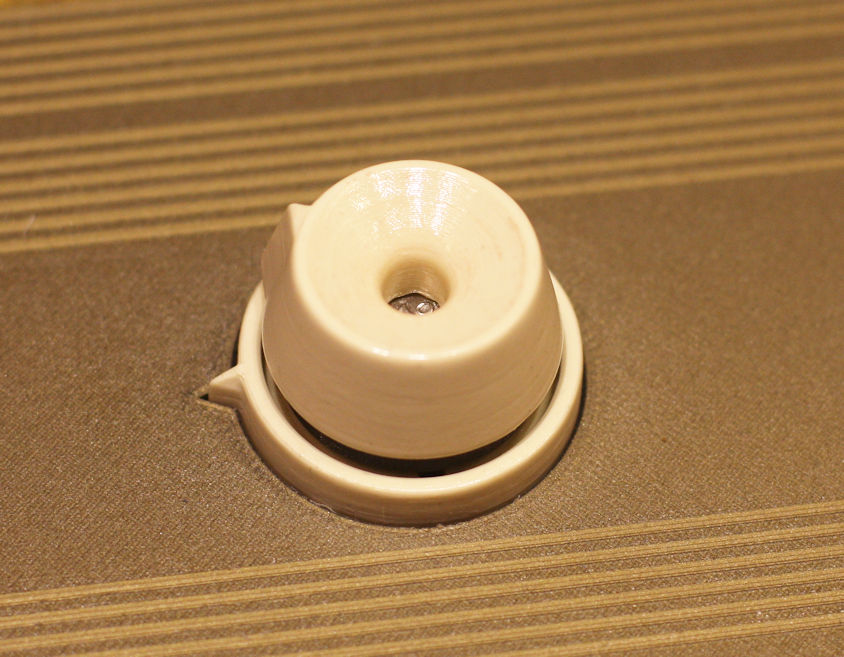
<p>The cassette drive is a part of the Tefifon that often breaks. Also it is constructed in a way that it is impossible to disassemble without breaking it. Therefore, there is no good way to relubricate the sintered bearing. Many drives therefore no longer run well and make noise.</p><figure class="image image-style-align-center image_resized" style="width:29.85%;"><img src="https://media.prusaprinters.org/media/prints/74659/rich_content/49ce3f2a-35c0-452c-9348-8579d166d137/original.jpg#%7B%22uuid%22%3A%22abf549b8-b504-4ff9-b2b3-1856a4376982%22%2C%22w%22%3A522%2C%22h%22%3A702%7D"></figure><p>So I decided to design this replacement part. When mounted to the device it almost looks identical to the original part. But all invisible parts have been optimized for 3d printing, stability and for using a standard ball bearing.</p><figure class="image image-style-align-center image_resized" style="width:55.41%;"><img src="https://media.prusaprinters.org/media/prints/74659/rich_content/1cbd207b-4a39-4d76-974b-286d8cc38079/result.jpg#%7B%22uuid%22%3A%22583aff8b-0c99-456c-8bd8-b0730538bda1%22%2C%22w%22%3A636%2C%22h%22%3A424%7D"></figure><h3><strong>Changelog:</strong></h3><ul><li>August 30, 2021:<ul><li>Improved the design of the ‘top-connetor’ to make it easier to insert the screw</li><li>The shape of the 'bearing-adapter' was changed from round to hexagonal to allow it to be gripped with pliers.</li></ul></li><li>August 26, 2021:<ul><li>Added supports for sanding and varnishing to the design.</li></ul></li></ul><h3><strong>Printing</strong></h3><p>The cassette drive consist of seven parts. Two of them are printed in light ivory PLA to match the color of the original part as good as possible. All the other parts should be printed in PETG. I opted for metal colors there. Everything prints without support. The 3mf and gcode files are provided for download as well as the stl files. You can look up the settings in the 3mf files.</p><h3>Parts required</h3><p>In addition to the printed parts, you will need the following:</p><ul><li>A ball bearing 19x8x6mm</li><li>A hex screw M5x25mm for the axis (I did use a M5x30mm screw in my first print, as can be seen in the photos. It also works, but is not the best option)</li><li>3 pcs. ISO7830 M3 x 5mm...8mm flathead screws (for mounting the top-connector to the top part)</li><li>4 pcs. ISO7830 M3 x 5mm...6mm flathead screws (for mountint the mount-ring and mount-lower to the mount-upper part)</li><li>3x M3x6mm set screws (for mounting the pulley to the axis)</li></ul><p>For assembly you will also need an M5 nut, a wrench and an Allen key for the set screws. So this is all you will need:</p><figure class="image"><img src="https://media.prusaprinters.org/media/prints/74659/rich_content/d96cc43d-ea3d-4035-974d-755b3bb5e0b3/parts.jpg#%7B%22uuid%22%3A%225a4901a6-a1b8-43f2-8fbb-f7c94bc1ba09%22%2C%22w%22%3A1056%2C%22h%22%3A1044%7D"></figure><h3>Assembly</h3><p>1. Insert the M5 screw into the ‘top-connector’ completely. Use the M5 nut and a wrench to pull the head of the screw into the part. Rotate the head further until the flat sides line up with the three screw holes:</p><figure class="table"><table><tbody><tr><td><figure class="image image_resized image-style-align-right" style="width:97.69%;"><img src="https://media.prusaprinters.org/media/prints/74659/rich_content/215272de-5563-4c14-9d04-2d40ecd4df62/assembly1a.jpg#%7B%22uuid%22%3A%229337d8bd-628f-4f30-9f5e-821b108f9a02%22%2C%22w%22%3A494%2C%22h%22%3A386%7D"></figure></td><td><figure class="image image_resized image-style-align-left" style="width:79.21%;"><img src="https://media.prusaprinters.org/media/prints/74659/rich_content/fddf5970-28f9-48d5-9b57-acfcfc0074b1/assembly1b.jpg#%7B%22uuid%22%3A%22c06f655a-bd1f-4f62-a752-d0750a357de1%22%2C%22w%22%3A610%2C%22h%22%3A495%7D"></figure></td></tr></tbody></table></figure><p>2. Attach the 'top-connector' to the ‘top’ by using 3 M3 screws:</p><figure class="image image_resized" style="width:46.14%;"><img src="https://media.prusaprinters.org/media/prints/74659/rich_content/0dd1de60-6388-4949-9971-02124594a012/assembly2.jpg#%7B%22uuid%22%3A%22b6ec719e-4d75-4d6d-af29-864ddaa97469%22%2C%22w%22%3A1333%2C%22h%22%3A987%7D"></figure><p>3. Insert the ball bearing into the ‘mount’ part from below. Attach the ‘mount-lower’ part and the ‘mount-ring’ like so using 4 screws:</p><figure class="table"><table><tbody><tr><td><figure class="image image_resized image-style-align-right" style="width:78.78%;"><img src="https://media.prusaprinters.org/media/prints/74659/rich_content/8907751b-0988-4392-a819-d41f59f01dd6/assembly3a.jpg#%7B%22uuid%22%3A%22734f1566-6b06-476d-9537-a3ab9f1e65b0%22%2C%22w%22%3A837%2C%22h%22%3A595%7D"></figure></td><td><figure class="image image-style-align-left"><img src="https://media.prusaprinters.org/media/prints/74659/rich_content/a1da183a-c5e5-4fc0-8042-7075cd5c1bcd/assembly3b.jpg#%7B%22uuid%22%3A%226e5e21b1-be2b-437a-aa36-38f5f88475b9%22%2C%22w%22%3A583%2C%22h%22%3A473%7D"></figure></td></tr></tbody></table></figure><p>4. Push the top part through the bearing and attach the ‘bearing-adapter' from below:</p><figure class="image image_resized" style="width:45.21%;"><img src="https://media.prusaprinters.org/media/prints/74659/rich_content/966ca18b-cdad-48ae-855f-5b15f72f3824/assembly4.jpg#%7B%22uuid%22%3A%2293615257-15e4-4665-8c09-9c11405dcd22%22%2C%22w%22%3A519%2C%22h%22%3A491%7D"></figure><p>5. Use the M5 screw nut an a wrench to tighten the top part and the ‘bearing-adapter’ firmly to the ball bearing:</p><figure class="image image_resized" style="width:55.14%;"><img src="https://media.prusaprinters.org/media/prints/74659/rich_content/fa823cfe-ab94-4c63-847e-b462fae52c20/assembly5.jpg#%7B%22uuid%22%3A%226935ca26-c65c-419b-9a12-c0eaefb0a3eb%22%2C%22w%22%3A719%2C%22h%22%3A461%7D"></figure><p>6. Attach the ‘pulley’ to the screw and drive it thightly to the ‘bearing-adapter’. Use the 3 set screws to fix it in place:</p><figure class="image image_resized" style="width:48.6%;"><img src="https://media.prusaprinters.org/media/prints/74659/rich_content/3fa36350-1a77-44a0-ad37-722ccc459d5a/assembly6.jpg#%7B%22uuid%22%3A%224cb5f0d2-ff5b-475d-be2e-e73078da5914%22%2C%22w%22%3A546%2C%22h%22%3A473%7D"></figure><p>You're done:</p><figure class="image image_resized" style="width:67.28%;"><img src="https://media.prusaprinters.org/media/prints/74659/rich_content/4f8cc63b-abbf-46f9-a784-96696310de98/result.jpg#%7B%22uuid%22%3A%22422b8083-78c3-46f9-945b-779f5799dc0a%22%2C%22w%22%3A636%2C%22h%22%3A424%7D"></figure><p>Mounting the replacement part to the Tefifon chassis works works exactly the same as with the original part (M3x10mm countersunk screws, washers, nuts) :</p><figure class="image image_resized" style="width:59.18%;"><img src="https://media.prusaprinters.org/media/prints/74659/rich_content/de3531f2-9ce5-4074-a31c-6ea7616daf7c/mounted1.jpg#%7B%22uuid%22%3A%22efedcb9e-a38e-44a1-975a-87ea83680253%22%2C%22w%22%3A741%2C%22h%22%3A650%7D"></figure><p>Here is what it looks like on the device:</p><figure class="image image_resized" style="width:67.39%;"><img src="https://media.prusaprinters.org/media/prints/74659/rich_content/d41ca9d2-c098-4ce5-8fbf-da9634d23bc2/mounted2.jpg#%7B%22uuid%22%3A%221b3e2650-ca6e-4035-bb2f-71479310a5a8%22%2C%22w%22%3A844%2C%22h%22%3A657%7D"></figure><h3>Varnish</h3><p>You can improve the look of the replacement part by varnishing the two ivory parts. The download files contain varnishing supports you can print. They make sanding and varnishing much easier (use M3 screws to temporarily attach the supports to the parts):</p><figure class="image"><img src="https://media.prusaprinters.org/media/prints/74659/rich_content/0f179212-88a1-46f7-86bf-441ee01c1224/varnishing-supports.jpg#%7B%22uuid%22%3A%22aa3aab5a-aef4-4949-8db7-d16928eda18a%22%2C%22w%22%3A825%2C%22h%22%3A573%7D"></figure><p>I am using glossy polyurethan varnish. Don't forget to sand the parts before painting and after the first coat has dried. I applied multiple thin coats to get a perfect result. I am very happy with how it turned out.</p><h3><strong>Design and Source Code</strong></h3><p>The part has been designed using OpenSCAD. </p><figure class="image image_resized" style="width:51.64%;"><img src="https://media.prusaprinters.org/media/prints/74659/rich_content/7ba5925c-fb74-44fa-b957-87795aec3089/openscad.png#%7B%22uuid%22%3A%227a462a7b-46d2-4a44-9334-e7856e67778b%22%2C%22w%22%3A666%2C%22h%22%3A481%7D"></figure><p>I have provided the source code for download.</p><p>Here you can see a cross cut:</p><figure class="image"><img src="https://media.prusaprinters.org/media/prints/74659/rich_content/68ac545b-fd2a-4a10-98cf-85bd5efa9352/openscad_crosssection.png#%7B%22uuid%22%3A%22bd0ef63e-d459-4d45-b3b2-7a59af6e2516%22%2C%22w%22%3A1093%2C%22h%22%3A621%7D"></figure><h3><strong>Happy printing!</strong></h3><p>If you like this design, then <strong>please leave a like</strong> and also <strong>post a photo in the comments</strong>.</p><p>Looking for more Tefifon related stuff? Have a look at my <a href="https://www.prusaprinters.org/social/52356-mageb/collections/64615"><strong>Tefifion collection</strong></a>. </p><p>You might also want to check out my <a href="https://www.prusaprinters.org/social/52356-mageb/prints"><strong>other designs</strong></a>.</p>
With this file you will be able to print Tefifon Replacement Part: Cassette Drive with your 3D printer. Click on the button and save the file on your computer to work, edit or customize your design. You can also find more 3D designs for printers on Tefifon Replacement Part: Cassette Drive.