Tefifon Replacement Cartridge Adapter
prusaprinters
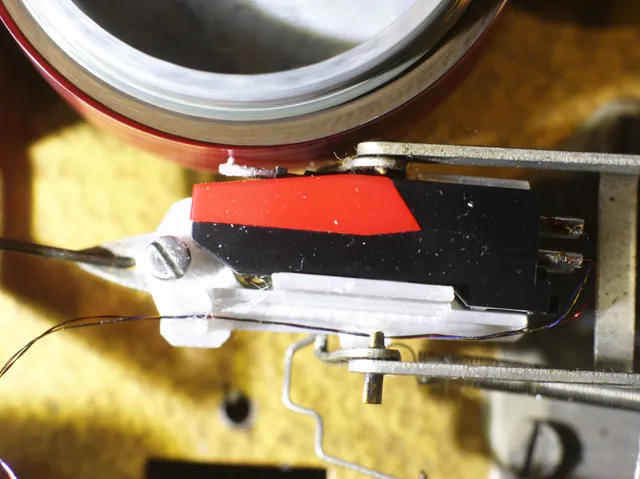
The original ceramic pickup cartridges of Tefifons are made from a material that absorbs moisture. Therefore, almost all of these cartridges are now rotten and need to be replaced. Here is a photo of an early attempt of me replacing the ceramic by a part from a piezo buzzer :Achim has written very detailed instructions for the restoration of Tefifons, including how to replace the cartridge by a cheep Chinese one that is readily available for little money: https://radio-bastler.de/forum/showthread.php?tid=14749 (German).I added a bit of 3d printing fun to Achim's version of the mod and ended up with this design for an adapter:The cartridge easily snaps in to this holder - no glue required:It then can be mounted onto the tone arm using the original screw (M2 x 6mm):I did not even have to shorten the cartridge, as Achim and others have done.I have now successfully replaced the cartridges of two Tefifion KC-1 Ra devices.PrintingI have printed the holder using PETG in 0.1mm layer height.Selecting the right cartridgeBe aware that although they all look pretty much the same, not all of the “RPC"-cartridges will fit. I have since found two different versions of the cartridge, that differ in quality and size:I got the correct ones from ebay sellers in Germany for about 5 EUR per cartridge. The faulty ones are from China for about 1.60 EUR per cartridge.Mounting the Assembly to the TefifonFor mounting the cartridge you will have to cut a crossbar that is in the way by using a side cutter:As the cutter deforms the bar, the remaining pieces should now be fixed at their locations. Make sure that the mechanism can still move well.If your Tefifon does not have this crossbar, then I guess my solution will not fit your device, since the original connector should be longer than the cut one...WiringFor wiring you can choose from stereo or mono wiring.Wiring for MonoWiring for mono is the easiest option. Just connect the + and - connectors from the left and right channel using some wire and then connect the original cable from the Tefifon:Wiring for StereoYou can upgrade your Tefifon to stereo by running 4 wires instead of 2 from the cartridge to the preamp. I have used 0.1mm enamelled copper wire in 4 different colors to connect the cartridge:Note that you will also have to rewire the cable from the connection point to the bottom of the device, as it is only 2 wires and shielding. Or you can do what I did and connect to - terminals to shield and use the 2 wires in the cable for left and right. But be aware that you then have already have chosen your central grounding point and should take care of not making a ground connection anywhere else.Adjusting the Tracking ForceYou will most likely have to reduce the tracking force to match the new cartridge. I am not sure about the correct value, but I aimed for about 6 grams (please let me know in the comments if you know better). If you can not adjust to such low values you might want to check out this replacement part.Design and Source CodeThe adapter has been designed using OpenSCAD. I have provided the source code for download, so you can adjust the design to your needs.What's next?As for ceramic pickups, I am satisfied with the adapter. However, I would find the conversion to magnetic pickups exciting. If you happen to know a small cartridge that would be suitable for a conversion, then please let me know in the comments.Happy printing!If you like this design, then please leave a like and also post a photo in the comments.Looking for more Tefifon related stuff? Have a look at my Tefifion collection. You might also want to check out my other designs.
With this file you will be able to print Tefifon Replacement Cartridge Adapter with your 3D printer. Click on the button and save the file on your computer to work, edit or customize your design. You can also find more 3D designs for printers on Tefifon Replacement Cartridge Adapter.