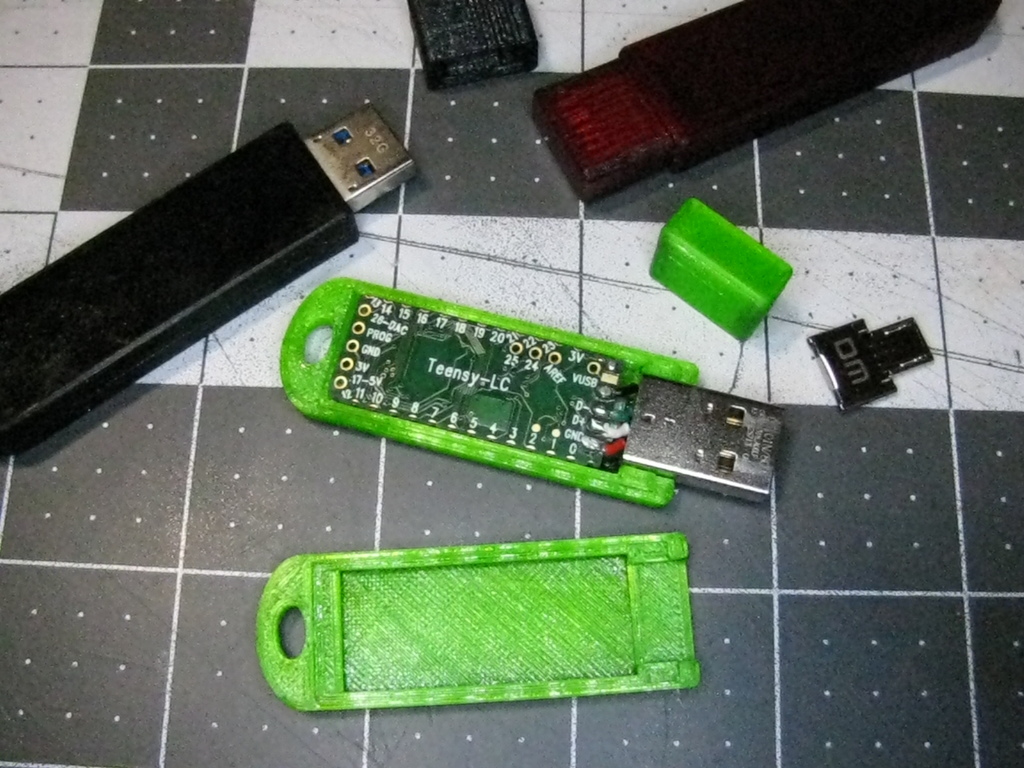
Teensy LC / 3.2 USB HID
thingiverse
<h2>If you like what you see here, consider leaving a tip.</h2> <b>This is not a standard USB mass storage device!</b> It's a modified <a href="https://www.pjrc.com/teensy/teensyLC.html">Teensy LC</a> or <a href="https://www.pjrc.com/teensy/teensy31.html">Teensy 3.2</a> microcontroller that sends keystrokes to a computer, phone, or tablet at around 6000 words per minute as if it were a USB keyboard. <b>Modifying the board:</b> I reduced the board width to ~14.85mm by cutting and filing the parts where through holes were located. Be cautious not to cut the traces that connect the USB 5v input to pin 26 or other parts of the board. I filed too much off, so I had to bridge the traces with solder. The ground pin has a similar issue, with traces on both the top and bottom sides of the board. If the bridge between them is cut, you can solder a ground wire from the outer case of the USB A connector to the case of the USB mini connector. <b>Adding a male USB A Connector:</b> The male USB A connector I used came from an old Kingston USB thumb drive, so I'm unsure if others will fit this case without modification. My best guess is <a href="https://www.sparkfun.com/products/437">this USB A connector</a> from Sparkfun. It seems to have the right dimensions, but the solder pads are further towards the rear of the connector. Heat shrink tubing should be enough to insulate them from shorting out on the micro USB connector, or you could try desoldering the micro USB connector from the board before soldering wires from the USB A connector to the pads under the board. You could also cut away insulation from the shell of the USB A connector, exposing more of the connector pins. Note that I've soldered the wrong wire colours to the USB A connector: black to +5V (should be red), white to D+ (should be green), green to D- (should be white), and red to ground (should be black). It's not like electrons know what colour insulation is. <b>Programming the Teensy:</b> PJRC has created an add-on for the Arduino IDE that includes software libraries, example code, and the ability to upload compiled code to the Teensy LC through their <a href="https://www.pjrc.com/teensy/loader.html">Teensy Loader</a>. I've included a Windows example code file that waits one second, opens Notepad, types out a message, then fades the on-board light on and off to let you know the program has finished running. To upload new code to the Teensy, open the .ino file in the Arduino IDE or create your own script. Click on "Tools" and ensure that the "Board" is set to the correct board (Teensy LC or 3.2). Click on "Tools" again and set "USB Type" to "Keyboard," then hit the upload button. When the source code is done compiling, the Teensy Loader will open automatically. Click the "Automatic" button to turn it off. This prevents the Teensy from running the program immediately after it has been uploaded. Hold down the programming button on the Teensy board as you insert the device into a USB slot on your computer, then release the button. This prevents any code on the Teensy from executing and makes it ready to receive new programming. The Teensy Loader should recognize the Teensy board, and now you can click the "Program" button. When it's done sending the binary file to the Teensy, a message will appear that says "Download Complete." You can now remove the Teensy from the USB port and plug it back in without holding the program button, and the Teensy board will automatically run the code. Enjoy your new keyboard!
With this file you will be able to print Teensy LC / 3.2 USB HID with your 3D printer. Click on the button and save the file on your computer to work, edit or customize your design. You can also find more 3D designs for printers on Teensy LC / 3.2 USB HID.
