Teach Measurement by Making Your Own Ruler!
thingiverse
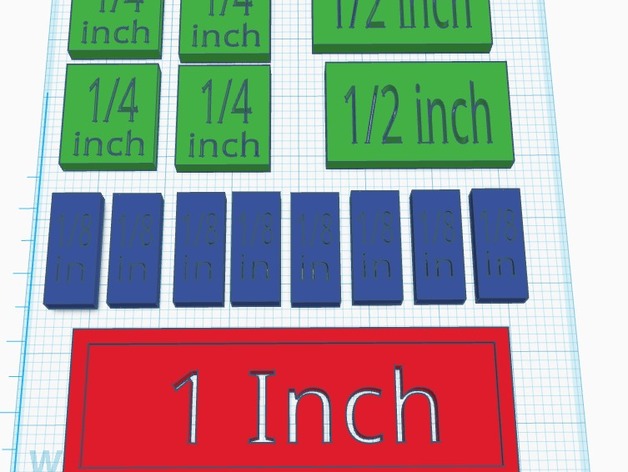
The goal of this lesson is to teach students how to use a ruler by teaching them the concept of the parts that make up an inch. Understanding an inch can be challenging for kids, and grasping its different sizes expressed as fractions can be even harder. This model is much larger than an inch, so reviewing the concept of scale is also essential. It's crucial that students know this is a representation and not an actual inch. This model can be easily manipulated to teach students the parts of an inch and their relationships with one another. For example, two 1/4-inch pieces are equivalent in size to one 1/2-inch piece. Part two of this lesson involves having students design their own ruler. Here's a link to a downloadable template: http://www.thingiverse.com/thing:1733620 Print Settings: Printer Brand: MakerBot Printer: MakerBot Replicator (5th Generation) Rafts: Yes Supports: No Resolution: 0.03 Infill: 10% Notes: These parts take a few hours to print but work well once completed. Overview and Background: If students build a ruler using a 3D printer and can manipulate the parts, they will have a better understanding of measurement concepts. Students will use 3D printed measurement manipulatives to develop an understanding of the parts that make up an inch. Objectives: Students will be able to conceptualize the parts of an inch. Standards: CCSS.MATH.CONTENT.3.MD.B.4 Generate measurement data by measuring lengths using rulers marked with halves and fourths of an inch. Show the data by making a line plot, where the horizontal scale is marked off in appropriate units – whole numbers, halves, or quarters. Lesson Plan and Activity: This lesson involves students using 3D printed manipulatives more than designing anything. They will design something in part two of this lesson. Part one should take one class period. Have students use the manipulatives and ask them what they notice about the different pieces and how they relate to each other. Hopefully, they can see how many pieces fit together to make an inch. Next steps would be to have them create a ruler of their own design. The goal is that they understand an inch has two halves, four quarters, and eight eighths, which they can represent in any way they want. Preparation: Before and after the lesson, I would give students a short quiz on the parts of a ruler to assess their knowledge. This website provides measurement games suitable for higher grades: http://www.rulergame.net/. Softschools.com also offers a game that is helpful: http://www.softschools.com/measurement/games/ruler/inch_ruler/. A great illustration to introduce the concept can be found here: https://s-media-cache-ak0.pinimg.com/564x/68/e0/60/68e06064aec55a18320883eedeac695a.jpg. It's a bit small, but it can be enlarged. I use this handout because it's an effective way to introduce the concept. The song can also be fun and engaging for students. This website is a valuable resource for math quizzes in general: https://www.thatquiz.org/tq-6/math/identify/fractions/. From here, I would compare my pre-test and post-test results to assess student learning.
With this file you will be able to print Teach Measurement by Making Your Own Ruler! with your 3D printer. Click on the button and save the file on your computer to work, edit or customize your design. You can also find more 3D designs for printers on Teach Measurement by Making Your Own Ruler!.
