Tank Track, Shocks, Idler Arm, Pins
thingiverse
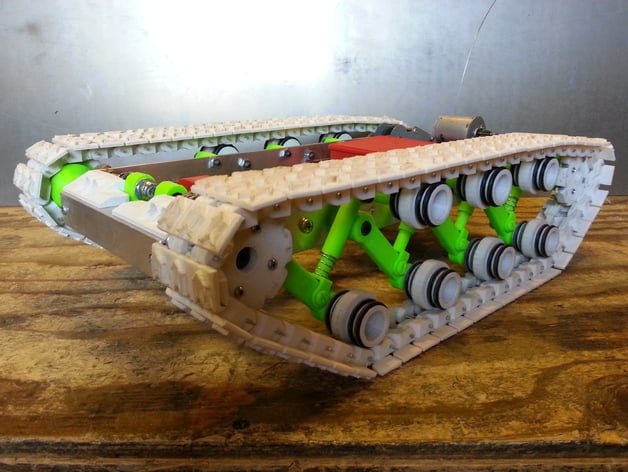
This was a thrilling experience to say the least. Printing was a chore and took up a lot of space to make everything fit. But I dropped a 7 1/2 lbs tank from 24" on to my table several times without breaking anything. It might take a few attempts to get the shock mounts right, but they'll hold up beautifully and give your tank a great cushioning effect. This product goes perfectly with the Tank Track 2in, Tank Track Idler wheels, worm gear cases, body parts, and lots more in my collection. If you space the Idler arms and shocks 3 inches apart on your tank side rail, you can create your tank any size you like. All of the components are designed to position the tank track with a center 1.5 inches from the side rail. The 2 inch tank track provides 1/2" clearance from the tank side rail. Apart from the printed parts, you'll need: (4) 1/4"x3/8"x1/8" sealed ball bearings, (8) #212 O-rings for idlers, (1) 1/4"x1 1/2" shoulder bolt, (1) 1/4"x7/8" shoulder bolt, (1) 1/4"x3/4" shoulder bolt, (1) 1/4"x1/2" shoulder bolt, (4) 10-24 nuts, (1) 4x3/8" sheet metal screw, (1) #6 flat washer, (1) #90 Hillman compression spring 1/2"x3/4"x.035 (optional), (1) #6 Hillman compression spring 5/16"x1 1/2"x.020, and one of each of these suspension units. Springs and bolts are available at True Value or Fastenal. I added some additional sizes of Idler arms and shocks to play with. You can choose from 2 1/2" 2 1/4" and 2" arms. The shocks come in 3", 2 3/4" and 2 1/2" eye-to-eye lengths. Use a #6 spring for the longest shock, and the same size spring only shorter for other shocks. Shorter arms will allow your rollers to be closer than 3" apart, while shorter shocks will lower your tank's height. Have fun! There's also a PDF drill guide for the frame rails in the downloads, along with other guides for gear boxes in the gear box listing. Be sure to check out the instructions tab for more information. Dec. 8, 2017: I just added some sprockets and cool mag idler wheels in bigger sizes to play with. Also some different arms that hold the track idlers on the arm. Check my collection for more tank-related stuff. Dec. 29, 2017: I now have CNC machined motor rails available to help you build a tank. This is the hardest part to make on the tank, and having one will greatly simplify things. Mar. 15, 2018: You can find Tank frame kits and parts to build the fastmiketank on eBay. For more pictures of the fastmiketank and other projects, check out my collection. Instructions: Okay, now comes the fun part! To get these shocks working, you have to drill out the inside of the bottom of the shock. Start with a "D" bit, then move on to an "E" bit, and finally an "F" bit until it moves freely up and down in the top of the shock. File down anything sticking out from the outside of the lower shock tube. You may need to assemble the shock bottom on the arm first. The #6 Hillman spring fits right inside the top of the shock. If you have a heavier tank, add the #90 springs to the bottom of the shock. You can adjust how much movement and load capability you want by the wire size and length of the springs. The #6 spring fits this tank's weight and travel requirements perfectly. You can trim the spring or use different wire sizes to fine-tune your tank's suspension. Be sure that when you mount the arm, the angle of the shock has free movement at the pivot points for the full range of motion of the arm. Pins: print with raft no support.
With this file you will be able to print Tank Track, Shocks, Idler Arm, Pins with your 3D printer. Click on the button and save the file on your computer to work, edit or customize your design. You can also find more 3D designs for printers on Tank Track, Shocks, Idler Arm, Pins.