Tank Extruder Mount (RigidBot, E3Dv6, Printrbot Gear Head)
cults3d
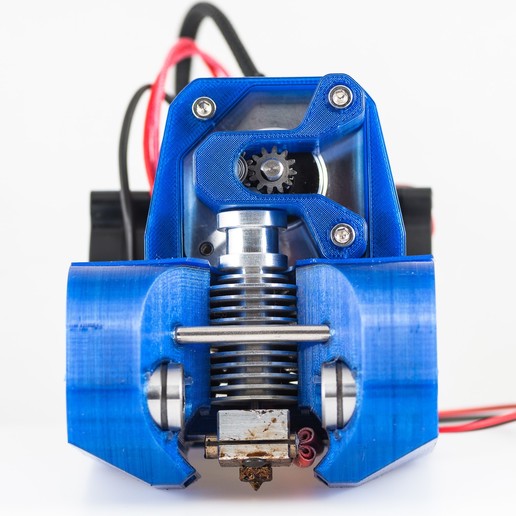
Single extruder mount for a RigidBot. Uses the following parts: RigidBot E3D v6 Printrbot Gear Head Beta Gear Head Extruder Mount 2 - 50mm x 15mm radial fans 4 - LM8UU Bearings 7W LED COB module (optional) 4 - 70mm M4 socket cap screws 4 - M4 nuts (preferably nyloc) 4 - 16mm M3 socket cap screws (for the motor mount) 1 - 8mm M3 socket cap screws (for the motor mount) 2 - 25mm M3 socket cap screws (for the extruder mount) 2 - 4mm M3 socket cap screws (for the extruder PCB) some 1.75mm NinjaFlex assorted wiring and connectors Support: Do not add support material inside the main air ducts, it will probably be difficult to remove. I printed with support material around the screw holes and near the radial fan mounts but it can be printed without (those areas are hidden anyway). Materials: The flex top part was designed to be printed with a flexible filament, but can be printed in other materials. I'm currently using a rectangle of 3mm sorbothane, but I don't think it makes a significant difference. The fan band should be printed in NinjaFlex or similar filament. I used PET+ for the main parts but I've also used PETG and PLA for some of the earlier versions. Warping from the heated bed or extruder may be an issue so ABS may be a better option if you can print it without warping. Assembly: There are 1.75mm channels for NinjaFlex or other similarly flexible filament, 3 around each bearing and 4 around the heatsink mount (16 total). The 30mm fan band goes around the E3D fan, which slides into the slot between the two main pieces (see picture). I tend to mount the fan backwards so the air and fumes blow away from me, but it may work better with fan blowing at the heatsink (facing the heatsink is the normal E3D configuration and puts less strain on the fan wires). The LED module slides in near the rear bearings. Wiring: If you want to use both fans or the LED light, you'll need to make splitter cables or rewire the fans. Make sure the heater cartridge cables don't touch the air ducts or they may melt. Mounting: Leave the M4 screws slightly loose until it's mounted on the 8mm rails, then tighten them gradually, checking that the entire assembly slides freely. It may require some fiddling to make sure the sides are parallel enough to avoid binding.
With this file you will be able to print Tank Extruder Mount (RigidBot, E3Dv6, Printrbot Gear Head) with your 3D printer. Click on the button and save the file on your computer to work, edit or customize your design. You can also find more 3D designs for printers on Tank Extruder Mount (RigidBot, E3Dv6, Printrbot Gear Head).