Tambour liqueur cabinet
prusaprinters
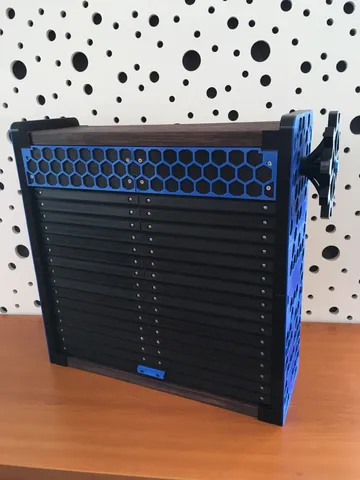
For this build you are gonna need the following:- 2x ball bearings (608z) 8x22x7mm (you can get them here)- 460 mm of M8 threaded rod- 2x 145x400x20 mm wooden plank- 1x 420x375x4 mm plywood- 1x M8 nut with locking insert- 8x M3 8mm sink head screws - 12x 4x40 mm wood screws- 2x 4x16 mm wood screws- 2x M3 15 mm round head screw- 82x M3 10 mm round head screws- 92x M3 nuts- Piece of nylon clothYou can get most of those parts in any hardware store. You are also gonna need two part epoxy glue, superglue and some glue that you can use to glue fabric to the plastic (I did use Chemopren standard). You need to print following number of the parts:- 1x Handle- 42x Door_piece- 42x Side_tooth- 21x Midle_tooth- 1x Cog- 1x Cog_plug- 2x Door_stop- 2x Inside_Cog- 1x Side_overlay_top- 1x Side_overlay_top_for_cog- 2x Side_overlay_midle- 2x Side_overlay_bottom- 2x Overlay_front_piece- 1x Front_piece_right- 1x Front_piece_connector- 1x Left_side_bottom- 6x Peg_7-9- 21x Peg_4-9- 1x Front_piece_left- 1x Left_side_top- 1x Right_side_bottom- 1x Right_side_topIf you can, you should substitute the pegs with steel rods of appropriate size. If this is not possibility for you, print the dowels with 3-5 peimeters.Layer hight: 0,15Filament: Prusament PLANone of the parts require supportsI did print all the parts on Anycubic Vyper.Workflow:1. Print all the parts2. Glue the sides together with super glue or two part epoxy3. Press the ball bearings in to the sides. It is tight fit, so it might require some sanding.4. Assemble 21 door panels. Each consists from two door pieces and are held together by superglue. You need to make sure that you are gluing the parts as straigth as possible.5. Glue the door panels on the cloth. You need to space them from each other, the spacing is little less than 1mm (I used credit card as a gauge). 6. Now you need to make holes in the cloth for M3 screws. I did burn the holes with soldering iron.7. Screw two side tooths and one midle tooth on each door panel. Once again you need to make sure, that all is oriented as precisly as possible.8. Prepare the wood and plywood, dimensions are mentioned abowe. I did stained it and than used carnaub wax as finnish9. Glue two pieces of inside cog on the threaded rod. The rod needs to protrude on both sides, on one side (the side that will go into the ball bearing it should not be more than 7 mm)10. Dry fit the finished door piece into the slots in the sides. It has to move frely. If it does not, sand the slot until it does11. Screw both wood parts into one side and put plywood into the slot in the back12. Put the inside cog piece into its place and set the door piece into the slot.13. It is time to put in the place the second side. Note, that all parts must fit precisly into their palce, ale it will not work. This step took me few atempts to fit all together. When all fits you need to screw the side in place.14. Set in the front pieces and front piece connector. For this step it is good to slide the door piece to its back position.15. Put the M8 nut inside the cog and than gloue the cog on threded rod that protrudes from side. Use two part epoxy as a glue for its strenght.16. Glue the door stops into the slots in the back17. Glue on the overlay pieces and screw in place the handle.
With this file you will be able to print Tambour liqueur cabinet with your 3D printer. Click on the button and save the file on your computer to work, edit or customize your design. You can also find more 3D designs for printers on Tambour liqueur cabinet.