TALKING AND COUNTING CLOCK
prusaprinters
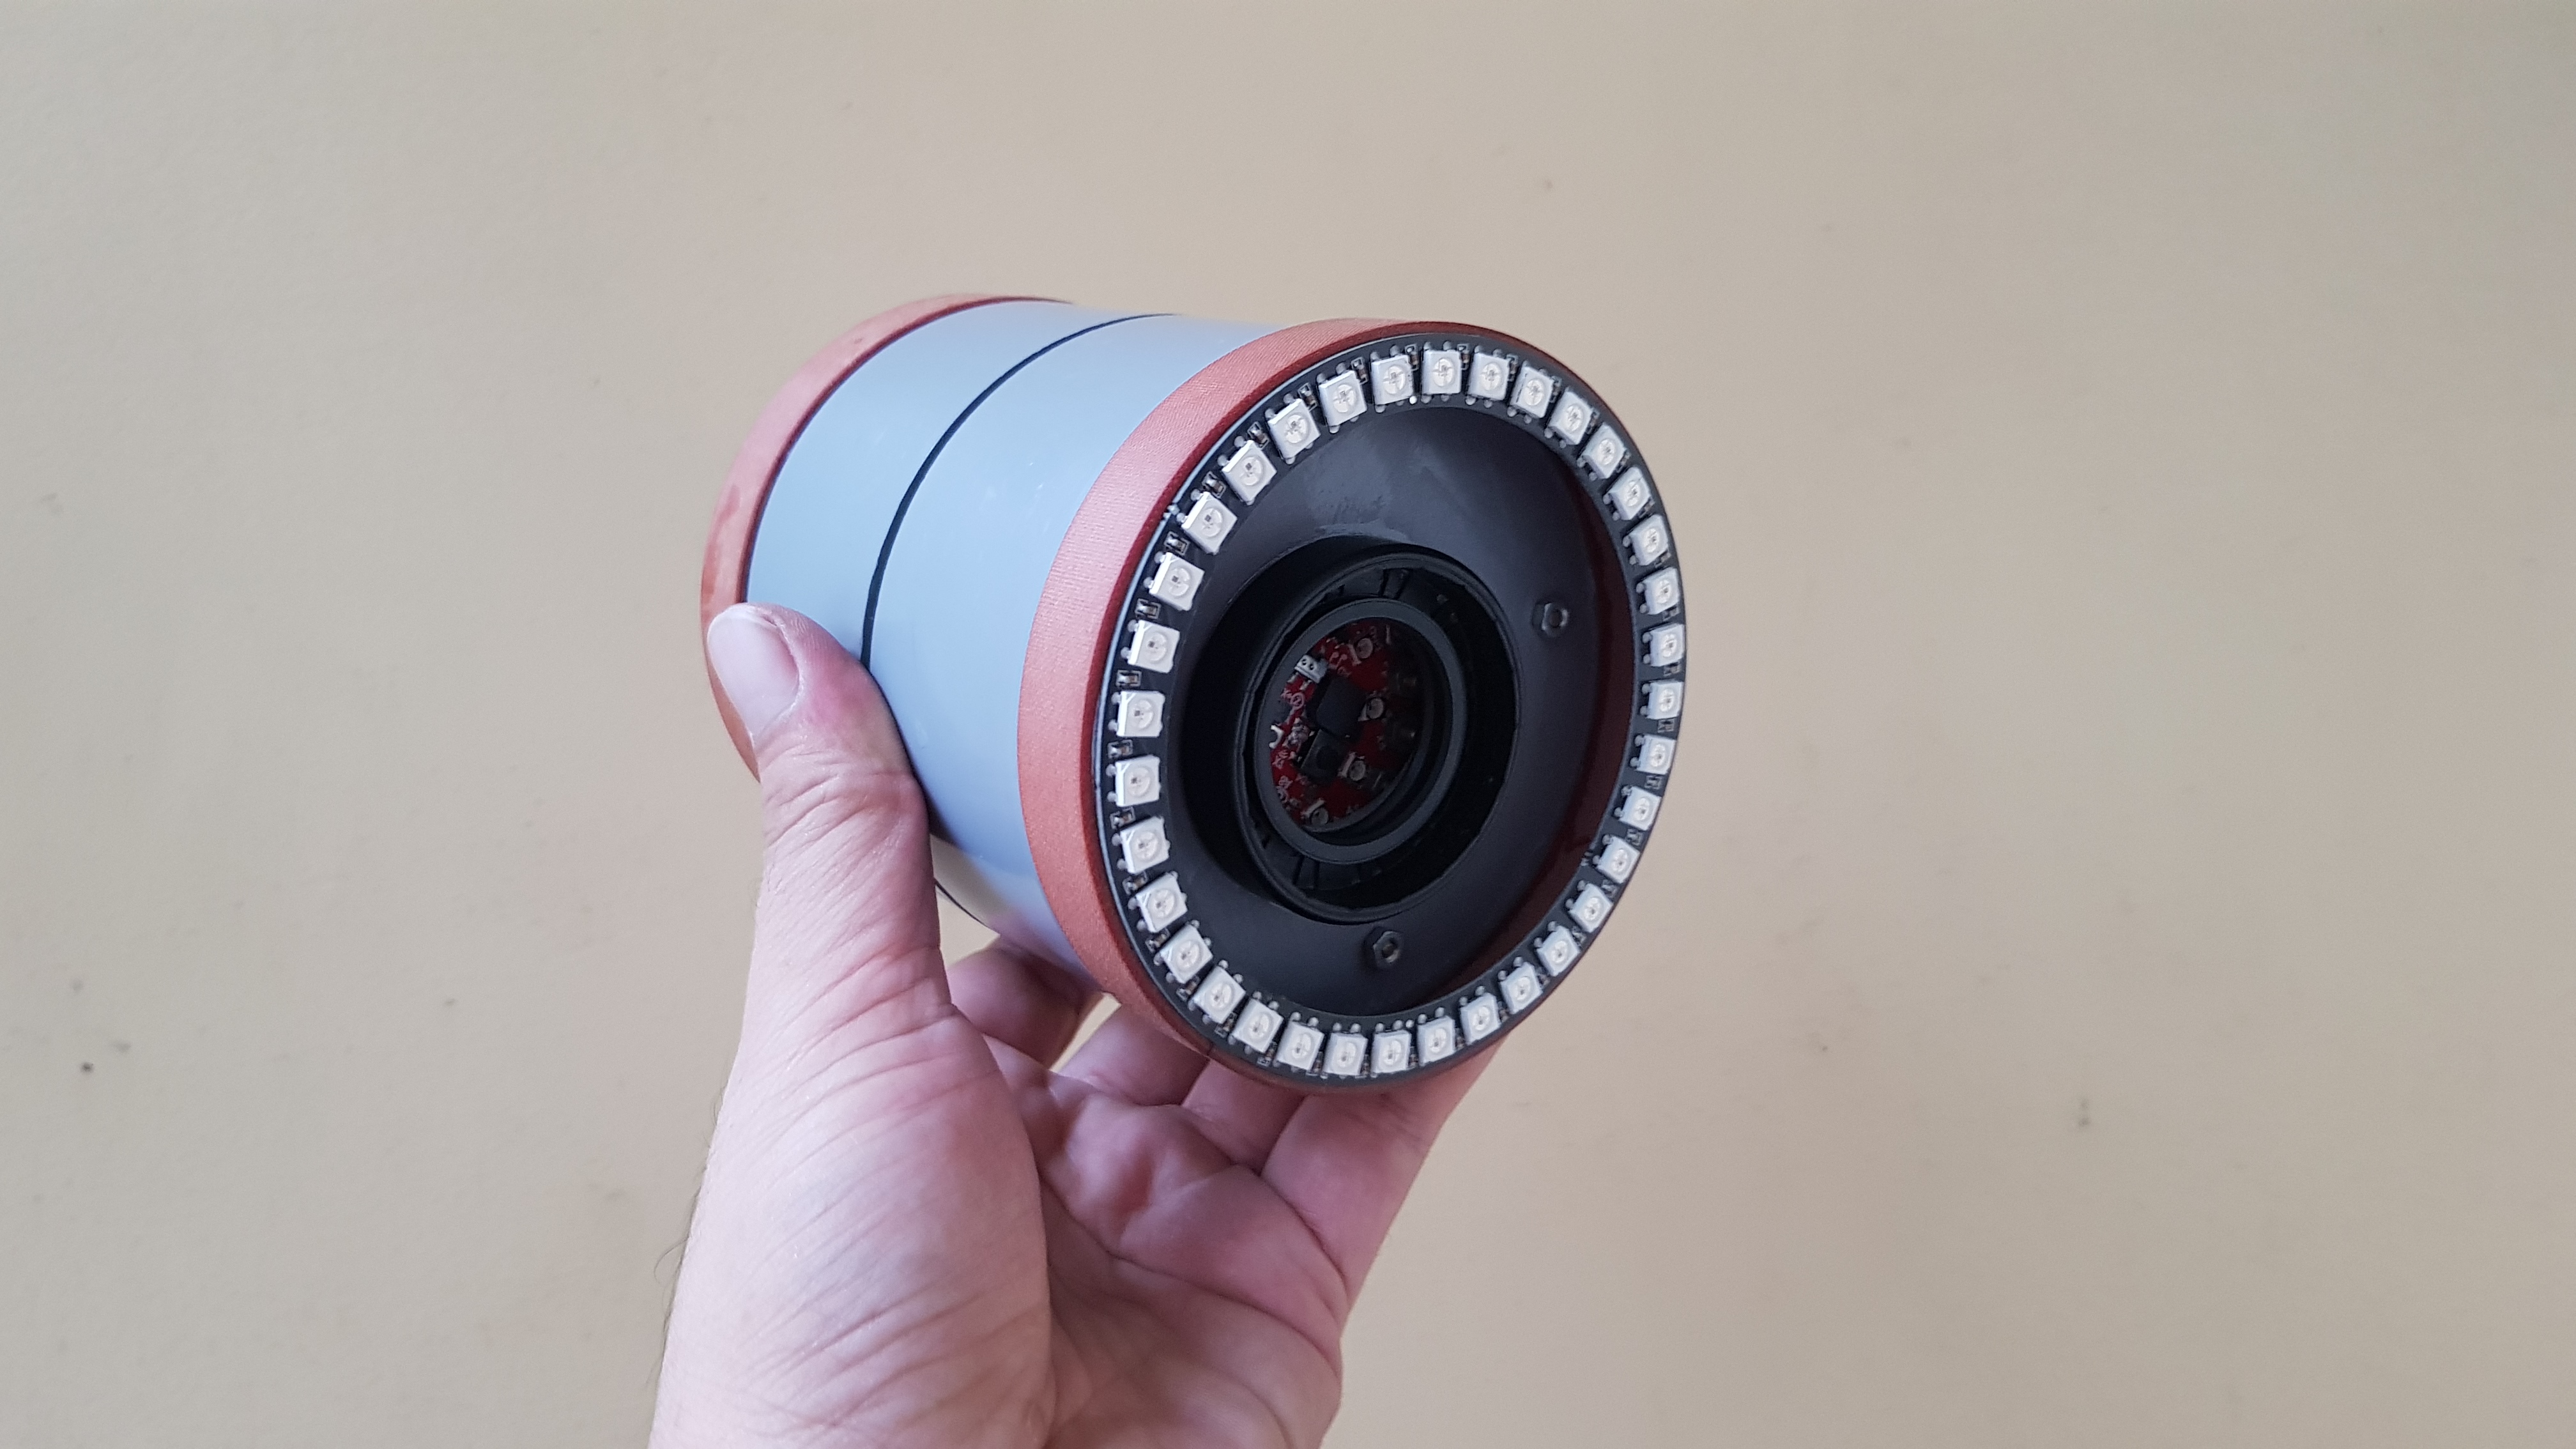
<h5>Introduction Videos</h5><figure class="media"><oembed url="https://www.youtube.com/watch?v=2BTqIvvOsYM"></oembed></figure><h5>Bill of Materials</h5><ul><li>1pcs x Adafruit Circuit Playground Express. Digikey: <a href="https://www.digikey.com/en/products/detail/adafruit-industries-llc/3333/7310913.">https://www.digikey.com/en/products/detail/adafruit-industries-llc/3333/7310913.</a> Amazon: <a href="https://amzn.to/3fywFtx">https://amzn.to/3fywFtx</a></li><li>1pcs x <a href="https://amzn.to/3bsGzM1">Speaker</a>.</li><li>1pcs x <a href="https://www.banggood.com/custlink/Kv3hjo0pCK">DS3231 Real Time Clock Module</a>.</li><li>1pcs x <a href="https://www.banggood.com/custlink/KKKhllgWcP">AMS1117 3.3V Power Supply Module</a>.</li><li>1pcs x <a href="https://www.banggood.com/custlink/mG3hOL4Wrs">Double Side DIY PCB 7x9cm</a>.</li><li>1pcs x <a href="https://amzn.to/3tOPj5k">TIP41C</a>.</li><li>1pcs x <a href="https://amzn.to/3uT3bNd">Capacitor 1000uF</a>.</li><li>1pcs x <a href="https://amzn.to/3oibAHy">Resistor R1K</a>.</li><li>1pcs x <a href="https://amzn.to/3bpb8Sr">Female header 40P</a>.</li><li>2pcs x <a href="https://amzn.to/3ohbr78">Screw 2P female headers</a>.</li><li>1pcs x Neopixel Ring 35.</li><li>2pcs x End cap for PVC pipe diameter 90mm.</li><li>20pcs x Copper pillars 10mm.</li><li>12pcs x Copper pillars 20mm and 5mm.</li><li>12pcs x Female power jack.</li><li>Some bolts & nuts.</li><li>Power supply 5V.</li></ul><h5>Project Schematic</h5><figure class="image"><img src="https://media.prusaprinters.org/media/prints/68349/rich_content/4dcd300a-e2bc-40d1-ae6c-7805b048b6e1/talking_clock_schematic_v22_bb.jpg#%7B%22uuid%22%3A%2252bbe371-96ec-468c-aaa0-48a090a4c5e9%22%2C%22w%22%3A1680%2C%22h%22%3A1749%7D"/></figure><p>The schematic is shown on the picture above.</p><p>Take note that I couldn't find out the Neopixel ring 35 in the Fritzing library so I used another one instead.</p><p>There is a built-in mini speaker on the Adafruit Circuit Playground Express board but its sound is not loud enough so I used an external speaker.</p><h5>Controller - Adafruit Circuit Playground Express</h5><p>The Adafruit Circuit Playground Express Board is equipped with an ARM Cortex M0 Processor, 48MHz and it is integrated with many sensors such as:</p><ul><li>Motion sensor.</li><li>Light sensor.</li><li>Temperature sensor.</li><li>IR receiver and transmitter.</li><li>Sound sensor.</li><li>Mini speaker.</li><li>Some interactive push buttons/ slide switch and RGB Neopixel LEDs...</li></ul><p><strong>Assembly & Soldering Works</strong></p><p>Firstly, after measuring and marking, I drilled 14 holes on DIY PCB corresponding to the 14 alligator-clips of Adafruit Circuit Playground Express board. And I mounted copper pillars on the drilling holes.</p><figure class="image"><img src="https://media.prusaprinters.org/media/prints/68349/rich_content/fd56563f-b210-4592-9d79-5c01ecb6ce22/pad.jpg#%7B%22uuid%22%3A%226dcf49f4-6201-456e-ad33-5c343af6cfbd%22%2C%22w%22%3A4032%2C%22h%22%3A3024%7D"/></figure><p>Then I plugged Adafruit Circuit Playground Express board on the copper pillars and did some adjustments to make sure their pads didn't touch each other.</p><figure class="image"><img src="https://media.prusaprinters.org/media/prints/68349/rich_content/764de01e-8784-44e9-a468-fc6017d74d8a/acpe-plug.jpg#%7B%22uuid%22%3A%221069a069-4136-4239-8cb1-2cc89047f88f%22%2C%22w%22%3A4032%2C%22h%22%3A3024%7D"/></figure><p>At the PCB backside, I soldered a 6 pins female header to plug DS3231 RTC. You see the picture below, I used led pins, bent them into circles around the drilled holes and fixed them by soldering to PCB. This ensures good contact between the copper pillars and bolts.</p><figure class="image"><img src="https://media.prusaprinters.org/media/prints/68349/rich_content/8a8b02df-f86d-4a4c-8aec-80a76f08cc31/led_pin.jpg#%7B%22uuid%22%3A%2292ffbc9b-3e6e-4d68-a3e1-b005a4493964%22%2C%22w%22%3A4032%2C%22h%22%3A3024%7D"/></figure><p>I continued to solder the remaining components according to the schematic diagram in the previous step.</p><figure class="image"><img src="https://media.prusaprinters.org/media/prints/68349/rich_content/2cba8e09-3b32-4b2b-ac1c-532ed2ee6e2b/soldering-all.jpg#%7B%22uuid%22%3A%222068cb63-344c-4d21-a3c8-d1e13d3392f4%22%2C%22w%22%3A4032%2C%22h%22%3A3024%7D"/></figure><p>Plugging DS3231 RTC and AMS1117 on the PCB headers.</p><figure class="image"><img src="https://media.prusaprinters.org/media/prints/68349/rich_content/121909f7-d296-4f9f-9858-b78f1ab2efd8/ds3231_ams1117.jpg#%7B%22uuid%22%3A%2263edd3ec-076d-45d5-bebe-071e5556f4a0%22%2C%22w%22%3A4032%2C%22h%22%3A3024%7D"/></figure><p>Connecting speaker to PCB control board.</p><figure class="image"><img src="https://media.prusaprinters.org/media/prints/68349/rich_content/0694b3e4-c845-4cdd-a58a-c9f68d7724f6/speaker_connecting.jpg#%7B%22uuid%22%3A%228e1fdb68-997c-42b1-99e1-491cc2fd9070%22%2C%22w%22%3A4032%2C%22h%22%3A3024%7D"/></figure><p>I mounted speaker onto the PCB control board by some copper pillars. The PCB control board and speaker can be placed either horizontally or vertically. This is my first version without Neopixel led ring.</p><figure class="image"><img src="https://media.prusaprinters.org/media/prints/68349/rich_content/1f2940f3-d9b6-485f-9ff0-b4cb2452b568/horizon.jpg#%7B%22uuid%22%3A%225f575bca-12cc-4bc7-b7ac-54275fa319ab%22%2C%22w%22%3A4032%2C%22h%22%3A3024%7D"/></figure><figure class="image"><img src="https://media.prusaprinters.org/media/prints/68349/rich_content/c1f6cebb-0570-4f9c-9d17-41497caed471/vertical.jpg#%7B%22uuid%22%3A%22eaec10b3-6326-4519-b805-fe69245ee7dd%22%2C%22w%22%3A4032%2C%22h%22%3A3024%7D"/></figure><p>Update for 2nd version.</p><p>I cut the PCB so that it can fit inside a 90mm diameter end cap PVC pipe, glued the led ring on the top of end cap pipe and power supply female jack.</p><figure class="image"><img src="https://media.prusaprinters.org/media/prints/68349/rich_content/3e9e17eb-a037-458f-bec2-fd3b78b4d352/update_1.jpg#%7B%22uuid%22%3A%228817b1e8-f09f-4fa4-9dd9-5c5b95949716%22%2C%22w%22%3A4032%2C%22h%22%3A3024%7D"/></figure><p>At the top of remaining end cap pipe, I glued the speaker and made some decorations to hide the drilling holes.</p><figure class="image"><img src="https://media.prusaprinters.org/media/prints/68349/rich_content/1085dcea-3824-4e3d-a6cf-08a599ac5b23/update_2.jpg#%7B%22uuid%22%3A%2201afcaad-f8d9-44ab-99c6-c41ecf1ea187%22%2C%22w%22%3A4032%2C%22h%22%3A3024%7D"/></figure><p>Connecting 2 end caps pipe together by copper pillars. Finish and if I had an 3D printer, it should be more beautiful.</p><figure class="image"><img src="https://media.prusaprinters.org/media/prints/68349/rich_content/c02adea3-bce2-4ad0-ae0c-d5fb44414ea9/ok_1.jpg#%7B%22uuid%22%3A%225b482b59-29f2-4202-a059-f3b536e3527c%22%2C%22w%22%3A4032%2C%22h%22%3A2268%7D"/></figure><figure class="image"><img src="https://media.prusaprinters.org/media/prints/68349/rich_content/1e0d0efe-1af4-4e32-9c0e-35941f70bcd2/ok_2.jpg#%7B%22uuid%22%3A%2223d73c20-254a-4ae8-ac5c-033007d0ba52%22%2C%22w%22%3A4032%2C%22h%22%3A2268%7D"/></figure><h5><strong>Programing</strong></h5><p>The project code of "<strong>Talking and Counting Clock</strong>" project is available at my GitHub.</p><ul><li><a href="https://github.com/tuenhidiy/Talking_Clock_V1">1st version</a> without Neopixel Ring and video:</li></ul><figure class="media"><oembed url="https://www.youtube.com/watch?v=H0Gv9vkj7mQ"></oembed></figure><ul><li><a href="https://github.com/tuenhidiy/Talking-And-Counting-Clock-V2">2nd version</a> with Neopixel Ring.</li></ul><p>Libraries for Arduino IDE.</p><ul><li><a href="https://github.com/adafruit/Adafruit_CircuitPlayground">Adafruit Circuit Playground by Adafruit</a>.</li><li><a href="https://github.com/adafruit/RTClib">RTCLib by Adafruit</a>.</li></ul><p>For 2nd version, this clock can notify by voice for time, temperature and show hour - minute by counting their ten and unit digit number on Neopixel Led Ring 35. Detail is as follows:</p><ul><li>When the left button on Circuit Playground is pressed, the time is notified by speaker.</li><li>When the right button on Circuit Playground is pressed, the temperature is notified by speaker.</li><li>The time is also shown on led ring and the counting digits are identified by colors:<ul><li>Blue: Hour - Ten digit</li><li>Purple: Hour - Unit digit</li><li>Green: Minute - Ten digit</li><li>Red: Minute - Unit digit</li></ul></li><li>Ten built-in Neopixel on the Adafruit Circuit Playground Express board are change their colors each second.</li></ul><p>For example below, to read the time we just count the digits.</p><figure class="image"><img src="https://media.prusaprinters.org/media/prints/68349/rich_content/bf4fa0ec-a788-4214-a7b4-86cd4da721ef/explain.jpg#%7B%22uuid%22%3A%226688ea90-832e-4d57-85fc-9315af1048f5%22%2C%22w%22%3A4032%2C%22h%22%3A3024%7D"/></figure><p>Thank you for reading my works!!!</p><p>Please <strong>LIKE</strong>, <strong>SHARE</strong> and <strong>SUBSCRIBE</strong> to my YouTube channel: https://www.youtube.com/tuenhidiy</p><p>If you have a PCB project, please visit the <a href="https://www.nextpcb.com/?code=tunendd">NEXTPCB</a> website to get exciting discounts and coupons.</p><ul><li>Only $0 for 1-2 layer PCB Prototype: <a href="https://www.nextpcb.com/pcb-quote?act=2&code=tunendd">https://www.nextpcb.com/pcb-quote?act=2&code=tunendd</a></li><li>New customer get $100 coupons, register at: <a href="https://www.nextpcb.com/register?code=tunendd">https://www.nextpcb.com/register?code=tunendd</a></li></ul>
With this file you will be able to print TALKING AND COUNTING CLOCK with your 3D printer. Click on the button and save the file on your computer to work, edit or customize your design. You can also find more 3D designs for printers on TALKING AND COUNTING CLOCK.