Tablet into 3D Printer Control Center
thingiverse
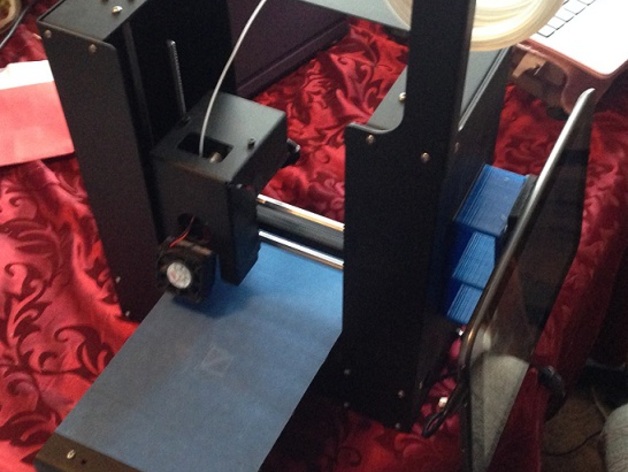
1/19/16 Mount tilt is increased by 10-3 for a better view. Mount bevel 2 is 11mm shorter to match the mount and bevel perfectly. 1/15/16 Mount Bevel 1 is attached to the Mount (10-2-mount) with strong 3M 20lb tape. Hot glue is used at the top and bottom for a secure hold that won't peel loose over time. Mount Bevel attaches to the Tablet with 3M 20lb double-sided foam tape only. The Mount attaches to the printer side with two 1" strips, one on top and one on the bottom across the mount. A cap head screw, washer, and a nut are used to attach the mount to the printer itself for added security. The tape provides some vibration isolation. This is a Windows 10 Tablet turned into a 3D Printer control Center. The pictures show an "Unbranded" Tablet on a highly modified Printrbot Play. It started life as a Printrbot Simple Makers kit, upgraded to a Play then a Simple Metal bed modified to fit for 7.4" print length. Why: One of the biggest problems with 3D Printers is that they must be connected directly to your computer for full functionality. You can print with an SD card on most, but then you end up running a "sneakernet" - you run the card back and forth between your computer and the printer. Or you configure a device like a Raspberry Pi as a print server. Sneakernet wastes time, and you can easily hit $100 setting up a print server! My wife found the print server too hard to use, I found it was not flexible enough. The LCD "upgrade" is $100 and then you can use multiple files from the SD card. I decided to look into tablets to see if they could fill the gap. Most Tablets are just too expensive. I have a Surface 3 Pro but it costs more than either of my printers. I found an 8" Hipstreet W8pro Tablet for $56. I bought an OTG cable ($12) to connect micro USB to Micro USB. It worked really well and was faster than the Unbranded tablet. That Tablet was dropped and cracked the screen. I then bought the Unbranded Tablet $75. It has had a number of challenges, mostly due to it won't accept Data and power at the same time. Look for a Tablet that has the Intel Atom Z3537F 2GB processor. I recommend 32GB storage. You will find these with Win8 installed. I upgrade them to Win10. I usually use CURA to print, but Repetier also works on the Intel Atom. I also install Sketchup. All work just fine! I recommend you look for a tablet that has separate power and USB connectors. Unless you are not afraid to open a tablet up and do some soldering. A Bluetooth keyboard/touchpad speeds things up. But it can be run by touch alone. You will have to look in refurbished or used to find a decent price. Both of mine came from Amazon! Edit: Matter Control 1.4 works on the Z3537F processor. No preset for the Play. Use Simple Metal and edit bed size, name, no heated bed. I now have a WiFi connected, touch screen control center that is very easy to use. I installed a 32GB Micro SD card for more storage and to use File History. I can send objects to the tablet by workgroup to a public folder for printing. It is easy to keep the latest software up on the tablet. I also have created my most used links on the desktop. I have a link to the RepRap 3D printing troubleshooter. Oh yeah, my printer can play Netflix too LOL!! Print Settings Printer Brand: Printrbot Printer: Simple Silver Rafts: No Supports: No Resolution: .4 nozzle Infill: 35% Notes: Printed on blue tape heated bed at 50C hotend at 208C
With this file you will be able to print Tablet into 3D Printer Control Center with your 3D printer. Click on the button and save the file on your computer to work, edit or customize your design. You can also find more 3D designs for printers on Tablet into 3D Printer Control Center.
