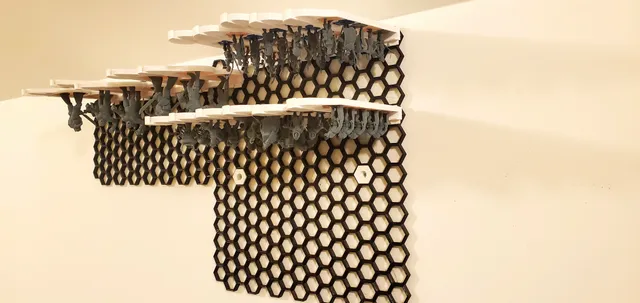
Table Top Miniature Hinged Holder
prusaprinters
*Cover photo update. Out of test phase and into printing full force. Introducing my Pathfinder and Dungeons and Dragons miniature side loaded sleeve for upside down storage of in process or completed miniatures during painting and prep. In my quest for printing as many of MZ4250's miniatures as I can, I have found that the bottle neck is primering and painting and thus I needed a storage system to keep them visible and as dust free as possible without getting some fancy glass cabinet. Visible because my work flow for completed mini's is to add them to portable cases once complete, sorted by monster/NPC type.Ok, I have started to just leave the mini's in the sleeves to paint them, especially when painting masses of cannon fodder monsters so I guess you could call this a mini painting holder, but that wasn't my ordinal intent. The sleeves are optimized for my base design located at: Tabletop Miniature Figure BasesSleeves: 25mm x 550mm x 2Sleeve Hex Wall Mounts: 3 by mount (holds 3x25mm or 2x50mm sleeves). Uses the part insert_empty.stl x 2 to attach to the wall honeycomb by RostaP Honeycomb storage wall . Limitation Notes: Miniatures with large based robes or cloaks do not work well with this sleeve. I do plan to see if I can rework the design a bit to better fit those flowing garments. Works best with bases of corresponding size at Tabletop Miniature Figure BasesModels: The design features a "printed in" hinge for no sleeve assembly requirements. Models are set in the orientation I have test printed. The 2 pieces of the hinge are ‘connected’ by a thin radius that helps a tiny bit with bed adhesion but is there mainly to avoid making each side a separate object for ease of printing set up. Printing Experience: Machine: Raised3D E2Filament: PolyLite™ PETG Nozzle: 0.4mm SteelLayer height: 0.2mmSettings: Raise3D's standard settings for E2 and PETG Likely failures during printing that I have experienced through the design process with my design countermeasures to elevate. Layer over lap at the hinge of sleeve - countermeasure: bed leading chamfers to avoid elephant foot or first layer issues. Increased clearance between parts (causes a bit more ‘looseness’, but has better print success).‘hook’ on sleeve for mounting to wall poor layer adhesion resulting in easy breakage - countermeasure: widened the base and added filets to minimized the layer height. Hinge breakage - increased the diameter of the hinge (doubled) for a more robust hinge point, especially when first pulling off the printer and rotating for the first time.Small side breaking at first rotation - doubled number of ribs, and on first rotation, grasp sides as near to hinge as possible to reduce moment arm on sleeve parts.
With this file you will be able to print Table Top Miniature Hinged Holder with your 3D printer. Click on the button and save the file on your computer to work, edit or customize your design. You can also find more 3D designs for printers on Table Top Miniature Hinged Holder.
