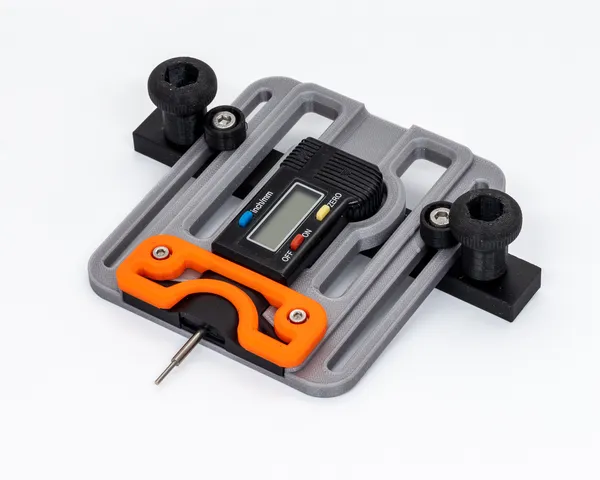
TABLE SAW BLADE ALIGNMENT JIG
prusaprinters
With the use of a cheap digital tyre depth tread indicator, you can easily build a jig that will measure your tablesaw blade's runout to two decimal places of (insert your favourite unit of measure.) I'm not sure whether I have the skills to adjust mine to the tolerance it will measure, and I certainly don't have what it takes to cut timber to those tolerances, but I will persevere.This tool is a really simple gadget made to look more complicated than it is. The gauge should a satisfying press-fit if your printer is nicely tuned.MEASURING GAUGE.You can easily find this online at your favourite el-cheapo trading website. A Search for TYRE TREAD DEPTH INDICATOR should bring up thousands of hits with prices ranging from a few dollars to almost twice that. Here are some key words copied from one of these advertisements if you are having trouble:<0-25mm Car Tester Checker Digital Motorbike Tyre Tread Brake Pad Depth Gauge>PRINTINGThis model is for someone who enjoys the process of printing, It is easy to print but there are nuts to be inserted in both the main body and the slide, so you'll have to pay attention when slicing and printing. If you don't want to use my .3mf files, you should at least open them to get an idea where the nuts are hidden - they have the “pauses” built in at the correct spot, or actually one layer lower than the correct spot because that's how I roll!I've used PLA (the gorgeous Prusament Galaxy Silver and Prusa Orange) printed at standard 0.2mm layer height QUALITY mode with a 0.4mm nozzle.HARDWARE - ahh - I apologise for the motley collection of sizes, but it's what was available at the time. You'll need (all with nuts and washers) :Two countersunk M6 x12mm or longer for the runner tension bolts.Two M5's with flat heads x 12-15mm for the sliding rail - if they are too long they'll poke through the bottom of the rail but that's easily fixed by printing a couple of washers to space them up a bit. (Nuts are embedded in the rail.)Two M3 x 10 (Nuts are embedded in the body.HOW TO USE THIS TOOLFettle the rail for a nice fit, you will want it to slide easily without binding. It's printed at 19mm wide which should fit many standard table saws, but the ends will expand a surprising amount, so if it's a bit loose in the track, tighten the knobs a touch until it isn't. You will need to slide it while using it just make it tight enough so there's no play.If it's too tight, a quick rub with some sandpaper should do the trick, or if it's really too big give me a shout with your special dimensions and we'll make a new one! Turn off your saw and preferably pull the plug out! Set the jig against one end of the saw blade, so that the probe is touching it and zero the gauge. With the blade as high as it goes, mark just below one tooth on the blade. Taking all measurements to that mark will eliminate the chance of a mis-measure from a warped blade. Don't measure from the tooth, they are welded on and often not exactly in the same position. Measure the distance from the mark when rotated to the front of the saw, and again at the back. If there's no difference in measurement you can be happy that your blade is perfectly aligned. If there is a small difference, it's probably time to trawl YouTube looking for blade alignment tips!There are plenty of resources on how to set up your saw, this is not a tutorial on how to do that, just how to use the tool that will!
With this file you will be able to print TABLE SAW BLADE ALIGNMENT JIG with your 3D printer. Click on the button and save the file on your computer to work, edit or customize your design. You can also find more 3D designs for printers on TABLE SAW BLADE ALIGNMENT JIG.
