T-Nuts for Ikea Skadis Pegboards
prusaprinters
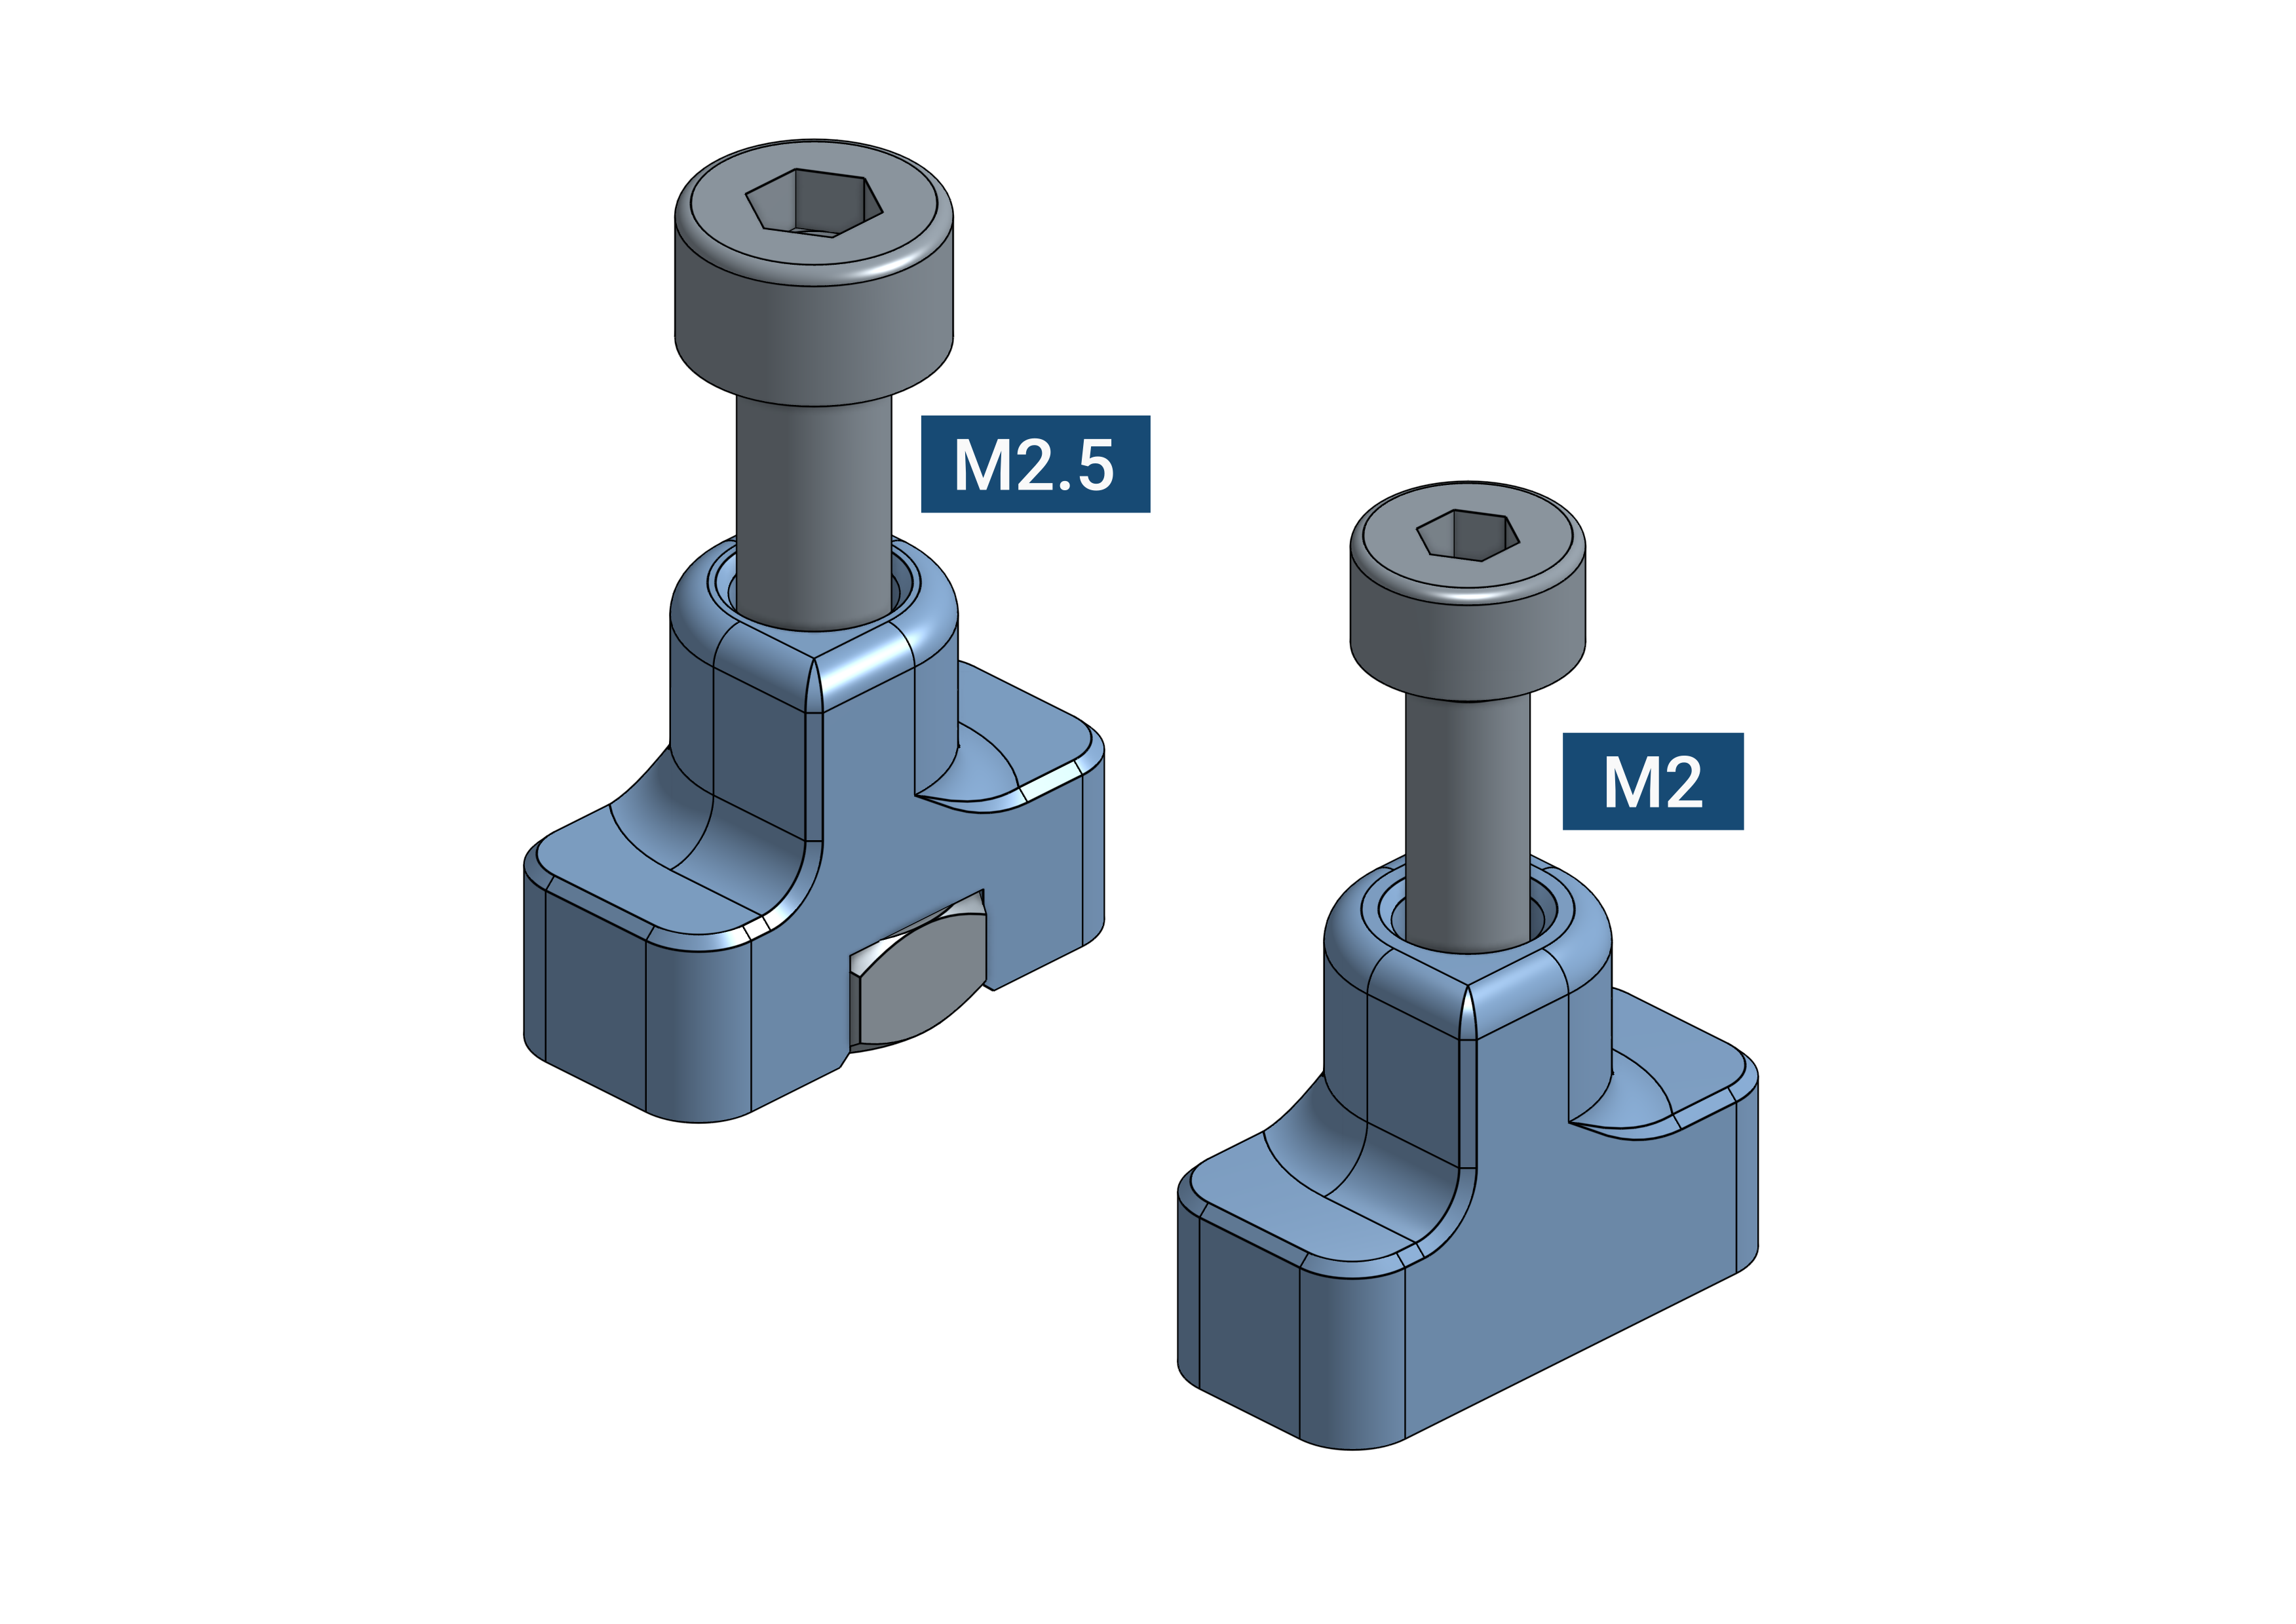
<p>These are <strong>T-Nuts for </strong><a href="https://www.ikea.com/us/en/p/skadis-pegboard-white-10321618/"><strong>IKEA SKÅDIS </strong></a><strong>pegboards that make installing accessories on your pegboard much easier</strong>. You no longer have to design custom mounting hooks into your part. All you need is holes. The T-Nuts come in two different sizes for M2 and M2.5 screws. Larger screws, unfortunately, aren't possible because the nuts don't fit through the Skadis peg holes.</p><p>Additionally, you can mount many existing non-Skadis things onto your pegboard by just drilling holes with the appropriate spacing.</p><p>The nuts work the same way as drop-in T-nuts for aluminum extrusions. Turning the screw clockwise (tighten) makes them lock in a horizontal position and turning the screw counter-clockwise (loosen) puts them back into the vertical position. This is due to th elemon-like shape if you look at the T-Nut from the top.</p><h5>Examples and Inspiration</h5><p>You can find more Skadis accessories that use T-Nuts under the <a href="https://www.printables.com/search/models?q=tag:skadistnut">“skadistnut” tag</a>. I also maintain the <a href="https://www.printables.com/social/105798-6d6178/collections/291558">Skadis T-Nuts collection</a> with all the compatible models that I find. Check out the <a href="https://www.printables.com/model/228663/remixes">remix section</a> too.</p><figure class="media"><oembed url="https://www.youtube.com/watch?v=PaHMk0wF3O8"></oembed></figure><h3> </h3><h3>Why T-Nuts Over Hooks and Clips?</h3><ul><li>You don't need to design L-shaped hooks into your design that might make your part require support material or make it more difficult to print.</li><li>Integrated hooks often easily break due to unfortunate layer orientation.</li><li>Clips can be bulky and not visually pleasing.</li><li>You don't have to find the perfect tolerances for your hooks. Hooks often have a loose fit or are too tight and difficult to install or remove. T-Nuts <strong>fit all the time</strong>.</li><li>T-Nuts provide a <strong>very strong hold</strong> and are <strong>easy to install and remove</strong> with a screwdriver without damaging your pegboard.</li><li>T-Nuts are <strong>low-profile</strong>, <strong>not bulky</strong>, and <strong>easy to hide</strong> in your custom parts.</li><li>You can <strong>convert existing accessories</strong> (printed or non-printed) into SKÅDIS accessories by just drilling holes in the right locations.</li></ul><h4>What Are the Disadvantages?</h4><ul><li>Needs screws. You need one M2 or M2.5 screw and a matching nut per T-Nut. And therefore a screwdriver to install your accessories.</li><li>There are designs where screw driver access might be difficult to implement.</li><li>For accessories that are meant to be moved frequently, T-Nuts might not be the right solution. It doesn't take much time but you have to have a screwdriver ready.</li><li>You should design alignment guides into your part because T-Nuts have to be centered in the pegboard hole. No biggie though. More info below.</li></ul><figure class="image"><img src="https://media.printables.com/media/prints/228663/rich_content/f4a1a6e1-39bd-4963-b3fc-d8be0c5b3e05/trays-assembly.png#%7B%22uuid%22%3A%226142338d-b54a-4d1b-8ea4-cc63aebda5e2%22%2C%22w%22%3A3504%2C%22h%22%3A2477%7D"></figure><h3>FAQ</h3><ul><li><strong>Should I use M2 or M2.5 hardware?</strong><br>Go with M2.5 if possible. M2.5 screws are stronger and the screw head is larger which distributes the pressure over a slightly larger area which puts less stress on your part. The M2 version exists because M2 screws are sometimes easier to find in hardware stores.<br> </li><li><strong>Can you make an M3 version?</strong><br>Unfortunately, M3 nuts are too big and wouldn't fit through the holes. The Skadis pegboard holes are 5mm wide and M3 DIN934 hex nuts have a diameter of 5.5mm. <br><br>You may want to check out the <a href="https://www.printables.com/model/273165-direct-screw-in-t-nuts-for-ikea-skadis-pegboards">Direct Screw in T-Nuts by @rynn</a> which do not use metal nuts and therefore do support M3 and M4 screws. They require additional post-processing with a drill and an M3 or M4 tap.<br><br>Additionally, there's a <a href="https://www.printables.com/model/302296-m3-t-nut-for-ikea-skadis-pegboard-using-brass-stan">version that uses M3 brass standoffs by @contrapuntal</a>. A very creative solution to the M3 problem.</li></ul><p> </p><h3>BOM - M2.5 Version (recommended)</h3><figure class="table"><table><thead><tr><th>Qty</th><th>Description</th><th>Sourcing</th></tr></thead><tbody><tr><td>1</td><td>M2.5 DIN934 Hex Nut</td><td><a href="https://www.aliexpress.com/item/4000941884140.html">Aliexpress</a>, <a href="https://smile.amazon.com/dp/B082XPZV1V?psc=1&;ref=ppx_yo2ov_dt_b_product_details">Amazon</a> (kit)</td></tr><tr><td>1</td><td>M2.5 Screw (see length calculation below)</td><td><a href="https://www.aliexpress.com/item/4000948238295.html">Aliexpress</a>, <a href="https://smile.amazon.com/dp/B082XPZV1V?psc=1&;ref=ppx_yo2ov_dt_b_product_details">Amazon</a> (kit)</td></tr></tbody></table></figure><h4>BOM - M2 Version</h4><figure class="table"><table><thead><tr><th>Qty</th><th>Description</th><th>Sourcing</th></tr></thead><tbody><tr><td>1</td><td>M2 DIN934 Hex Nut</td><td><a href="https://www.aliexpress.com/item/4000941884140.html">Aliexpress</a></td></tr><tr><td>1</td><td>M2 Screw (see length calculation below)</td><td><a href="https://www.aliexpress.com/item/4000948238295.html">Aliexpress</a></td></tr></tbody></table></figure><p> </p><h3>Designing Your Own Skådis Accessories Using T-Nuts</h3><h4>Things to Include in the Description</h4><p>If you decide to publish your own SKÅDIS accessories that use T-Nuts it'll be really useful for your users if you include the following things in the description:</p><ul><li>Add the “<a href="https://www.printables.com/search/models?q=tag:skadistnut">skadistnut</a>” tag to your project for discoverability.</li><li>Explain how to use T-Nuts or link to this page which has extensive documentation.</li><li>Mention the screw diameters (M2 or M2.5) and the required lengths.</li></ul><h5>Designing</h5><p>To design your own accessories that work with the T-Nuts you have to add M2 or M2.5 holes with some additionalclearance (~0.3mm). Please read the “SKÅDIS Hole Pattern” section below to determine how you need to place the holes.</p><p>In order for the T-Nuts to be centered in the pegboard hole, it's recommended to <strong>incorporate alignment guides</strong> in your parts as well. They make sure that the T-Nuts can rotate freely during installation, your part doesn't slip during installation, and your part doesn't rotate or spin after installation in case you use only a single mounting point.</p><p>The area around a 3.5mm radius around the center of the mounting hole (red) should remain free of extra material so that the T-Nut can rotate freely. The remaining area in the 5x15mm with a 2.5mm radius at the short edges (green) should be used for the alignment guide.</p><p><strong>Note: For alignment guides taller than 1mm a 0.3mm tolerance is recommended. Use 4.7mm instead of 5mm and 14.7mm instead of 15mm and a 2.35mm radius.</strong></p><p>Alignment guides should be between 0.8mm and 4mm tall. Extrude up to 4mm if your alignment guide is at the top of your part (in the printing orientation) and 0.8mm if your mounting hole is on the side of your part. You add a 0.8mm 45deg chamfer at the bottom of the alignment guide so that it can be printed without support material. See examples below.</p><figure class="image"><img src="https://media.printables.com/media/prints/228663/rich_content/5dceb068-d35b-4adc-b665-4d3f453d9b74/alignment-guide-1.png#%7B%22uuid%22%3A%222b19a6d0-f11e-4376-8352-ffeb1f9a7827%22%2C%22w%22%3A3504%2C%22h%22%3A2477%7D"></figure><p> </p><p>Here are some examples of alignment guides depending on the position and orientation when printing. If your mounting hold is at the bottom of your part you can print the Alignment Guide (M2 or M2.5) STL as a separate part (see “Mount Anything…” section below).</p><figure class="image"><img src="https://media.printables.com/media/prints/228663/rich_content/5cc4aaca-82ae-436f-9b4c-2a484dd0d8fd/alignment-guide-2.png#%7B%22uuid%22%3A%22b476ca4f-5a58-4ce6-b819-37563ce431e4%22%2C%22w%22%3A3504%2C%22h%22%3A2477%7D"></figure><p> </p><h3>Mount Anything on a Skådis Board</h3><p>Using the “Alignment Guide M2.stl” or “Alignment Guide M2.5.stl” files you can mount anything on a SKÅDIS board using T-Nuts. Just drill holes (2mm or 2.5mm) with the appropriate spacing (see “SKÅDIS Hole Pattern” below).</p><figure class="image"><img src="https://media.printables.com/media/prints/228663/rich_content/7593848c-f88b-4cd3-91b6-1bdf500b8fb8/drill-1.png#%7B%22uuid%22%3A%227bb12f5c-a3aa-4f4e-9100-080c6633eee9%22%2C%22w%22%3A3504%2C%22h%22%3A2477%7D"></figure><p>Then install the Alignment Guide and T-Nuts and your part is ready to be installed on the pegboard. The Alignment Guide makes sure that the screw is centered inside the pegboard hole and the T-Nut can rotate freely.</p><figure class="image"><img src="https://media.printables.com/media/prints/228663/rich_content/aa8b4474-8c50-4763-922a-f07d23bfb979/drill-2.png#%7B%22uuid%22%3A%2218db96f3-e846-4600-9afd-d649a6ab38eb%22%2C%22w%22%3A3504%2C%22h%22%3A2477%7D"></figure><h3> </h3><h3>Skådis Hole Pattern</h3><p>The holes on the same row/column on the Skadis are spaced 40mm apart in both directions. So it's basically a 40x40mm hole pattern with a second pattern shifted 20mm in X and Y.</p><p>The peg holes measure 5x15mm (X/Y) and have a radius of 2.5mm and a 1mm fillet.</p><figure class="image"><img src="https://media.printables.com/media/prints/228663/rich_content/f24b2969-e2ee-44c8-9946-a7afdf84f7fb/skadis.png#%7B%22uuid%22%3A%2202e6c5ad-53d9-4e39-b84c-ce5cef3a536b%22%2C%22w%22%3A3504%2C%22h%22%3A2478%7D"></figure><h3> </h3><h3>Screw Length Calculation</h3><p>The T-Nut measures 7.4mm in height and reaches 4mm into the Skadis peg hole (1mm gap).</p><p>To calculate your minimum screw length, take the thickness of your part and add 9.4mm (give 1mm for smooth rotation) and round up to the next available screw size. <code>ceil(part_thickness + 8.4mm + 1mm)</code></p><p>The pegboard stands roughly 20mm away from the wall and the board thickness is 5mm. So your maximum screw length is <code>floor(part_thickness + 25mm - 2mm)</code> (2mm safety margin) rounded <i>down</i> to the next available screw size.</p><figure class="image"><img src="https://media.printables.com/media/prints/228663/rich_content/22288520-6bc0-4c41-a7b0-37b495720641/screw-length.png#%7B%22uuid%22%3A%22f6670d61-338c-4ec7-8033-6cd60bd1e5c0%22%2C%22w%22%3A3504%2C%22h%22%3A2478%7D"></figure><p> </p><h3>Printing</h3><p>Your printer must be well calibrated. Over extrusion might result in bad fit.</p><p>Print the part in the default orientation of the STL (files are pre-rotated). You might want to print the part a little slower than usual because it's so tiny.</p><ul><li>Material: Use a material with great layer adhesion.</li><li>Supports: No</li><li>Layer height: 0.2mm or 0.1mm</li><li>Extrusion width: 0.4mm</li><li>Perimeters: 3</li><li>Infill: 0% (doesn't matter)</li><li>Solid layers: 5 top, 5 bottom</li></ul><figure class="image"><img src="https://media.printables.com/media/prints/228663/rich_content/a9e0da35-5f74-4bc2-8139-199770a5b049/slicing.png#%7B%22uuid%22%3A%22501f36e0-6399-4471-8053-96a09e9ef55e%22%2C%22w%22%3A1431%2C%22h%22%3A871%7D"></figure><p> </p><h3>Assembly & Installation</h3><ol><li>Install the DIN934 hex nut in the printed T-Nut. You may use a tiny dot of superglue if the fit is loose.</li><li>Determine the correct screw length (see “Screw Length Calculation” section above).</li><li>Stick the screw through the hole in your part.</li><li>Screw the T-Nut onto the screw until the distance between the upper part of the T-Nut and your part is between 4 and 1mm. The T-Nut should be able to rotate without much resistance.</li><li>Insert the T-Nut through the Skadis peg hole in the vertical orientation.</li><li>Tighten the screw and the T-Nut will lock in the horizontal orientation and secure your part.</li><li>Do not over-tighten the screw.</li></ol>
With this file you will be able to print T-Nuts for Ikea Skadis Pegboards with your 3D printer. Click on the button and save the file on your computer to work, edit or customize your design. You can also find more 3D designs for printers on T-Nuts for Ikea Skadis Pegboards.