SWD1 KIT Z-AXIS FOR WANHAO DUPLICATOR I3 / MONOPRICE MAKER SELECT
thingiverse
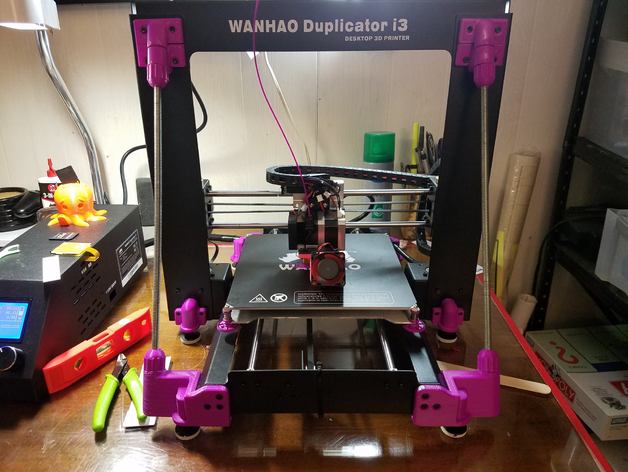
This is a remake on two separate designs found here on Thingiverse that influenced me. First inspiration came from AzzA's dense printed blocks concept. I modeled in Inventor a complete update of the front and Top connectors, extending out to make the rods parallel to the y axis, completely rethinking them from scratch. Second inspiration was TyphonPS's design with levelers, incorporating stability into the bases of the yaxis blocks and zaxis towers. While only some similarities exist between both creations, these parts are completely rebuilt in inventor and checked against the Wanhao I3 Duplicator to fit perfectly. The Front and Rear Y axis braces that run along the front plate can be used from AzzA's kit as I have not recreated those parts for my own design yet but will be in the future with modifications to support changes on the Wanhao. This Z axis mod was designed to eliminate the need to completely remove the Top Z-Axis bolts, which could lead to getting the z-axis top frame out of square and causing issues for new installers. By using the top 2 screw brace it allows a new unskilled modder to install the z-axis brace without completely disassembling the machine. Additional Parts Required 2) 5/16 Threaded Rod @ 375mm long or 8mm Threaded Rod @ 375mm long 4) 5/16 Nylock Nuts - Replace with 8mm Nuts if using 8mm Rod 4) 5/16 Standard Nuts 26)M3 x 10mm Socket Cap Screws 6) 1/4-20 nuts 6) 1/4-20 Elevator bolts 1" long 6) 1" Dia x 1/8th thick Rubber pads (added to bottom of elevator bolts) Installation Process. Ensure Threaded rods are between 370mm and 380mm in lengths. Remove 3) M3x5 screws on front of y axis on one side, Mount New Bracket and replace with 3) M3x10mm and on the inside of the Y install 1) M3 x 10mm on Internal Brace. Repeat for opposite side. Then repeat for rear blocks minus the internal screw. Remove 2) M3 x5mm screws on the bottom of each z-axis tower and install the center feet with 2) M3x10mm screws each ctr foot. Install 6) 1/4-20 nuts in the blocks for the elevator bolts, then install 6 Elevator bolts Install threaded rods in the two front base blocks, 5/16 Nylocks run up before inserting into base and install 5/16 nut in base tube and thread rod into 5/16 nut. Slide printed cover over 5/16 nylock nut and slide an additional printed cover inverted next. Then Thread a standard 5/16 nut to fit in 2nd cap. Finally Install top z axis sleeve on threaded rod and cap off with 5/16 Nylock flush with end of threaded rod. Install the top z axis sleeve to the bottom two screws on the top z-axis tower. Then, install the center feet with 2) M3x10mm screws each ctr foot. The primary nylock Nut needs to be run up as shown before sliding into the hex tube.
With this file you will be able to print SWD1 KIT Z-AXIS FOR WANHAO DUPLICATOR I3 / MONOPRICE MAKER SELECT with your 3D printer. Click on the button and save the file on your computer to work, edit or customize your design. You can also find more 3D designs for printers on SWD1 KIT Z-AXIS FOR WANHAO DUPLICATOR I3 / MONOPRICE MAKER SELECT.